Progressive Scan DVD Player
with DivX
®
Playback
MODEL NO.: C479DVD
Instruction Manual
www.citizen-electronics.com
Maintenance and Care
Caring for the player
• “The apparatus shall not be exposed to dripping or splashing” and that no objects filled with
liquid shall be placed on the unit.
• Electronic products of this kind should never be subjected to extreme temperatures or high
humidity. For instance, this set should not be placed in bathing areas or around stoves and
radiators.
• If anything falls into the cabinet, unplug the unit and have it checked by qualified personnel
before operating it any further.
Cleaning the Unit
• To prevent fire or shock hazard, disconnect your unit from the AC power source when cleaning.
• The finish on your unit may be cleaned with a dust cloth and cared for as other furniture. Use
caution when cleaning and wiping the plastic parts.
• Mild soap and a damp cloth may be used on the front panel.
Inclination
• Do not install the unit in an inclined position. It is designed to be operated in a horizontal
position only.
Condensation
• If the unit is brought directly from a cold to a warm location, moisture may condense inside the
DVD player and cause damage to the lenses. When you first install the unit, or when you move
it from a cold to a warm location, wait for 30 minutes before operating the unit.
Avoid Interference
• Depending on the reception condition of the TV, interference may appear on the TV screen
while you watch a TV broadcast and the unit is left on. This is not a malfunction of the unit or
the TV. To watch a TV broadcast, turn off the unit.
Disconnect Power
• If you are not going to use the player for a long time, be sure to disconnect the player from the
wall outlet. To disconnect the AC power cord (main leads), grasp the plug itself, never pull the
cord.
• The mains plug is used as the disconnect device, the disconnect device shall remain readily
operable.
Disc Maintenance
• Before playback, wipe the disc from the center hole toward
the outer edge with a clean cloth.
• Never use benzine, thinner, cleaning fluid, static electricity
prevention liquids or any other solvent.
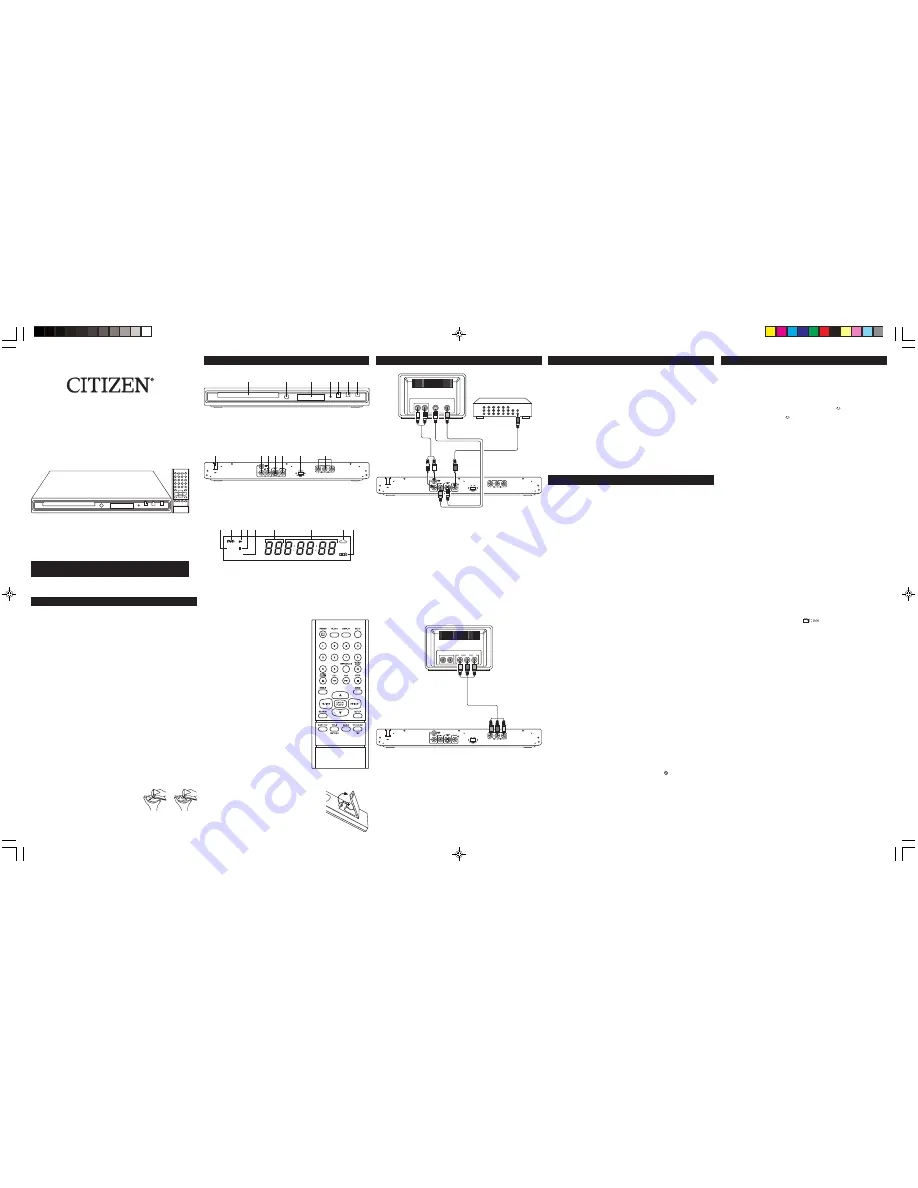
Location of Features
Front Panel Controls
1. Disc Tray
5. OPEN/CLOSE Button
2. Remote Sensor
6. STOP/STANDBY Button
3. Display
7. PLAY Button
4. STANDBY Indicator
Remote Control Unit
POWER
Power ON/OFF (Standby).
CLEAR
Clears some functions.
DISPLAY
Display the current playback status on
TV screen.
MUTE
Mute ON/OFF.
0 – 9
Numeric buttons.
REPEAT/A-B
Press repeatedly to set the repeat modes
and repeat A-B settings.
PAUSE/STEP
Press once to pause playback, press
repeatedly to play the movies frame by frame.
OPEN/CLOSE
Open/Close the disc tray.
REV
Searches back through the disc.
FWD
Searches forward through the disc.
STOP
Stops playback.
ANGLE
Press repeatedly to select the different
camera angle. (Function depends on the
record in DVD disc)
ZOOM
Press repeatedly to Zoom In the picture.
(Some of DVD discs without this function)
ENTER/PLAY
Confirmed the selection or Start Playback
or Resume to normal playback.
3
,
4
,
5
,
6
Navigates through the menus.
9
,
:
Advances to the Next/Previous Chapter or
Track.
SEARCH
Goes to a specific play time or track.
SETUP
Enter to the main menu.
SUBTITLE
Select the desired subtitle or turn it off.
TITLE
Accesses the title menu of the disc.
RETURN
Returns to the PBC menu in VCD V.2.0
when PBC is switched on.
AUDIO
Selects the audio languages or audio tracks.
DVD MENU
Accesses the disc’s menu. (if available)
PBC
For VCD V 2.0 discs, selects PBC.
Note: Point remote control unit no more than 6m from the remote sensor and within about 45° of
the front of the unit.
Display
1. VCD/CD Indicator
6. Chapter Track Indicator
2. DVD Indicator
7. Playtime Indicator
3. PLAY Indicator
8. REPEAT Indicator
4. PAUSE Indicator
9. DOLBY DIGITAL Indicator
5. PBC Indicator
Rear Panel Jacks
1. AC Power Cord
5. COAXIAL Digital Audio Output
2. Audio L/R Output
6. PROGRESSIVE SCAN Switch
3. VIDEO Output
7. Component Video (Y, Pb, Pr) Output
4. S-VIDEO Output
Battery installation (Remote Control)
1. Remove the battery cover.
2. Install one battery (CR2025) into the battery compartment
as the polarity makings and the figure on right.
3. Replace the cover.
Note: A battery is included and installed in the remote control,
remove the protective film before the first time use.
Basic Connection (DVD TV + Video Recorder)
Note: Whenever you are connecting your system cables, turn off the power and make certain that
the power cord has been removed from the wall outlet.
Use Audio Cable (Red/White), Video Cable (Yellow) to connect the DVD player and your TV.
1. Connect the audio cables to the AUDIO OUT L and R jacks on the back of your DVD player and
to the corresponding AUDIO INPUT jacks on your TV.
2. Connect the Video cable
• Basic connection — Connect the video cable to the VIDEO OUT jack on the back of your DVD
player, and to the VIDEO INPUT jack on your TV. Or
• S-VIDEO — If your TV set has an S-Video jack, connect the S-Video cable (not included) to the
S-Video jack on the DVD to the S-Video of your TV.
Digital Out Coaxial (Audio)
Use this jack to connect your DVD player to a Dolby Digital receiver or decoder.
Component (Y, Pb, Pr) Video Out
Component and Progressive Scan Video output ports. Use to connect a TV having Component or
Progressive Scan Video input jacks.
Note: Remember to connect the Audio cables because the component cable carries only the picture
signal, not the sound.
Progressive-Scan On/Off Switch
When you are connected the external TV via the Component and Progressive Scan Video output
jacks:
– If your TV support Progressive Scan system, slide the switch to ON position. The unit will
output the Progressive Scan signal to your TV. (recommend you choose this setting if your TV
support for the best picture quality.)
– If your TV is support Component Video system only, slide the switch to OFF position. The unit
will output the Component Video signal to your TV.
Notes:
1. If you connect the TV via Video or S-Video jacks, slide the switch to OFF position. Otherwise,
the TV picture may become to abnormal.
2. Consumer should note that not all the TV can support progressive scan picture. If your TV
picture is abnormal after you set the unit in progressive scan on mode, slide the PROGRESSIVE
SCAN switch to OFF position to switch off the progressive scan output.
VCD
PBC
1
2
3 4
6
8
5
7
9
1
2 3
4
6
5
7
1
3
4
5
7
2
6
About MPEG4 and DivX
MPEG is the abbreviation of the Moving Picture Experts Group which belongs to the family of
ISO/IEC standards (International Organization for Standardization and International Electro-
technical Commission).
MPEG-4 is a compression technology for Interactive Multimedia System.
DivX is a brand-name video codec (compression-decompression) technology codec based on the
MPEG-4 standard that compresses video to small enough sizes that it can be easily sent over the
Internet, but retains a high degree of video quality.
• This player is DivX 4 and DivX 5 compatible, which support up to home theatre profile with
maximum peak bit-rate = 10000 Kbps. The video resolution can support up to the maximum of
720 x 480 @ 30fps and 720 x 576 @ 25fps.
• This player supports the bitstreams that encoded in ISO MPEG-4 compliant. The visual profile
can support from Simple Profile (SP) level 0 to level 3 and Advanced Simple Profile (ASP)
level 0 to level 5, with maximum bit-rate = 8000 Kbps.
Notes:
• There are many non-standardised DVD/MPEG-4/DivX/CD-recording procedures and copy
protection procedures now in use, and many different kinds of DVD±R, DVD±RW, CD-R and
CD-RW blank disks. Therefore in some cases read errors or read delays may be encountered.
This is not a defect of the device.
• For CD-RW or CD-R, it may not be played according to the type of this disc.
Playback Mode
Repeat Playback Mode Buttons
The repeat functions that you can enjoy are dependent on the disc types played.
DVD: Title repeat, chapter repeat and given portion repeat.
CD:
All tracks repeat, single track repeat and given portion.
DivX: One track repeat, all tracks repeat.
Repeat Playback
While in the Playback mode, press the REPEAT/A-B button once; “ CHAPTER” will appear on
the screen for a few seconds and the currenty playing Chapter will repeat continuously. Press the
REPEAT/A-B button a second time; “ TITLE” will appear on the screen for a few seconds and
the currenty playing Title will repeat continuously. Press the REPEAT/A-B button repeatedly until
“Off” appear on the screen to indicate cancellation of the repeat mode.
A-B Repeat Playback
While in the Playback mode, press the REPEAT/A-B button three times to define where you want
the section to start. Press the REPEAT/A-B button again to define where you would like the
section to end, the unit will then play the selected area continuously. Press the REPEAT/A-B
button again to cancel all Repeat modes; “Off” will appear on the screen temporarily.
Note: Repeat function may not work properly with some discs.
DivX disc does not support this function.
Audio
Press the AUDIO button repeatedly to change the audio language/sound tracks. This feature is
not available on all discs.
Subtitle
Press the SUBTITLE button repeatedly to select a subtitle language or to turn the subtitle menu
off. This feature is not available on all discs.
DVD Menu
Press the DVD MENU button and the Main Menu of the disc will appear. Use the Navigation
(
3
,
4
,
5
,
6
) buttons to select the desired option, and then press the ENTER/PLAY
4
button to
confirmed the selection. This is not available on all discs.
Title
Press the TITLE button and the Title Menu of the disc will appear. Use the Navigation (
3
,
4
,
5
,
6
)
buttons to select the desired option, and then press the ENTER/PLAY
4
button to confirmed the
selection. This is not available on all discs.
Zoom
Press this button (Zoom 2x, 3x, 4x) during normal, slow or still playback mode. This player can
magnify a picture and use direction buttons
(
5
,
3
,
4
,
6
) to select desired part of the zoomed
picture.
Notes:
• Under Zoom function for JPEG file, press ZOOM button goes to Zoom 1x mode, then press
REV
7
or FWD
8
button repeatedly to select the zoom steps. Press ZOOM to quit the zoom
mode.
• DivX disc support this function.
Angle
Some discs may contain scenes which have been shot simultaneously from a number of different
camera angles. This jacket will be marked with “ ”.
• While in the Playback mode, press the ANGLE button; the total number of angles will appear
on the screen. Repeatedly press the ANGLE button to select the desired angle; the angle will
change in one to two seconds. This is not available on all discs.
Mute
To temporarily mute the playback sound, press the MUTE button. Press again to resume normal
playback.
Display button (OSD)
The display appears across the top of the screen when you press the DISPLAY button on the
remote while playing a disc. Press the DISPLAY button repeatedly to scroll through playback
information.
Return
Press the RETURN button to quickly go back to the menu page only when VCD version 2.0 disc is
playing and PBC function is ON.
Clear
Press the CLEAR button to erase a wrong input number.
Playback Control (PBC)
• The Playback Control feature is available only on Video CDs. Press the DVD MENU button to
turn the PBC feature on and off. The Playback Control feature supports the menus of the VCD
format similar to a DVD menu.
• When playing VCD with PBC function, you can enjoy simple interactive solfware on TV screen.
• When playback, there are such functions as track selection, stop, previous/next scene, fast
forward/backward, return, play/pause for you to select.
• PBC functions can be auto run after the disc is loaded.
• Desired tracks can be selected by pressing numberic buttons when PBC functions are on. After
selected, press ENTER/PLAY
4
, player will start playing the desired track.
DVD Basic Operation
Starting Playback
1. Plug the AC power cord into your AC power outlet at home. The STANDBY indicator turns on.
The unit is connected to the main power.
2. If the unit is on standby mode, press the POWER button of the remote control or the
STOP/STANDBY button of the unit to turn on the unit.
• Press and hold the STANDBY/STOP button of the unit a few seconds, the unit was turn off.
3. Press the OPEN/CLOSE button to open the disc tray (‘Open’ appears on TV screen) and place
the disc with the label side facing up on the disc tray.
• Hold the disc without touching either of its surfaces, position it with the printed title side facing
up, align it with the guides, and place it in its proper position.
4. Press the OPEN/CLOSE button. The disc tray closes (‘Loading’ appears on TV screen). Use
the Navigation (
5
,
4
,
6
,
3
) buttons to select the desired option and the ENTER/PLAY
4
button to select it.
5. To stop playback, press the STOP button once; “Press Play Key To Continue” will appear
on the TV screen. Because the unit will remember where you stopped, simply press the
ENTER/PLAY
4
button to resume playback where you left off (resuming playback). If the STOP
button is pressed twice, the unit will stop completely.
Notes:
• If a MENU appears on the TV screen, press the Navigation (
5
,
4
,
6
,
3
) buttons to select the
desired option/item, then press the ENTER/PLAY
4
button. Please make sure to refer to the
disc’s jacket or case for additional information.
• Resuming playback may not work on all discs.
Search
During playback, press
8
or
7
button to move the DVD forward or backward at double (x2)
speed to locate a specific section. Repeatedly press these buttons and the speed will increase
to x4, x8, x16 and resume normal playback. You can also resume normal playback by pressing
the ENTER/PLAY
4
button.
Skip
While a disc is playing, you can skip forward or backward a chapter or track at a time by pressing
the
:
or
9
.
Pause and Step
Press the PAUSE/STEP button to pause the picture. Repeatedly press the PAUSE/STEP button
to play the DVD one frame at a time. Press the ENTER/PLAY
4
button to resume normal playback.
Title/Chapter Search
– Press the SEARCH button once. Press the Navigation (
3
,
4
) buttons to select the Title (TT),
then use the Number buttons to select the desired title number (i.e. for number 5, press “0”,
“5”). Playback will start immediately. OR
– Press the Navigation (
3
,
4
) buttons to select the Chapter (CH), then use the Number buttons
to select the desired chapter number (i.e. for number 2, press “0”, “2”). Playback will start
immediately.
Title/Chapter/Time Search
– Press the SEARCH button twice. Press the Navigation (
3
,
4
) buttons to select the Title (TT),
then use the Number buttons to select the desired title number (i.e. for number 5, press “0”,
“5”). Playback will start immediately.
Then, press the Navigation (
3
,
4
) buttons to select the Title Time (T), use the Number buttons
to select the desired Title Time (Hour/Minutes/Seconds).
– Press the SEARCH button a third time. Press the Navigation (
3
,
4
) buttons to select the
Chapter (CH), use the Number buttons to select the desired chapter number (i.e. for number 5,
press “0”, “5”).
Then, press the Navigation (
3
,
4
) buttons to select the Chapter Time (T), use the Number
buttons to select the desired Chapter Time (Hour/Minutes/Seconds); playback will start
immediately.
• If you enter a time that exceeds the time limit of the DVD, then “ ” wil appear, and you must
try again.
T V
AUDIO
IN
R
L
Pr
Pb
Y
T V
AUDIO
IN
R
L
AV Amplifier with a
Dolby Digital Decoder
COAXIAL
IN
VIDEO
IN
S-VIDEO
IN
Right
Wrong
Please read this manual carefully before using the unit for the
first time and keep for future reference.
CITIZEN C479DVD_Engib.p65
9/25/2007, 9:53 AM
1