


IOM-TBN
Date: 12-2021
Supersedes: NEW
Page 2 of 6
TBN BACnet Thermostat
•
Network Configuration
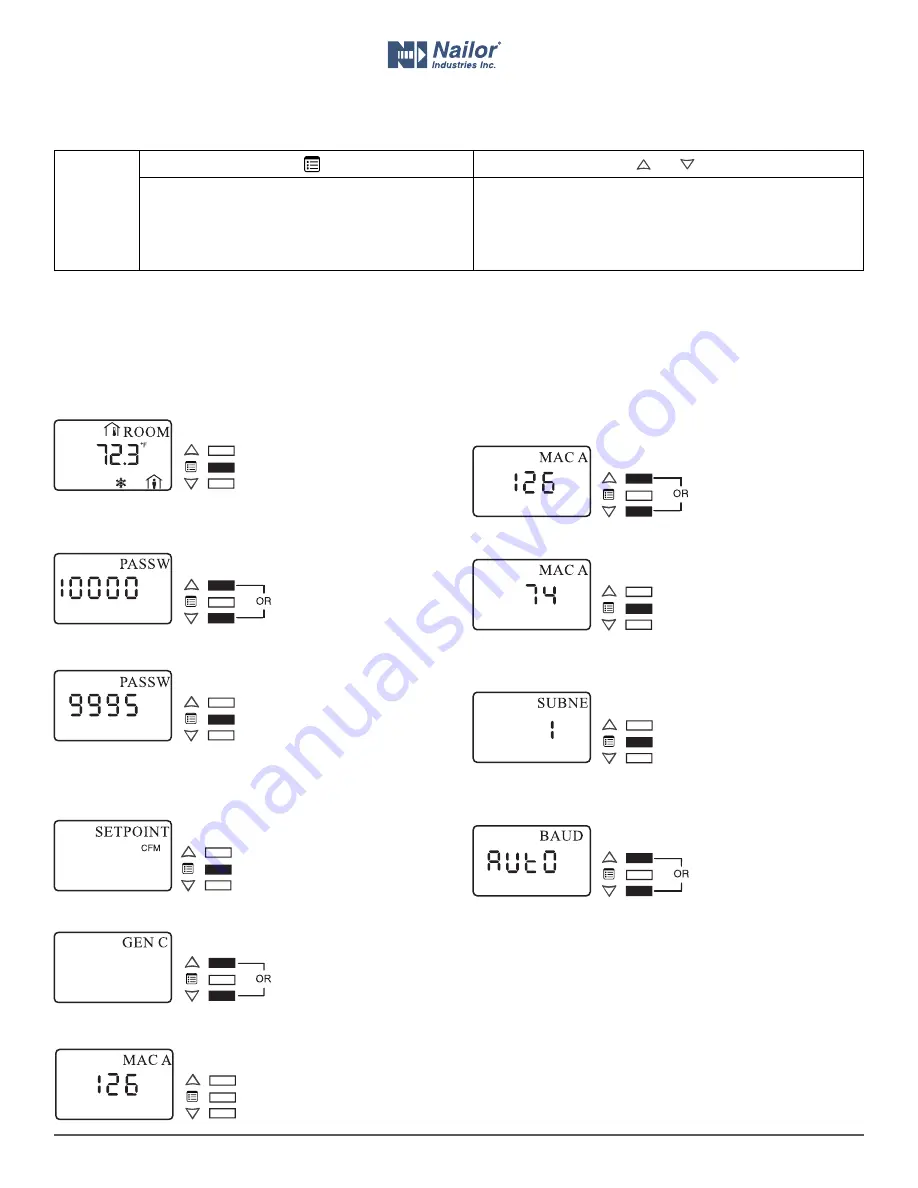
From the TBN General Configuration submenu, the controller’s
network parameters can be set.
How to enter the General Configuration submenu
To enter the General Configuration submenu:
1. Hold the
Menu
button for five seconds.
The password field appears.
2. Use the arrow keys to increase or decrease the displayed
number until it matches the configured password.
By default, the password is 9995.
3. Press the
Menu
button to submit the password.
Upon submitting the correct password, the Advanced Menu is
entered and the Setpoints submenu is displayed.
4. Press the
Menu
button several times until
GEN CFG
appears
on the display.
5. Press either of the arrow keys to enter the Configuration
submenu.
Upon entering the General Configuration submenu, the MAC
Address parameter appears.
Nailor reserves the right to change any information concerning product or specification without notice or obligation.
Advanced
Menu
and
-
Enters Advanced Menu, when held for 5 sec
- Navigates between parameters
- Submits a modified parameter
- Goes up one level, when held for 5 sec
- Cancels a modified parameter, when held for 5 sec
- Modifies a parameter
- Goes up one level when pressed in Exit screen
- Releases an override when both are pressed
- Enters into a submenu
Button Navigation Guide:
Setting up the Network Parameters
How to set up the BACnet® MS/TP
communication network parameters
The TBN can be used to set the controller’s BACnet
®
MAC address
and baud rate. In doing so, the TBN must have a subnet ID of 1.
To set up the network parameters:
1. Use the arrow keys to enter the controller’s MAC address.
2. Press the
Menu
button to submit the MAC address.
The TBN subnet ID of 1 appears on the display.
3. Press the
Menu
button once to move onto the next parameter.
The Baud Rate parameter appears on the display.
4. Use the arrow keys to set the baud rate.
Keep in mind that all the devices on the data bus must be set to
the same baud rate. Typically, the baud rate is set at the router
level. Therefore, it is recommended to set the baud rate to AUTO
so that the baud rate being used on the data bus is automatically
detected and applied to the controller accordingly.
5. Press the
Menu
button to submit the baud rate.
5 sec
Screen timeout: none
Screen timeout: 30 sec.
Screen timeout: 30 sec
Screen timeout: 30 sec
Screen timeout: 30 sec
Screen timeout: 30 sec
Screen timeout: 15 sec
Screen timeout: 15 sec
Screen timeout: 15 sec
Screen timeout: 30 sec


