background image

Page 11 of 15                                 Copyright © NAGRAVISION S.A. 2011                        August 19, 2011 

Player 

 
The main functions are playback, delete, copy 
to a local hard drive USB key or even create a 
CD/DVD. 
 
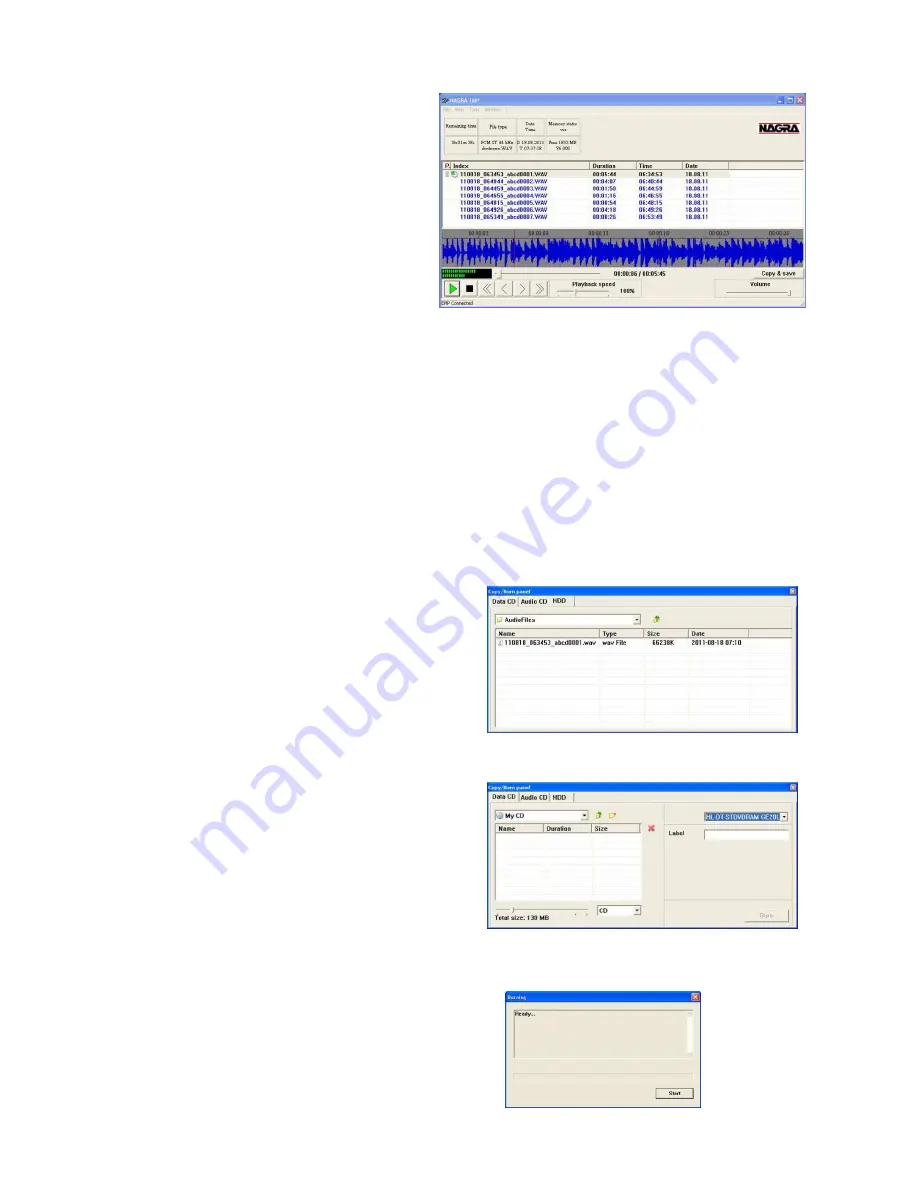
The player shows the list (Index column) of 
recordings in the memory of the Nagra EMP. 
As an example, the first index 
110818_063453_abce0001.WAV was recorded 
in 2011, 8

th

 month, 18

th

 day or August 18, 2011 

started at 6 h 34 m 53 seconds. 
 
The other columns clearly show the DURATION, TIME and DATE. 
 
To select an index, move the pointer to the index, press the left mouse key. 
 
To playback an index, move the pointer on the index and double click the left mouse key. 
 
The playback can also be started by first highlighting an index followed by pressing the green play button or 
simply by a double click on an index. 
 
During play, the fast forward or rewind keys (single arrow) moves the playback position inside the selected 
index. To jump to a previous or next index, use the double arrow keys. 
The playback speed potentiometer adjusts the playback from 50 % to 200 % of the nominal speed. The 
volume button controls the output level of the audio card inside the PC. 
 
To select additional functions such as delete, press the right mouse key. A sub-menu appears, permitting 
to play, delete all or delete a highlighted index. 

Copy / Burn panel 

 
To access to the Burner, press the “Copy / Save” 
button in the player window. 
 
Before selecting any files, first select in the Copy / Burn 
panel if the files need to be burned on a CD / DVD or 
Audio CD or copied to HDD. 
 
Return to the main window, select the files and press “Copy & save” 
 
In case of CD / DVD burning, select the target burner in 
the upper right corner and add eventually a label name. 
The lower area of the window will later on show the 
used size versus the total available memory. Observe 
in the bottom left corner that the total file size stays 
below the maximum capacity of the CD / DVD memory 
size. 
 
 
Return to the main window and select the files to be 
burned and press “Copy & Save”. 
 
Return to the Copy / Burn panel and press the “Burn” button”. A sub-window appears showing the burning 
status: 
 
Follow the instructions to complete the burning process: 

Summary of Contents for EMP

Page 1: ...Version Nagra EMP PC V1 024 Version Recorder V6 00 OPERATING INSTRUCTIONS AND REFERENCE MANUAL NAGRA EMP ...

Page 2: ...iter activity led s 4 6 Limiter selection 5 6 6 Limiter ganging 7 6 Input sensitivity selection 8 9 6 Headphone output selection 10 6 Phantom power selection 11 12 6 Led dimmer 13 7 Filter selection 14 15 7 Recorder control and indicator 16 7 Power on switch 17 7 Rear panel description 8 USB connector 8 Hirose DC connector 8 Line output XLR s 8 NagraEMP software installation 9 Recorder setup 9 Fil...

Page 3: ...mnities All freight costs as well as customs duty and other possible charges are at the customer s expense Our guarantee remains valid in the event of emergency repairs or modification being made by the user However we reserve the right to invoice the customer for any damage caused by an unqualified person or a false manoeuvre by the operator We decline any responsibility for any and all damages r...

Page 4: ...out recording is approximately 4 hours No Phantom no record It is equipped with a Hirose connector allowing external power The Nagra EMP has two analogue inputs on XLR connectors equipped with extremely high quality microphone preamplifiers They include as one expects 48 V phantom powering and in house wound NAGRA transformers offering an improvement of 6 dB in the noise floor when set to the 2 mV...

Page 5: ...A Hirose connector Power indication The power indication only operates on the internal batteries If the batteries are in place and the power button is pulled to TEST 1 or 2 of the led s above the channel 1 sensitivity adjustment will light up Green Full power 6 V to 4 5 V Green yellow Power 4 5 V to 4 4 V Yellow red Power 4 4 V to 4 2 V Yellow Power 4 2 V to 4 0 V Red Low power below 4 V Consumpti...

Page 6: ...The limiters start to activate at a signal level of 9 5 dBFS and from the range of 8 dB to 2 dB they compress the audio by 36 dB max 36 dB for 2 dBFS Limiter ganging 7 The upper position means ganged the down position means independent When ganged if one channel limiter is activated then the other will activate automatically irrespective of its input level Input sensitivity selection 8 9 The 2 mic...

Page 7: ... filters in the Nagra EMP roll off 3 dB at 150 Hz and then at 12 dB per octave If an alternative curve is required then provision is made on the input circuit board to add capacitors accordingly and the necessary values can be supplied if necessary The low cut filter roll off 3 dB at approximately 60 Hz 3 possibilities Flat Low cut or Vortex Recorder control and indicator 16 Turns on or off the bu...

Page 8: ...e maximum power draining reaches 3 5 W recorder included and that the voltage range goes from minimum 9 V up to maximum 13 V When using the external power the internal batteries are automatically disconnected Line output XLR s The line output level can be preset inside the Nagra EMP jumpers S4 S5 S6 for CH1and S7 S8 S9 for CH2 3 levels are available To set the jumpers switch the unit off and remov...

Page 9: ...er_Vx xxx or the downloaded version and double click to start the installation Important note If a previous NAGRA EMP software was already installed on your PC or laptop uninstall first then power down the PC or laptop and start again Once installed via the Start button All Programs select Nagra EMP and run The program starts and immediately disappears it runs in the background of the PC until a N...

Page 10: ...ng minimum 256 kb s File name The first four characters can be personalised To do this use the mouse and the left mouse button to highlight the characters and replace them Once changed click the OK button to enter this new information into Nagra EMP File extension As standard all file extensions have the name xxx WAV In the case that some players analysers or editors are requesting a dedicated ext...

Page 11: ...peed potentiometer adjusts the playback from 50 to 200 of the nominal speed The volume button controls the output level of the audio card inside the PC To select additional functions such as delete press the right mouse key A sub menu appears permitting to play delete all or delete a highlighted index Copy Burn panel To access to the Burner press the Copy Save button in the player window Before se...

Page 12: ...urning starts and shows the following sub window Wait until the burning process is ended and the next sub window appears Press the OK button to terminate the burning process Press the Finish button to quite the burning process Once the burning process is completed the player will show a disk icon in front of each burned or copied file In case of HDD copying If the indexes need to be copied in a fo...

Page 13: ...pin connector 9 to 13 V 3 5W Outputs Analogue line output 2 x XLR 4 4V max selectable 0 dBm 6 dBm or 15 dBm Headphones Stereo 6 3mm Jack 50 Ω Recorder File type PCM BWF or MPEG 1 L II 16 bit 32 to 48 kHz Stereo Mono Memory size 2 GB corresponds to 2 h 53 min in PCM BWF 48 kHz stereo Other USB Host USB 2 0 connector type mini USB General Dimensions 190 x 50 x 175 mm W x H x D 7 5 x 2 x 6 9 W x H x ...

Page 14: ...Page 14 of 15 Copyright NAGRAVISION S A 2011 August 19 2011 CE norm ...

Page 15: ...ight NAGRAVISION S A 2011 August 19 2011 NAGRAVISION SA KUDELSKI GROUP Route de Genève 22 CH 1033 Cheseaux Switzerland Phone 41 0 21 732 0101 Fax 41 0 21 732 0100 E mail audio_pro nagra com All rights reserved August 2011 ...

Reviews: