background image

In the EARS (Enhanced Ambience Retrieval System) Surround
Mode, a realistic level of ambience of surround sound is added to
a normal stereo source such as a CD or FM radio.
Surround Mode Off switches to normal Stereo operation.

NOTE:

When using Digital Audio Input 3, the Surround Mode Off

is selected, the analogue inputs will be selected. Therefore, ensure
that the analogue outputs of the digital sources are connected as
well to the same input the Digital Audio input has been assigned to.

As an additional convenience feature, your T770 memorises
which surround mode you have used with the given input
selection. When you next select that input, your T770 will
automatically choose the same Surround mode again. If normally
you use Dolby Pro Logic mode on the Video 1 and Video 2 inputs,
Dolby Digital on the Video 4 input, EARS on CD and By-Pass
(Stereo) on the others, pressing the Input Selector will
automatically default to the right Surround mode without having
to separately press the Surround Mode button.

NOTES:

An external source such as a decoder or DVD player with

a decoder built-in (DTS, MPEG for instance) can be connected to
the EXT. 5.1 CH input (No. 5). When the EXT. 5.1 CH input is
selected, no other surround modes are available, so “SURROUND
MODE” extinguishes in the display panel.
To obtain the best surround sound possible it is important that all
speakers have been set up correctly. Refer to the chapters “On
Screen Display” and “Setting up the Surround System”.

20. MULTI SOURCE

The NAD T770 allows you to change source and alter volume for
another room by remote control, independently from the main
listening room. This means you could be enjoying a DVD in Dolby
Digital Surround Mode CD in the main room and somebody else
to a radio broadcast in another room at the same time.

Full operation of the Multi Source facility, such as changing
volume, is possible only with remote control. It is possible
however to change the source for a second room by using the
Multi Source button on the front panel in the same way as it is
used on the remote control:

• On the remote control, press Multi Source (No. 5). The MULTI

SOURCE indicator in the display will flash.

• While the MULTI SOURCE indicator is still flashing (8 second

default time) select the desired source on the remote control. The
selected source will be indicated in the display by a box around it.

• If you want sound in just the second room and not in the main

room, disengage either Speakers A or Speakers B on the front
panel (No. 3) or the remote control.

• Adjust the volume for the second room setting by pressing

either the 

or 

MS VOLUME button (No. 6) on the

remote control. Upon adjusting the Multi Source level, the
display will indicate “MULTI” and the corresponding level
setting (ranging from -78 to 0 dB).

NOTES:

As it is possible to use the Multi Source facility

independent from the main listening room, an extra remote
control handset can be useful. Your NAD dealer can advise you
regarding the availability.

With the Multi Source facility in use, the source indicated in the
main display for the main listening room can be recorded from.

ON SCREEN DISPLAY (OSD)

The NAD T770 is equipped with an elaborate On Screen Display
facility (OSD). As the OSD is an essential tool to set up the various
parameters for Surround sound correctly it is recommended that
you connect your monitor or television to the T770.

For 230V versions only; not on 120V (North American versions):
Depending on your source and/or the television system used you
must first select the correct video system. If the OSD rolls over the
screen you must select another system: PAL or NTSC.
• While pressing the Memory button (No. 14), press the Video 1

input selector button (No.6) repeatedly until the desired
system is shown in the display area.

• If your television and your sources are multi-standard it is

recommended you choose the “OSD AUTO” option. In this
case the T770 will automatically select the system used by the
connected video input signal.

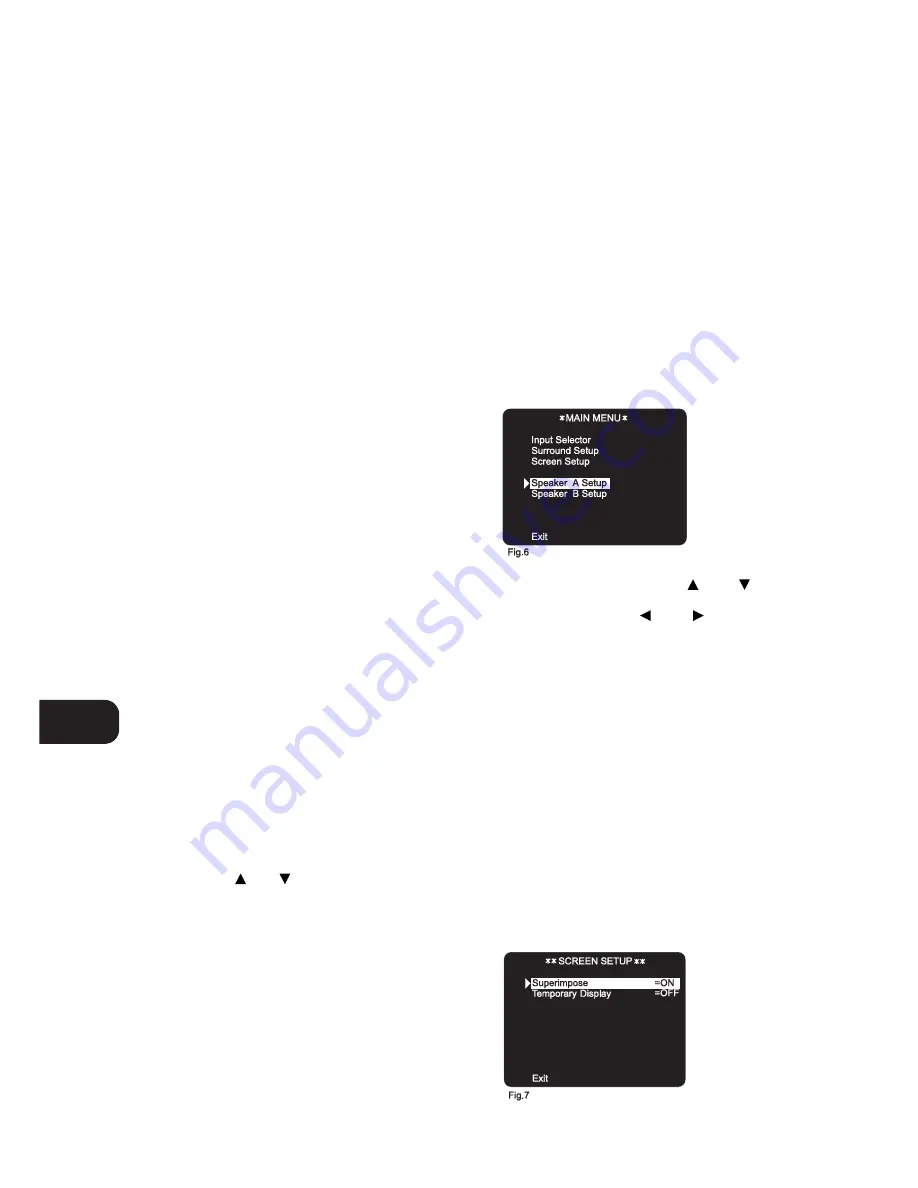
The OSD can be engaged by pressing one of the four cursor
buttons on the remote control (No. 9). The main menu will
appear (see Fig. 6).

Use the cursors buttons on the remote control to navigate, select
the desired menu and options. The 

and 

buttons are

used to navigate and select an option (indicated by highlighting
the available option), the 

and 

buttons to change a

setting from the highlighted section. Selecting “EXIT” from the
Main menu will switch the OSD off. Selecting “EXIT” from any of
the other menus takes you to the previous menu.

The OSD menu are at maximum three “layers” deep; this means that
from the main menu (layer 1) you can select a sub menu (layer 2),
from which you can again select a submenu (layer 3). The number
of starts left and right of the menu header indicates which layer is
displayed; 1 star for layer 1, 2 stars for layer 2, 3 stars for layer 3.

There are various ways in which the OSD can appear and function:
• From the Main menu select and enter the “Screen Setup” menu

(see Fig. 7).

• Select “Superimpose = ON so that the OSD is superimposed

over the video signal received from the T770 input selector. By
selecting “OFF” the OSD will always be displayed with a solid
blue background.

• Select “Temporary Display = ON” if you wish to see the OSD

confirming each time an operation is performed for 5 seconds
(such as volume change, different input selected, etc). By selecting
“OFF” the OSD will only be shown when calling up the Main menu.

GB

14

Summary of Contents for T770

Page 1: ...T770 Surround Sound Receiver Owner s Manual GB ...

Page 2: ...e operating condition REPLACEMENT WITH UNAUTHORIZED PARTS MAY RESULT IN FIRE ELECTRIC SHOCK OR OTHER HAZARDS ATTENTION POUR ÉVITER LES CHOC ELECTRIQUES INTRODUIRE LA LAME LA PLUS LARGE DE LA FICHE DANS LA BORNE CORRESPONDANTE DE LA PRISE ET POUSSER JUSQU AU FOND CAUTION TO PREVENT ELECTRIC SHOCK MATCH WIDE BLADE OF PLUG TO WIDE SLOT FULLY INSERT If an indoor antenna is used either built into the s...

Page 3: ...3 FRONT PANEL CONTROLS REAR PANEL CONNECTIONS ...

Page 4: ...4 ...

Page 5: ...5 FIGURE B FIGURE A ...

Page 6: ...6 FIGURE 1 FIGURE 2 FIGURE 3 FIGURE 4 ...

Page 7: ...7 1 5 6 9 13 14 2 3 4 7 8 11 10 12 15 16 FIGURE 5 T770 RC NAD 1998 ...

Page 8: ...reas of poor FM reception the tuner section s performance can be improved by using an externally mounted FM antenna A qualified aerial installer will be able to advise and fit a recommended aerial for your reception conditions 3 AUX INPUT Input for audio components Use a twin RCA to RCA lead to connect the audio component left and right Audio Outputs to this input 4 CD INPUT Input for CD player an...

Page 9: ...se therefore to also connect the analogue outputs of your CD DVD and Laser Disc player if these are already connected to any of the digital inputs 15 AUDIO PRE OUTS The NAD T770 receiver has five power amplifiers built in to power all the speakers connected to it Left Right Center Left Surround Right Surround It is also possible to use the T770 as a pre amplifier to drive external power amplifiers...

Page 10: ...daisy chained IN to OUT so that a whole system can be controlled from the remote control facilities of one unit 23 AC POWER CORD After you have completed all connections to the amplifier plug the AC line cord into a live wall socket 24 AC OUTLETS 120V North American versions only The AC power cords of other units in the audio system can be connected directly to the T770 s AC outlets If another ste...

Page 11: ...ttons select the active input to the T770 and the signal sent to the loudspeakers Tape 1 2 Video 1 2 and TV monitor outputs The name of the Input and Surround Mode will be shown in the Display Panel VIDEO 1 VIDEO 2 Selects the VCR connected to VIDEO 1 or VIDEO 2 as the active input VIDEO 1 or VIDEO 2 is shown in the Display Panel when selected VIDEO 3 VIDEO 4 Selects the signal from stereo TV Sate...

Page 12: ... tuning to a station and selecting to view RT the display will indicate WAIT and default to the station name c Press the button from the display RT mode to display the station frequency Press again to return to the default mode a When tuned to a non RDS station The PS RT button toggles the display to show either the station frequency or user entered station name If no user name was entered the dis...

Page 13: ...sponding analogue audio input To assign a Digital Audio input to a specific Input Selector button Press the desired input button except AM FM Tape 2 Monitor and EXT 5 1 CH Press the Digital Audio Selector button The DIGITAL AUDIO box will light up in the display with the first available digital input Press the Digital Audio Selector button again to until the desired digital input lights up either ...

Page 14: ...utton No 6 on the remote control Upon adjusting the Multi Source level the display will indicate MULTI and the corresponding level setting ranging from 78 to 0 dB NOTES As it is possible to use the Multi Source facility independent from the main listening room an extra remote control handset can be useful Your NAD dealer can advise you regarding the availability With the Multi Source facility in u...

Page 15: ... Bank and Preset selection Fig 9 SURROUND SETUP FIG 10 11 In the Surround Setup menu the desired Surround Mode can be selected With a Dolby Digital source you can choose between Dolby Digital Surround mode or Surround mode off Fig 10 With Dolby Digital selected you can also select Late Night on or off and LFE Level Atten at 0dB or 10dB Fig 11 Refer also to chapter Setting up the Surround Sound Sys...

Page 16: ...ls when its Preset is used Although the receiver automatically shows the frequency of any other AM or non RDS Preset station it also allows you to type in the station name to make it easier to identify which station is stored in the Memory Preset To enter a name Select the Preset you want to attach a name to Then press Character No 11 and the first space in the Station Data area of the Display Pan...

Page 17: ...erial it may sometimes be desirable to reduce the extremes between soft and loud passages when playing at low volume settings to retain intelligibility Press the Late Night button to engage press again to disengage When switched on the display will indicate LATE NIGHT 11 MODE SURROUND The Mode button scrolls through the available surround sound modes This button functions in the same way as the ri...

Page 18: ...ng the sound spread across three front speakers also stabilises the stereo image making the usable listening area much bigger For best results you should consider using a center speaker Ideally it should be the same type as the left and right speakers although there are now many new speakers such as the NAD 808CC which are specifically designed as center channel add ons for existing stereo systems...

Page 19: ...0dB and to match the other speakers to it Normally if the Right speaker is located at the same distance from the listening position to the Left speaker it should be set at the same level as the Left speaker The Level for each speaker can be adjusted in 1dB increments Continue to calibrate the level for each speaker until for equal loudness is achieved at your listening position A more accurate adj...

Page 20: ...not connected using digital in outputs Digital input has not been assigned to selected input Connect digital output of source to T770 Assign the digital input used to selected input WEAK BASS DIFFUSE STEREO IMAGE Speakers wired out of phase Check connections to all speakers in the system REMOTE CONTROL HANDSET NOT WORKING Batteries flat or incorrectly inserted IR transmitter or receiver windows ob...

Page 21: ...GB 21 ...

Page 22: ... LTD LONDON ENGLAND All rights reserved No part of this publication may be reproduced stored or transmitted in any form without the written permission of NAD Electronics Limited T770 Manual GB I P S 07 98 Printed in Malaysia SN29342662 ...

Reviews: