Mytrex MXD3G User’s Manual
Rev 0 July 29, 2013
Page 11 of 21
Please contact your service provider if the MXD3G does not connect
.
Testing the PHB (Range Test)
1.
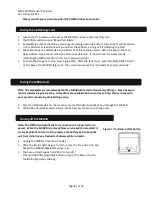
Locate the T/L button on the back of the MXD3G and press one time (Figure 5).
2.
The MXD3G will announce
“Range Test Mode.”
3.
Immediately activate the PHB by pressing and holding down the button. A green light will illuminate
on the PHB and a steady tone will sound from the MXD3G, as long as it is detecting the PHB.
4.
While activating the PHB, walk around all areas of the home and yard. Listen for gaps in the tone.
Gaps indicate “dead zones” where the PHB is not detected. If “dead zones” are detected, try
relocating the MXD3G and/or contact your service provider.
5.
To finish the Range Test, stop pressing the PHB. After the tone stops, press the black RESET button
on the back of the MXD3G (Figure 5). The unit will announce the
“[number] bars, System Ready.”
Testing the MXD3G unit
Note: The manufacturer recommends that the MXD3G be tested at least every 30 days. Most response
centers welcome regular testing. Attendants are available 24 hours a day to help. Please check with
your provider concerning their testing policy.
1.
Press the PHB and wait for the response center attendant to speak to you through the MXD3G.
2.
When the attendant answers, simply inform him/her that you are doing a test.
Turning off the MXD3G
Note: The MXD3G automatically turns on when it is connected to AC
power. When the MXD3G is removed from service and/or relocated, it
is very important to turn it off to preserve the battery and to keep the
unit from initiating any inadvertent alarms while in transit.
1.
Unplug the MXD3G from the AC outlet.
2.
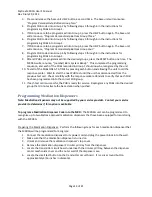
After the Status light begins to flash, press the T/L button on the
back of the MXD3G
three
times (Figure 7).
3.
The base unit will speak
“Hold HELP to turn off.”
Press and hold the large HELP button on top of the base unit until
the Status light stops blinking
Figure 7: Test/Learn (T/L) Button


