background image

17

Turning the Power ON/OFF

Operating Procedure

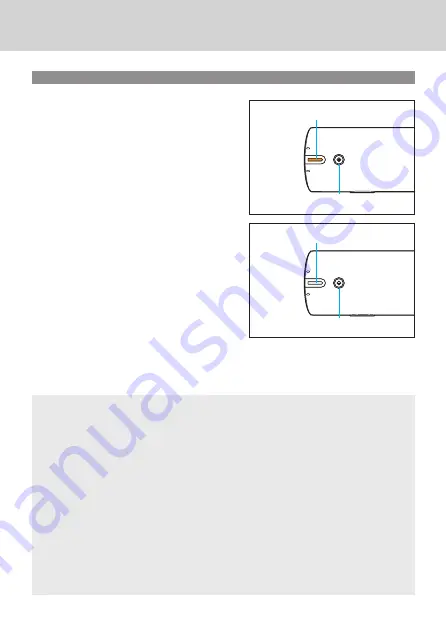
Press the power button.

The status indicator will be lit, and 
the power will turn ON.

Power button

Status indicator
Lit (orange)

Press the power button again.

The status indicator will turn OFF, 
and the power will turn OFF.

Power button

Status indicator
Off

Auto Power Off function (Initial setting: 15 minutes)

This instrument is equipped with an Auto Power Off function that 
automatically turns the power OFF if the device is not operated after a 
specified time. To turn the power back ON, press the power button.  
When this occurs, the calibration data will be erased, so recalibration will be 
necessary. The Auto Power Off function is disabled when the instrument is 
connected to a computer via a USB cable.

You can change the time using the Spectrophotometer Configuration Tool. 
The Spectrophotometer Configuration Tool can be downloaded from the 
following website.
https://www.myiro.com/downloads

Summary of Contents for MYIRO-1

Page 1: ...Spectrophotometer En Instruction Manual Please read before using the instrument Scan the 2D code to access the most recent instruction manual ...

Page 2: ...fully to ensure safe and correct use Denotes a prohibited operation This operation must never be performed Denotes an instruction This instruction must be strictly adhered to Denotes a prohibited operation Never disassemble the instrument Denotes an instruction To turn the power OFF unplug the USB cable from the connected device Denotes a warning about the LED Read the instruction carefully to ens...

Page 3: ... contents of this manual are subject to change without prior notice Every effort has been made in the preparation of this manual to ensure the accuracy of its contents However should you have any questions or find any errors please contact your retailer THE MANUFACTURER OF THIS PRODUCT will not accept any responsibility for consequences arising from the use of the instrument ...

Page 4: ...e Should liquid or metal objects enter the instrument turn the power OFF immediately disconnect the USB cable and contact your retailer Do not forcibly bend twist or pull the USB cable Also do not scratch fabricate or place heavy objects on the USB cable Doing so may damage the USB cable and cause a fire or electric shock The instrument should not be operated if it is damaged or if smoke or odd sm...

Page 5: ...tion from the battery may catch fire causing rupture or fire Do not place lenses reflective objects or optical elements in the path of the UV LED Doing so may cause the light from the LED to become concentrated which may cause injury to the eyes or burning In addition the back of the object should be blocked by a wall or other object capable of blocking the LED thus preventing the above from happe...

Page 6: ...ge to the instrument or other property Take care not to pinch yourself on the areas of the instrument that open and close Doing so may result in injury Do not use the instrument if the limiting aperture measuring port is in the line of sight Doing so may result in injury to the eye ...

Page 7: ...am 12 Names and Functions of Parts 13 Charging 15 Connecting to a Computer 16 Turning the Power ON OFF 17 Calibration 18 Calibration Method 19 Measurement 20 Scan Measurement 20 Spot Measurement 22 Display Measurement Brightness Measurement 23 Ambient Light Measurement 23 Cleaning the Protection Glass 24 Storage Method 26 Troubleshooting 27 Specifications 29 Dimensions 32 ...

Page 8: ...ndensation Be sure to use the instrument within this range Do not use it in areas of rapid temperature changes Do not leave the instrument in direct sunlight or near heat sources such as a stove Doing so may cause the internal temperature of the instrument to become much higher than the ambient temperature Do not use the instrument in areas where dust cigarette smoke or chemical gases are present ...

Page 9: ...sed includes the same serial number as that of the instrument being used The calibration data for the white calibration plate was measured at 23 C To achieve the highest accuracy when measuring absolute values colorimetric values calibration and measurement should be performed at 23 C Do not allow the white calibration plate to become scratched or dirty When the calibration cap is not in use keep ...

Page 10: ...in performance or a malfunction The limiting aperture measuring port of this instrument is a particularly precise component of the optical system Do not allow the aperture to become dirty or subject the aperture to impacts When the instrument is not in use make sure to attach the calibration cap to protect the limiting aperture measuring port The instrument may cause interference if used near a te...

Page 11: ...as these circumstances may cause a malfunction We recommended storing the instrument with a drying agent at a temperature of around 20 C Do not leave the instrument inside a vehicle such as in the cabin or the trunk Otherwise the temperature and or humidity may exceed the allowable range for storage during midsummer or midwinter resulting in a malfunction Do not store the instrument in areas where...

Page 12: ...soft clean dry cloth Never use solvents such as thinner or naphtha If the white calibration plate becomes dirty wipe it with a soft clean dry cloth If the dirt is difficult to remove wipe it off with a cloth dampened with commercially available lens cleaning solution remove the solution with a cloth dampened with water and allow the plate to dry before using Should the instrument break down do not...

Page 13: ...perform spot measurement or scan measurement USB Cable IF A41 Used to connect the instrument to a computer Soft Case MY A03 Used to store the instrument together with the included accessories Spectrophotometer ConfigurationTool MY CT1 Used to configure network settings and write calibration values to the instrument Visit the following website to download the tool https www myiro com downloads ...

Page 14: ...11 Optional Accessories Ambient Light Adapter MY A04 Used to perform ambient light measurement ...

Page 15: ...play measurement commercially available Computer commercially available Optional Accessories USB cable IF A41 Spectrophotometer Configuration Tool MY CT1 Available for download on the Web Ruler MY A02 Soft case MY A03 Calibration cap MY A01 Ambient light adapter MY A04 ...

Page 16: ... Battery indicator Displays the remaining battery power and charging status through flashing or being lit 6 USB connection terminal Used to connect the instrument to a computer via the USB cable In addition to enabling communication with a computer the terminal is also used for charging 7 Calibration cap Attached to the limiting aperture during calibration and for storage 8 Whitecalibrationplate U...

Page 17: ...erformed Lit green 1 s Calibration successful Calibration was performed correctly Flashingred 1s Calibration failed Calibration was not performed correctly The wireless LAN indicator colors and their relevant statuses are as follows Indicator Status Meaning Not lit Not connected Connection to the access point has not been established Alternatively a USB connection has been established Flashing ora...

Page 18: ...puter commercially available 2 Connect the other connector of the USB cable to the USB terminal on the computer The battery indicator displays the remaining power and charge status of the internal lithium ion battery Battery indicator Indicator Status Meaning Not lit Remaining battery power available The internal lithium ion battery has sufficient power to operate the instrument Flashing orange Lo...

Page 19: ...etworksettingsontheinstrumentusingtheSpectrophotometerConfigurationTool TheSpectrophotometerConfigurationToolcanbedownloadedfromthefollowingwebsite https www myiro com downloads Computer commercially available Spectrophotometer ConfigurationTool Availablefor downloadontheWeb Router commercially available Instrument Memo For how to configure the network settings for the instrument refer to Spectrop...

Page 20: ...ent is equipped with an Auto Power Off function that automatically turns the power OFF if the device is not operated after a specified time To turn the power back ON press the power button When this occurs the calibration data will be erased so recalibration will be necessary The Auto Power Off function is disabled when the instrument is connected to a computer via a USB cable You can change the t...

Page 21: ...erial numbers are included on both the instrument and the calibration cap Make sure the calibration cap being used includes the same serial number as that of the instrument being used Memo If the calibration cap was purchased as an optional accessory for replacement attach the included pairing number stickers to both the instrument and the calibration cap write the calibration data to the instrume...

Page 22: ...rformed Memo Thecalibrationresultwillbeindicatedbythecolorandilluminationpatterns lit flashing ofthestatusindicatorfollowingcalibration Seepage14 CAUTION If the status indicator lights up blue calibration will not be possible even if the measurement button is pressed Perform calibration from the software being used Memo The calibration cap can be stored on the instrument during measurement Attache...

Page 23: ...o 19 Scan Measurement Use the ruler included as a standard accessory 1 Set the ruler on the chart so that the mark on the ruler is at the end of the chart The scan operation should start from the white part of the paper mark Ruler 2 Place the instrument so that the two feet are aligned with the groove on the ruler and then align the limiting aperture with the open end of the ruler Two feet 3 Press...

Page 24: ...ler to the other in 3 to 5 seconds 5 Release the measurement button when the instrument reaches the white part of the paper on the opposite side of the test chart Memo The measurement result will be indicated by the color and illumination patterns lit flashing of the status indicator following measurement See page 14 Status indicator ...

Page 25: ...uler 2 Place the instrument so that the limiting aperture is aligned with the spot target limiting aperture 3 Press the measurement button Measurement button Memo The status indicator will light up white during measurement and turn green if the measurement is performed successfully The indicator will turn blue when the instrument is ready to perform the next measurement ...

Page 26: ...ment Usetheoptionalambientlightadapterformeasurement Attachtheambientlightadaptertothelimitingaperturetomeasureambientlight Limiting aperture Ambient light adapter Optional accessory CAUTION Write the ambient light adapter value to the instrument using the Spectrophotometer Configuration Tool MY CT1 in advance The Spectrophotometer Configuration Tool MY CT1 can be downloaded from the following web...

Page 27: ...ting aperture While pressing down on the ribbed rim of the attached accessory limiting aperture rotate counterclockwise until the accessory stops Taking care to prevent the limiting aperture from dropping flip the instrument over and take the limiting aperture in your hand Ribbed portion 2 Clean the protection glass If there is dust or dirt on the glass use a blower to blow it off or gently wipe i...

Page 28: ...rame and press the aperture into the frame While pressing on the ribbed rim of the limiting aperture rotate clockwise until a click is heard Installation is correct if the four long ribs on the limiting aperture align vertically and horizontally with the instrument Longer ribbed portions Indication Protrusion ...

Page 29: ... instrument inside the soft case for storage Attach the calibration cap to the limiting aperture on the instrument See 1 on page 19 Ruler Ambient light adapter Optional accessory USB cable Main body Storage Method ...

Page 30: ... Is the instrument pressed flush against the measurement specimen Make sure that the instrument is pressed flush against the specimen Is the calibration cap correct Read the Calibration and Calibration Method sections carefully to ensure calibration is being performed correctly Was calibration performed correctly The instrument does not respond to commands from the computer Commands cannot be acce...

Page 31: ...se the Spectrophotometer Configuration Tool to configure the wireless access point settings on the instrument correctly Is the instrument being used in an environment with poor or unstable wireless radio signal conditions Use the instrument in an environment with a good wireless radio signal The instrument cannot connect to the wireless LAN The wireless LAN indicator does not change from orange to...

Page 32: ...nufacturer s standard conditions Measurementtime single pointmeasurement Approx 1s Measurement conditions 2 M0 CIE Illuminant A M1 CIE Illuminant D50 M2 illumination with UV cut User defined illuminant Observers 2 or 10 Standard Observer Status indicator LED to indicate instrument status Interface Wireless LAN IEEE 802 11 b g n 3 USB2 0 Scanning measurements Scanningmeasurementofacolorchartcanbepe...

Page 33: ...d patches must satisfy ΔE ab 10 Valid scan range 270 mm Valid measurement range 257 mm 10 mm 10 mm This area must be blank Do not print anything in this area Item Specifications Remarks Patch Scan direction 7 mm or more The scan operation should start from the white part of the paper and end on the white part of the paper Orthogonal direction 7 mm or more Patch color difference ΔE ab 10 If the dif...

Page 34: ...olor difference is not specified when using two white lines or two black lines Gap width 0 5 to 1 0 mm Scan direction Black gap White gap Scan Conditions Item Specifications Remarks Scan speed Patch width 7 mm 54to154mm s Patch width 10 mm 54to208mm s Scan direction Not specified The scan direction will be detected and data will be output from left to right ...

Page 35: ...32 Dimensions 73 171 71 Unit mm ...

Page 36: ...Y DAMAGES RESULTING FROM THE MISUSE MISHANDLING UNAUTHORIZED MODIFICATION ETC OF THIS PRODUCT OR FOR ANY INDIRECT OR INCIDENTAL DAMAGES INCLUDING BUT NOT LIMITED TO LOSS OF BUSINESS PROFITS INTERRUPTION OF BUSINESS ETC DUE TO THE USE OF OR INABILITY TO USE THIS PRODUCT ...

Page 37: ...9222 ACJ1 11 En CABCDA ...

Reviews: