


113903G -System Installation Manual
35
D
IRECTIONS FOR
W
ALL
M
OUNTING USING
S
TRUT
C
HANNEL
SYSTEMS WITH FOUR BATTERY CABINETS
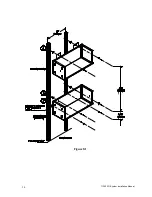
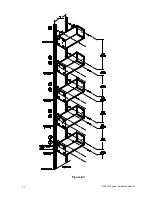
Refer to Figure 8.4.
•
Four Battery Cabinet mounting requires (16) Spring Clamp-nuts, (16) ¼-20 Bolts and
(16) ¼-20 Flat Washers.
•
Electronics Cabinet mounting requires (2) Spring Clamp-nuts, (2) ¼-20 Bolts and (2)
¼-20 Flat Washers.
1) Mount Strut Channels to wall vertically (hardware not included), 16” apart on center.
2) Place one spring clamp-nut on each strut channel 2.5” from the bottom of the strut
channels.
3) Place the next spring clamp-nuts 5.438” on center above the spring clamp-nuts
placed in step #2.
4) Place the next spring clamp-nuts 4.683” on center above the spring clamp-nuts
placed in step #3.
5) Place the next spring clamp-nuts 5.438” on center above the spring clamp-nuts
placed in step #4.
6) Place the next spring clamp-nuts 4.683” on center above the spring clamp-nuts
placed in step #5.
7) Place the next spring clamp-nuts 5.438” on center above the spring clamp-nuts
placed in step #6.
8) Place the next spring clamp-nuts 4.683” on center above the spring clamp-nuts
placed in step #7.
9) Place the next spring clamp-nuts 5.438” on center above the spring clamp-nuts
placed in step #8.
10) Place the next spring clamp-nuts 14.37” on center above the spring clamp-nuts
placed in step #9.
11) Remove cover from Electronics Cabinet and Battery Cabinets.
12) Line up the four holes on the back of Battery Cabinet #1 with the spring clamp-nuts
from steps #2 and #3. Secure Battery Cabinet #1 to the spring clamp-nuts using (4)
¼-20 bolts and (4) flat washers.
13) Remove the top left front knockout from Battery Cabinets #1, #2, #3 and #4.
14) Remove the bottom left front knockout from Battery Cabinets #2, #3 and #4.
15) Place Battery Cabinet #2 on top of Battery Cabinet #1. Line up the four holes on the
back of Battery Cabinet #2 with the spring clamp-nuts from steps #4 and #5. Secure
Battery Cabinet #2 to the spring clamp-nuts using (4) ¼-20 bolts and (4) flat
washers.
16) Place Battery Cabinet #3 on top of Battery Cabinet #2. Line up the four holes on the
back of Battery Cabinet #3 with the spring clamp-nuts from steps #6 and #7. Secure
Battery Cabinet #3 to the spring clamp-nuts using (4) ¼-20 bolts and (4) flat
washers.
17) Place Battery Cabinet #4 on top of Battery Cabinet #3. Line up the four holes on the
back of Battery Cabinet #4 with the spring clamp-nuts from steps #8 and #9. Secure
Battery Cabinet #4 to the spring clamp-nuts using (4) ¼-20 bolts and (4) flat
washers.
18) Remove the bottom left front knockout from the Electronics Cabinet.


