Replacement
Adjustment
29 November 2006
FTR-3-23
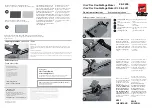
3.2.10 STOP GATE CARRIAGE
AREA C
Removal
1. Before switching off the power,
set the Trimmer (Paper size) to A4 / 8.5x11” and Trimming to off.
2. Remove Lower outfeed cover (
3.1.8).
3. Remove connectors [A] (
x2).
4. Remove connectors [B] (
x2).
5. Remove connector [C] (
x1).
6. Pull out the Carriage gently.
[A]
[B]
[C]
[D]
CAUTION
When removing the Carriage, watch out so the motor connectors [B] & [C]
do not get damaged by the side frame cut-outs.
Replacement
1. When positioning the carriage in place, make sure the two sliding rods and the
gear rack enters their holes and slot.
2. Reverse the removal procedure.
Summary of Contents for Plockmatic FTR 200
Page 2: ...TRIMMER FTR 200 SERVICE MANUAL 12 February 2007 Subject to change ...
Page 3: ...Page intentionally blank ...
Page 7: ...Page intentionally blank ...
Page 9: ...Page intentionally blank ...
Page 19: ...Page intentionally blank ...
Page 43: ...Page intentionally blank ...
Page 45: ...Page intentionally blank ...
Page 59: ...FTR 4 14 Page intentionally blank ...
Page 61: ...Page intentionally blank ...
Page 65: ...FTR 6 4 29 November 2006 6 1 3 OUTFEED VIEW FTR Q6 FTR M2 FTR M1 ELECTRICAL COMPONENT LIST ...
Page 67: ...Page intentionally blank ...
Page 71: ...Page intentionally blank ...
Page 77: ...Page intentionally blank ...
Page 79: ...Page intentionally blank ...