background image

Table Extension

Your folder comes with two Table Extensions.  One
is used as an extension on the Exit Conveyor, the
other on the Feed Table (see the illustration for

“Parts”

).

To install the Extension onto the Feed
Table, align the locking tabs of the
Extension with the slots in the Feed
Table as shown.  Squeeze the Feed
Table and Extension together nearest the
tabs and slots until the 2 pieces snap
together. 

To install the Extension onto the Exit
Conveyor, align the tabs on the Extension
with the slots provided in the Exit Conveyor
as shown.  No force is required to install
the Extension - gravity will hold the
Extension in place.

Using Your Folder

Reach under the second fold table
and turn on the power.  When the
power switch is turned on, the display
will read as follows:

This message will display for a short
time and then the display will read:
In the event that you must call Martin Yale Support for help, please
have the software revision number available.

Enter diagnostics by pressing and holding the "Stop" button for sever-
al seconds.  Press number "1".  Use the "+" or "-" buttons to find
"Languages" in the menu.  Press "Enter".  Scroll through the list of
languages using the "+" or "-" buttons.
Press "Enter" to select.  Press the
"Stop" button twice to exit diagnostics.

After a few seconds, the display will
change again and read as follows:

Both fold tables will begin to move to their respective home positions.
This operation may take several sec-
onds.  Allow the folder to continue
without interruption until the display
changes.  Once the Fold Tables have
been homed, the display will toggle
between these 2 messages:

You will see the "Custom Fold Set" message anytime one of the Fold
Tables is in the Home position, or if the folder does not recognize the
Fold Table positions as a standard fold type, such as a custom fold.

Loading Paper

To load paper into the Feed Table, firmly push the Feed Table down,
until it locks into the "load" position as shown.
Load the paper into the Feed Table, making sure that the paper is

fully within the folder, and that the leading edge of the stack is resting
against the face indicated below.  Once the Feed Table has been
loaded with paper, the Feed Table must be unlocked, allowing the
Feed Table to return to the raised position.  To unlock the Feed Table,
press the Feed Table Release (see illustration below).

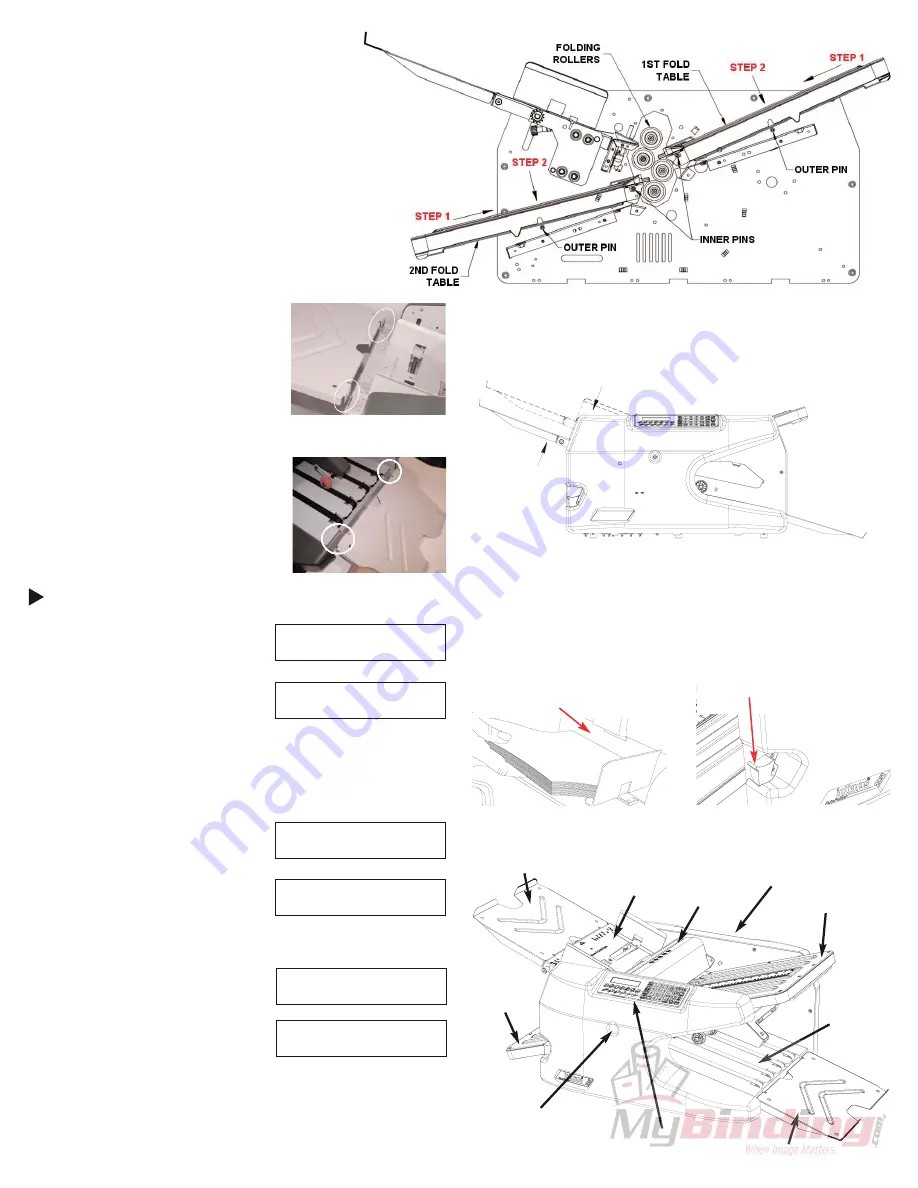
Fold Table Installation

To install the 1st Fold Table, refer to the illustration
below.  Step 1: slide the front slot opening of the fold
table onto the inner set of pins (closest to the folding
rollers).  Step 2: lower the fold table onto the outer
set of pins with a light amount of downward pressure
as shown.  There will be a slight snapping action as
the fold table drops into the detent position.  Repeat
Step 1 and Step 2 for 2nd Fold Table installation.

I

Intimus 2

2051 F

Folder

By M

Martin Y

Yale I

Ind.

Custom F

Fold S

Set

Qty D

Done =

=      0

0

Bypass R

Ready

Qty D

Done =

=      0

0

Homing F

Fold T

Tables

Please S

Stand B

By

Model 2

2051

Revision X

XX.XX

PUSH HERE ON FEED TABLE
TO LOCK INTO LOAD POSITION

LOAD POSITION

(6)

Stack must rest against 

this face!

Feed Table Release

Parts

Feed Table

Extension

De-jam Port

Operator Interface

Exit Conveyor

1st Fold Table

Multi-Sheet

Bypass

De-jam Handle

Storage

2nd Fold

Table

Extension

Language    +

+/-

English

Summary of Contents for Martin Yale 2051

Page 1: ...Martin Yale 2051 Smartfold Electronic Paper Folding Machine Instruction Manual...

Page 2: ...e d un port USB MISE EN GARDE Ne jamais brancher la machine sur r seau lectrique avant que vous ne soyez pr ts installer et faire fonctionner la plieuse Cet appareil contient des pi ces en mouvement...

Page 3: ...e dans sa position initiale ou si la plieuse ne reconna t pas les positions des poches de pliage comme un type de pliage standard mais comme un pliage personnalis Chargement du papier Afin de charger...

Page 4: ...pliage en appuyant plusieurs fois ou en maintenant la pression sur les touches de r glage pro gressif vous verrez les indicateurs bouger sur la poche de pliage corre spondante Les poches de pliage pe...

Page 5: ...e touche m morisera la configuration du pliage actuel sur un espace m moire Cette touche rappellera une configuration de pliage m moris e pr c demment Les programmes sont conserv s en m moire m me si...

Page 6: ...machine is USB Capable WARNING Never connect power to the machine until you are ready to set up and operate the folder This machine con tains moving parts During setup operation and maintenance keep h...

Page 7: ...es have been homed the display will toggle between these 2 messages You will see the Custom Fold Set message anytime one of the Fold Tables is in the Home position or if the folder does not recognize...

Page 8: ...d table buttons as you repeatedly press or hold down one of the Incremental Adjust Buttons you will see the indicators on the corresponding fold table move The fold tables can be positioned to a speci...

Page 9: ...nfiguration into a memory location This button will recall a previously stored folder con figuration Programs are maintained in memory even if the power is turned off or power is removed Once a progra...

Page 10: ...V AC 1 4 A 50 60Hz Tento p stroj lze p ipojit k USB V STRAHA Skl dac p stroj nikdy nep ipojovat k s ti dokud nejste p ipraveni ho instalovat a obsluhovat Tento p stroj obsahuje pohybliv d ly B hem in...

Page 11: ...d ch se displej op t zm n a zobraz se n sleduj c Oba skl dac stoly se za nou pohybovat do sv ch v choz ch poloh Tento proces m e trvat n kolik vte in Nechte skl dac p stroj pokra ovat bez p eru en a s...

Page 12: ...u a potom stiskn te tla tko bu nebo tla tka pro stup ovit nastaven Potom co opakovan stla te jedno z tla tek skl dac ho stolu nebo jedno z tla tek p idr te stla en uvid te jak se odpov daj c ukazatel...

Page 13: ...konfiguraci skl dac ho p stroje na jedno pam ov m sto Toto tla tko vyvol d ve ulo enou konfiguraci skl dac ho p stroje Programy z stanou ulo eny i kdy je p stroj vypnut nebo je vypnuto elektrick nap...

Page 14: ...4 Amperios 50 60Hz Esta m quina es apta a la conexi n a un puerto USB AVISO No conecte nunca la m quina a la red de corriente el ctrica hasta que sea capaz de ajustar y hacer funcionar la plegadora Es...

Page 15: ...si ci n inicial o bien si la plegadora no reconoce las posiciones de la bandeja de plegado como un tipo de plegado est ndar como por ejemplo en el caso de un plegado personalizado C mo colocar el pape...

Page 16: ...los botones de la bandeja de plegado pulsando repetida mente o sin haber soltado los botones de ajuste incrementales usted podr ver que los indicadores sobre la bandeja de plegado correspondiente se m...

Page 17: ...un programa Este bot n guardar la configuraci n actual de la plegado ra en una posici n de la memoria Este bot n consultar una configuraci n de la plegadora guardada previamente Los programas se mant...

Page 18: ...ger t niemals an Strom anschlie en bevor Sie bereit sind das Ger t aufzustellen und zu bedienen Dieses Ger t enth lt bewegliche Teile W hrend des Aufbaus des Betriebs und der Wartung H nde Haare lose...

Page 19: ...inden sich die Falztische in ihrer Ausgangsposition zeigt das Display abwechselnd diese beiden Meldungen Sie sehen Custom Fold Set Meldung sobald sich einer der Falztische in der Ausgangsposition befi...

Page 20: ...ur stufenweisen Einstellung Nachdem Sie eine der Falztisch Tasten wiederholt gedr ckt haben oder w hrend Sie eine der Tasten zur stufenweisen Einstellung gedr ckt halten sehen Sie wie sich die entspre...

Page 21: ...gramme bleiben auch gespeichert wenn das Ger t aus geschaltet wird oder der Strom abgeschaltet wird Sobald ein Programm an einem Speicherplatz gespeichert ist kann es nicht mehr gel scht werden Progra...

Reviews: