background image

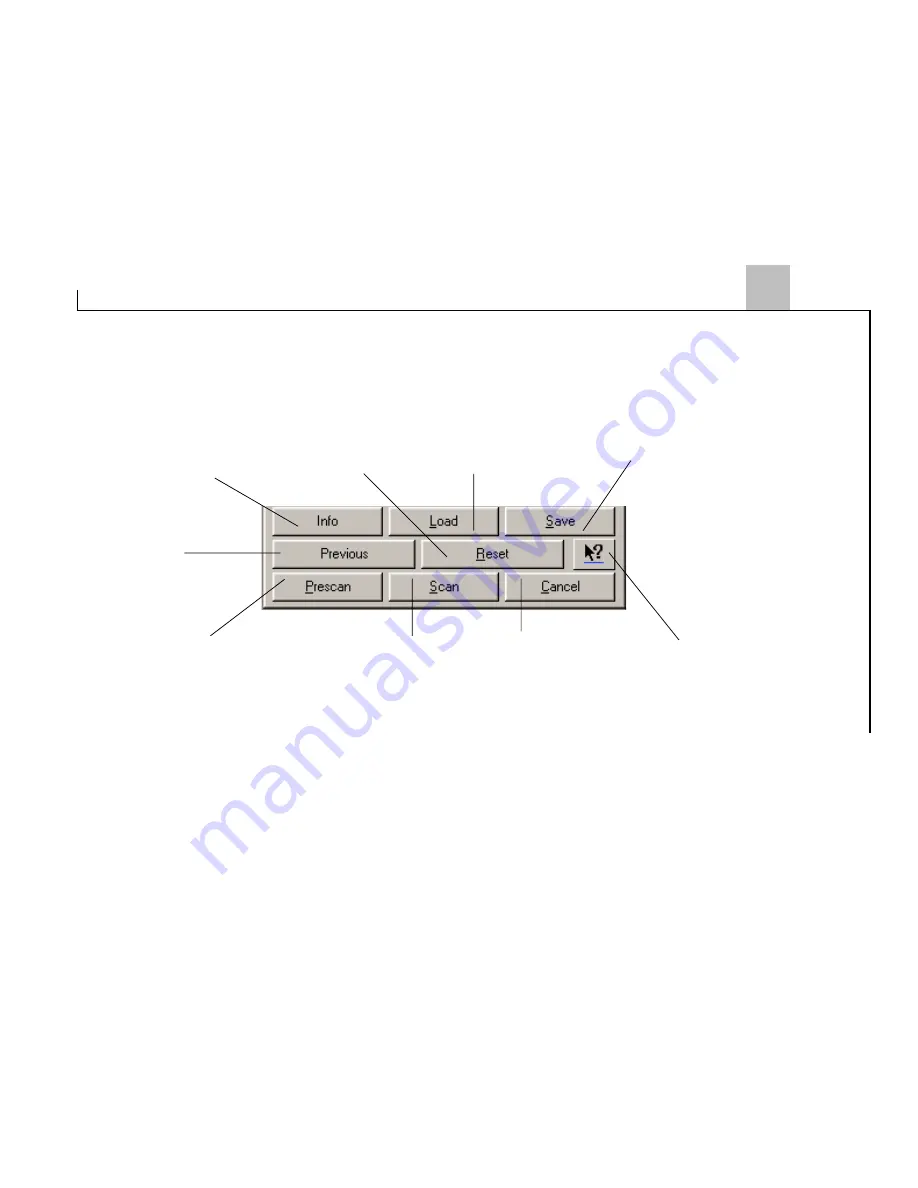
Info Button
Shows the current
control settings.

Load Button
Loads previously saved
settings.

Save Button
Saves current settings to
a file.

Previous Button
Sets settings to previous
values.

Prescan Button
Quickly scans the entire
document at a low
resolution.

Scan Button
Executes the scan
operation.

Cancel Button
Closes the
TWAIN dialog box.

Quick Help Button
Click on this button and
then click on any item on
the dialog box to get a
brief description.

Reset Button
Returns settings to their
default values.

13

Summary of Contents for Paragon 1200A3Pro

Page 1: ...in Folder 2 12 The Enhancement Folder 2 14 The Preview Window 2 16 Prescan the Image 2 17 Set Up the Scan Parameters 2 17 Execute the Scan Command 2 18 Using the Scanner Driver 3 19 Scanner Features 3 19 Scan Modes 3 19 The TWAIN Driver 3 20 The Dialog Box 3 20 The Preview Window 3 21 The Preview Window Buttons 3 21 Control Settings 3 22 Scan Mode 3 23 Resolution 3 24 Destination 3 24 Quality Fact...

Page 2: ...aving Feature A 32 To Return to the Scanning Mode A 32 Appendix B A 34 Appendix C A 35 Cleaning Procedures A 35 Determining Error Messages A 35 LED Ready Indicator Messages A 35 Other Troubleshooting A 35 Appendix E Technical Support A 36 ...

Page 3: ...ashes momentarily and then remains lit Document Cover Scan Window Glass LED Power Indicator Carriage Lock LED Ready Indicator Power Button Setting Up the Scanner System Requirements IBM PC AT with a 200 MHz Pentium based prosessor or better 64MB system memory minimum VGA Super VGA high color or true color graphics card and appropriate monitor Windows 98 or higher Unpacking the Scanner Carefully un...

Page 4: ...ransparency Adapter Port This 15 pin port is for connecting an optional transparency adapter Carriage Lock The carriage lock prevents the scanner s internal mechanism from moving during shipment Unlock the scanner before using and re lock it when shipping the scanner UnlockingtheScanner In the rear of the scanner is a carriage lock that protects the scanning mechanism during shipping To prevent ca...

Page 5: ... do so may cause damage to the unit s scanning mechanism To lock the scanner push the carriage lock down as shown in the illustration Installing the Scanner to a PC 1 Power off and open the computer 2 Select an empty slot and remove its back plate 3 Remove the interface card from the anti static bag Lock Unlock ...

Page 6: ...stalled the scanner driver 5 Connect one end of the scanner cable to the scanner and tighten the retaining screws Do not use non SCSI cables to connect your scanner 6 Connect the other end of the scanner cable to the interface card you installed and also tighten the screws 7 Connect the power cable to the scanner and plug it into an appropriate power outlet ...

Page 7: ...5 5 8 Power on the scanner and wait until the ready light stops flashing and remains lit 9 Power on the computer 10 Install the scanner driver by referring to the next section ...

Page 8: ... CD into your disk drive 2 Follow all on screen instructions If after inserting the Driver Installation CD into your disk drive the Driver Installation Welcome screen does not appear do the following a Click on Start and select Run b In the Run dialog box type drive setup where drive is your CD ROM drive and click OK c Follow all on screen instructions When presented with the option of whether to ...

Page 9: ...steps described Configuring the Software In order to scan with your scanner driver you must first configure the TWAIN compliant application software that came with your scanner or which was purchased separately The configuration process only has to be done once After the configuration process is complete the TWAIN driver will control all interactions between your scanner and the host program To co...

Page 10: ...choose Select Source to display the Select Source dialog box 5 From the list of sources choose your scanner as your image source and click Select You will return to the main screen of the host application Software configuration is now complete ...

Page 11: ...t until the computer finishes booting Position the Document For the best possible image scans it is important that you position your documents correctly and carefully For this tutorial use a paper based document such as a color photograph Procedures for document positioning are as follows 1 Lift the scanner document cover 2 Place the document face down on the glass and in the upper left corner 3 S...

Page 12: ...st TWAIN compliant software e g Photoshop 3 Call up the TWAIN Data Source by selecting Acquire from the File menu In some programs the Acquire command will appear in a submenu under the Import command The TWAIN dialog box will appear The TWAIN dialog box contains control settings which you must set prior to scanning a document The basic steps to scan a document are 1 Prescan the document 2 Set the...

Page 13: ...wo sections the left section where most of the control settings are located and the right section which is the Preview Window Folders Contain different control settings Preview Window Used for viewing the prescan image and selecting the final scan area 11 ...

Page 14: ...ulting scanned Output Matching Activates Calibrator Width and Length Show the dimensions of the image area inside the Crop Frame Output Scaling Changes the dimensions of the final output Calibrator Icon Displays the color calibration dialog box Quality Factor Enabled only if a halftone printer is the destination Sets the desired quality for printed output Descreen Sets the media type of the docume...

Page 15: ... Sets settings to previous values Prescan Button Quickly scans the entire document at a low resolution Scan Button Executes the scan operation Cancel Button Closes the TWAIN dialog box Quick Help Button Click on this button and then click on any item on the dialog box to get a brief description Reset Button Returns settings to their default values 13 ...

Page 16: ...ount of brightness in the image Shadow Control Adjusts the overall amount of shadows in the image Gamma Control Adjusts the brightness level in the highlights midtones and shadows of the image Next Page Button Displays additional control settings Available only for color images Histogram Button Adjusts the histogram Auto Button Sets the highlights and shadows based on the histogram Preview Button ...

Page 17: ...rol settings of the previous page Color Balance Controls Are used to intensify the colors of the image to the desired color spectrum None No filter is applied Invert Reverses an image to its negative or compliment Flip Creates a mirror image of the original Blur or Blur More Smooths or softens the image Emboss Makes the elements in the image appear raised or sunken Sharpen or Sharpen More Enhances...

Page 18: ...ow Eyedropper Button Sets the shadow level to the pixel under the mouse cursor Highlight Eyedropper Button Sets the highlight level to the pixel under the mouse cursor Zoom Tool Button Magnifies the image in the Preview Window Single Scan Button Allows only one Crop Frame or scan region Preview Resolution Button Sets the resolution of the preview image to high or low Final scan image is not affect...

Page 19: ...he desired length and width To move the entire Crop Frame position the mouse cursor inside it and drag with the left mouse button Only the area inside the Crop Frame will be included in the resulting scanned image when you click Scan The size information at the bottom of the dialog box is automatically updated when the Crop Frame is resized 2 Select the desired scan mode The Scan Mode determines h...

Page 20: ...printer or choosing Cont Tone Printer means you wish to output the image to a dye sublimation printer Execute the Scan Command When you are finished with the control settings click on the Scan button The scanner begins to scan the document and a message box appears on the screen displaying the progress of the scan When the scan is finished the image will be displayed in the main screen of the host...

Page 21: ...an modes can reproduce your documents into six types of images 36 bit color images 24 bit color images CMYK 8 bit grayscale images 8 bit fast gray images and 1 bit text or line art images The choice of scan mode and image type depends on your output require ments and system configuration 36 Bit Color This scan mode captures 36 bits of color image information for every pixel in the screen image Rep...

Page 22: ...de are rendered with up to 256 shades of gray Text Line Art 1 Bit Images scanned in 1 Bit Text Line Art have absolutely no shading only black and white This scan mode is best used with text images for OCR and graphics with only black and white areas The TWAIN Driver The TWAIN driver is the scanning module provided with your scanner TWAIN is an industry standard that allows scanning directly into a...

Page 23: ... dialog box appears The dialog box consists of two sections the left section where most of the control settings are found and the right section which is the Preview window The Preview Window The Preview window is where you can view the prescan image The first time you want to scan a document it is better that you do a prescan With the prescan image you can then specify the final image area to be i...

Page 24: ...he desired length and width To move the entire Crop Frame position the mouse cursor inside it and drag with the left mouse button Zoom Tool Button Clicking on the Zoom tool button magnifies the image in the Preview window This allows you to position the Crop Frame with precision Highlight Eyedropper Button Selecting the Highlight Eyedropper button and clicking on a pixel in the preview image sets ...

Page 25: ...xel or over 16 7 million colors CMYK When you wish to output your scanned image to a color printer you can use this mode to convert a three channel image i e RGB into a four channel CMYK Cyan Magenta Yellow and BlacK image Only Adobe Photoshop 3 0 or later currently supports this image type 36 Bit Color This mode is the scanners s highest setting for capturing color images and is only available if...

Page 26: ...dialog box where you can set a specific dpi setting Destination The Destination is for selecting the output device you will use for the scanned image Choose Monitor default if you want to display the image on the computer screen Choose Halftone Printer if you want to print the scanned image using a halftone printer e g laser and inkjet printers or choose Cont Tone Printer if your output device is ...

Page 27: ...alibrator for more details Width and Length The Width and Length values show the dimensions of the image area inside the Crop Frame in the Preview window If you want to you can change the measurement unit to inches pixels centimeters or millimeters Output Scaling Output Scaling enables you to enlarge the size of the final output image For example setting the Output Scaling to 200 will enlarge the ...

Page 28: ...ge the channels individually or choose Master to change all channels equally and simultaneously A grayscale image has only one channel Highlight Control The Highlight control allows you to adjust the overall amount of brightness in the image Shadow Control The Shadow control allows you to adjust the overall amount of shadows in the image Gamma Control The Gamma control is used for adjusting the br...

Page 29: ...Note This arrow will not show if the prescan image is not in color The second page of the Enhancement folder contains the same thumbnails of the prescan image a color wheel and additional control settings for adjusting the color balance and saturation Color Balance Control The Color Balance control has three settings The Cyan to Red Magenta to Green and the Yellow to Blue By dragging any of the sc...

Page 30: ...lter is applied This is the default setting Invert The Invert filter reverses an image to its negative or compliment Flip The Flip filter creates a mirror image of the original by flipping the image horizontally Blur and Blur More The Blur and Blur More filters smooth the image by lightening the pixels that are in sharp contrast to their neighboring pixels Sharpen and Sharpen More The Sharpen and ...

Page 31: ...using different combinations of scan modes and resolutions To activate batch scanning click on the Batch Scan button This will bring up the Batch Scan dialog box The Batch Scan Dialog Box The Batch Scan dialog box contains several controls that make batch scanning simple and easy to use It will also display the number of batch jobs that you make when you create the scan regions Scan to File Check ...

Page 32: ... to name the selected or highlighted batch job Cancel Batch Button Click on this button to cancel batch scan and exit the Batch Scan dialog box Trash Batch Button Click on this button to delete the selected or highlighted batch job To do a batch scan the steps are 1 Click the Batch Scan button The Batch Scan dialog box appears 2 Create a scan region a Move the cursor inside the preview window b Ho...

Page 33: ... regular scanning mode Batch Scan auto detects the borders of the images or paper edges of the documents allowing you the option of scanning any or all of these images documents without having to manually select and scan them individually as required in the regular mode 31 ...

Page 34: ...in menu select the power function button 2 In the dialog box that appears enter the amount of elapsed time the scanner is idle before the power saving feature engages This feature powers down the scanning lamp but keeps the scanner in a power saving ready mode To Return to the Scanning Mode 1 To re engage the scanner to the regular power mode simply click the scanner toolbar or the scanner icon 32...

Page 35: ...loadable by software Brightness Control 255 adjustable steps software controlled Contrast Control 255 adjustable steps software controlled Host Interface Built in SCSI port for Microsoft Windows PC Data Transmission Connector50 pin SCSI connector Transparency Adapter Port 15 pins Light Source Double Cold Cathode lamp Dimensions 695mm x 500mm x 125mm 23 x 14 8 x 5 5 inches L x W x H Weight 16 kg Vo...

Page 36: ...ound by sharp staples or paper clips on the scan window glass Scratches on the glass will show up as unwanted marks in scanned images Don t open the scanner case because there is danger of electrical shock and there are no customer serviceable parts inside For servicing needs call your scanner dealer for assistance Cleaning Procedures 1 Power off the scanner and disconnect the power cord 2 Gently ...

Page 37: ...ed on 2 Make sure the scanner is unlocked The carriage lock is located at the right side of the scanner housing Drive the carriage lock counter clockwise to horizontal to release the carriage 3 If the scanned image appears dark check if the scanner lamp is on If you need a lamp replacement contact your scanner dealer or The Technical Support See Appendix E for more details 4 If you turned on the s...

Page 38: ... paid prepared and packaged appropriately for safe shipment To bring you the best possible service please have the following information ready when you call Which scanner model do you have Which computer model are you using What version of scanning software and firmware do you have What other application programs are you using What other components are in your system For example FAX card sound car...

Reviews: