


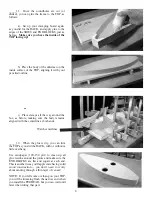


_____10. Set the body aside so you can plan the placement of your sound holes. Center the FRETBOARD on the
centerline and mark its outline on the inside of the TOP also. The FRETBOARD need not span the entire length of
the body, so don’t worry if it seems a little short.
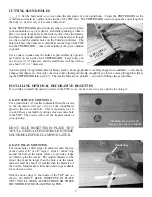
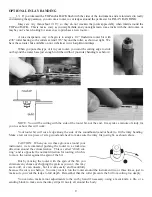
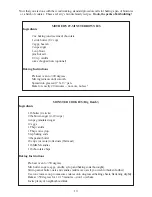
2) EASY INLAY MOUNTING
Cut round holes a little larger in diameter than the size
of the rosette (1/8” or 1/4” larger). Glue a “donut” ring
around the hole on the inside surface to provide a ledge
on which to glue the rosette. The outside diameter of the
donut ring must be larger than the hole, and the inside
diameter must be about 1/4” smaller than the diameter of
the rosette. Musicmaker’s Kits has donut rings available
for each size rosette.
Glue the donut rings to the inside of the TOP now, as
shown, but DON’T GLUE ROSETTES IN PLACE
YET! YOU’LL NEED ACCESS THROUGH THESE
SOUNDHOLES FOR CLAMPING LATER.
1) EASY SURFACE MOUNTING
Cut a round hole 1/4” smaller in diameter than the rosette
so the decoration will rest on top of the soundboard,
glued to the rim of the hole. This is especially nice if
you don’t have a method for cutting a clean accurate hole
in the TOP. The rosette will cover the imperfections of
your opening.
INSTALLING OPTIONAL DECORATIVE ROSETTES
If you’d like to install decorative rosettes in the TOP, as we do, here are two easy options for doing it:
inside surface
of TOP
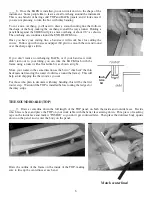
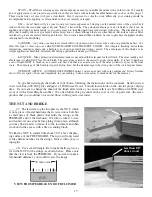
CUTTING SOUND HOLES
Set the FRETBOARD aside and decide where you want to place
your sound holes (see cover photo). Generally speaking, we like to
place two fairly large holes at the widest point of the instrument,
and then cut optional smaller holes closer to the head end, though
we often omit the smaller holes on the Teardrop dulcimer. The
holes look best when they are centerd between the edge of the TOP
and the FRETBOARD -- thus in the middle of the space outlined
in pencil.
Use a square to make sure the holes are placed directly opposite
each other on each side of the FRETBOARD. Large holes can
be as big as 2-1/2” diameter, and the small holes look best if they
are about 3/4” to 1” diameter.
medium size rosettes fit
nicely in the space available
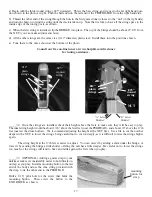
DON’T GLUE ROSETTES IN PLACE YET!
YOU’LL NEED ACCESS THROUGH THESE
SOUNDHOLES FOR CLAMPING LATER.
donut ring
You have plenty of opportunity here for being creative. Some people like to cut fancy shapes for soundholes -- ovals, hearts,
f-shapes, leaf shapes, etc. Our only concern is to have the larger holes big enough for you to fit a c-clamp through for clamp-
ing the FRETBOARD later (step 23). The smaller holes are no problem -- no need for fitting clamps into them.
7


