


MUSICMAKER’S KITS INC
P.O. BOX 2117
STILLWATER, MN 55082
(651) 439-9120
www.harpkit.com
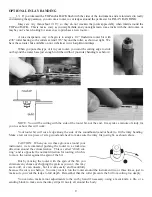
D. If a string rattles or buzzes at just one or two positions (frets), or if you discover that two or three frets
all give the same pitch, then look for a fret that stands up higher than its neighbors. You will need to either tap that
fret back down into its slot in the fretboard or use the long flat file to level the tops of the frets some more. Just
loosen the strings, lift them out of the grooves in the nut, and hold them along either side of the fingerboard as you
work the file lengthwise along the tops of the frets. You can easily see which frets are the highest, as they are the
ones that receive the most filing.
CONGRATULATIONS! You have successfully completed making a mountain dulcimer that should give you many
years of musical satisfaction. We hope you have enjoyed the project. Don’t hesitate to contact us for any further
help that you may need. We also appreciate hearing suggestions and hints that you think might help a future kit-
builder.
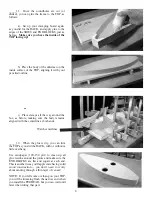
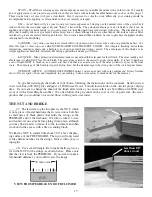
_____34. Fine adjustments can be made in the placement of the BRIDGE to make sure the dulcimer plays perfectly
in tune. The measurement given earlier (27-1/8”) should be very close to the exact placement, but some variations
may occur depending upon final string height and string thickness.
The technique for finding the exact location of the bridge requires a good musical ear or an electronic tuner.
Test the accuracy of the octave note by plucking a string with one hand while pressing it to the 8th space from the nut
with the other hand. That note should sound exactly one octave above the same string when plucked in the “open”
position (vibrating at full length).
If the octave note is a little too high (sharp), then slide the bridge a little toward the tail of the instrument. If
the octave sounds too low (flat) compared to the open string, then slide the bridge toward the strum hollow. Make
adjustments until you find the correct placement, then mark that location on the fretboard with a pencil in case the
bridge gets bumped out of position in the future.
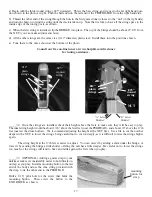
_____35. There may be some other fine adjustments needed to make your dulcimer work its best. Test each string
by plucking it with one hand while you press it down at each playing position (fret) along the neck. Here is what
to check for:
A. If the string is difficult to push all the way to the fretboard, it is too high. Filing the grooves deeper in
the NUT will lower the string at the head end, and sanding the underside of the BRIDGE will lower the strings near
the middle of the instrument.
B. If a string buzzes when plucked in the OPEN POSITION ONLY (when not held down to a fret), then
the notch in the NUT is too deep -- the string is probably buzzing against the first fret. You’ll need to loosen the
strings, knock the NUT loose and glue it back with a thin shim under it (even just gluing it back again will raise it a
little because of the additional layer of glue build-up).
C. If your strings buzz and rattle in general as you play, sight down the FRETBOARD first to make sure it is
not humped up in the middle. Let us know if you encounter this problem. If the FRETBOARD is reasonably level,
then you simply need to shim up the BRIDGE to raise the strings a little more, giving them more room to vibrate.
TROUBLESHOOTING
18


