Musicmakers Mountain Dulcimer KIT Assembly Instructions Manual Download Page 6

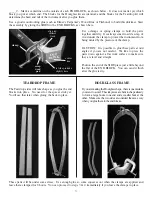
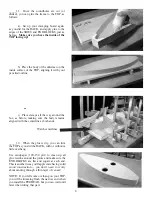
_____8.  Once the BACK is installed, you can trim it down to the shape of the 

instrument.  Some people like to leave a small overhang around the instrument.  

This is one benefit of having solid TOP and BACK panels, and it looks nice if 

you are not planning to trim the box with inlay banding. 

To cut a nice overhang, you’ll need to draw a smooth cutting line that follows 

the shape of the body, making the overhang even all the way around.  Holding a 

pencil flat against the SIDES will give a nice overhang of about 1/8”, as shown.  

The overhang can continue around the END BLOCKS too.

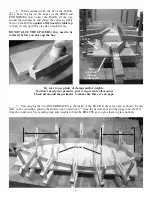
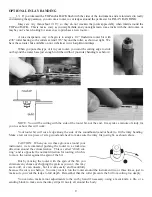
Once you have your cutting line, a band saw will work best for cutting the 

curves.  Follow up with coarse sandpaper (80 grit) to smooth the cut and round 

over the sharp edges a little. 

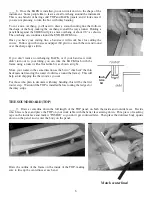
If you don’t want an overhanging BACK, or if your band saw work 

didn’t turn out to your liking, you can trim the BACK flush with the 

frame using a router with a flush-trim bit, as shown at right.  

Move your router in the same direction as the bit to “climb cut” the thin 

back material (moving the router clockwise around the frame).  This will 

help avoid chipping the the wood as you cut.

For those who plan to decorate with inlay banding, this will be the first 

router step.  Wait until the TOP is installed before routing the ledges for 

the inlay strips.

THE SOUNDBOARD (TOP)

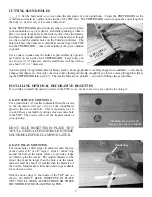
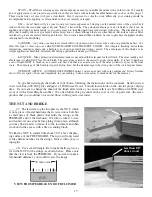
_____9.  Draw a centerline down the full length of the TOP panel, on both the inside and outside faces.  Decide 

which face is best, and place the TOP on your work table with the better face aiming down.  Put a piece of masking 

tape on the inside face and mark it “INSIDE” so you don’t get confused later.  Then place the dulcimer body upside 

down on the panel  and center the body on the panel.

Draw the outline of the frame on the inside of the TOP, making 

sure to line up the centerlines at each end.

flush

trim

bit

Match centerlines!

6

Summary of Contents for Mountain Dulcimer KIT

Page 1: ...651 439 9120 www harpkit com Mountain Dulcimer KIT ...

Page 2: ...ill be packed with the appropriate tuners _____1 Please take the time to check over the parts of your kit now to make sure everything is there If you discover a problem call us right away so we can rectify it quickly without causing you much delay in your project We also suggest skimming through the entire directions before beginning just to get an overview of the project You may decide that you n...

Page 3: ...of wood under the clamp to protect the instrument from being dented by the pressure of the clamp CAUTION It is possible to glue these parts at odd angles if you are not careful We like to press the parts down against a flat work surface to make sure they are level and straight Position the end of the SIDE piece just a little beyond the flat of the END BLOCK You can sand it flush after the glue is ...

Page 4: ...The single spacer for the Teardrop kit can be pushed toward one end or the other to shift the center of the bout one way or the other Just be careful to avoid spreading the SIDES too far apart to fit the TOP and BACK We like to keep the instrument no wider than about 9 1 2 at the widest point The three spacers for the Hourglass kit will force the SIDES into position without much room for adjustmen...

Page 5: ...and the longer one about 11 from the wider end Use masking tape and weights to hold the BRACES as you glue them in place until dry flat plywood support underneath BACK braces _____6 When satisfied with the fit of the BACK put a bead of glue on the edges of the SIDES and END BLOCKS that contact the BACK all the way around the instrument and clamp the entire assembly down on the BACK against a flat ...

Page 6: ...n t turn out to your liking you can trim the BACK flush with the frame using a router with a flush trim bit as shown at right Move your router in the same direction as the bit to climb cut the thin back material moving the router clockwise around the frame This will help avoid chipping the the wood as you cut For those who plan to decorate with inlay banding this will be the first router step Wait...

Page 7: ...opening INSTALLING OPTIONAL DECORATIVE ROSETTES If you d like to install decorative rosettes in the TOP as we do here are two easy options for doing it inside surface of TOP CUTTING SOUND HOLES Set the FRETBOARD aside and decide where you want to place your sound holes see cover photo Generally speaking we like to place two fairly large holes at the widest point of the instrument and then cut opti...

Page 8: ...ure the body remains aligned with the centerline at both ends Watch centerlines _____12 When the glue is dry you can trim the TOP as you did the BACK with or without a little overhang Use sandpaper 120 150 grit to clean up all glue residue around the joints and make sure the END BLOCKS are flat and square at each end This is another time you ll appreciate having solid wood construction you don t n...

Page 9: ...cutters extend 1 16 beyond the roller as shown at right We have these router bits available on our website at www harpkit com inlays When you put athis type of it in your router you want the cutting edge to stick out beyond the router base just enough to fit the width of your inlay banding see below CAUTION When you cut these grooves around your instrument we recommend pushing the router in a cloc...

Page 10: ...D _____15 OPTIONAL Most people like to mark certain spaces on the FRETBOARD to guide their playing We provide 1 4 diameter PEARL DOTS for this purpose but you may choose to do something more or less ornate if you like Here s how to install the dots Find the centers of the spaces in your FRETBOARD corresponding to the dots in the diagram below Punch mark the wood to help keep your drill from wander...

Page 11: ...in the same way and so on until all frets are installed _____18 File or sand the ragged ends of the frets down until they are smooth and flush with the sides of the FRETBOARD If you happen to have access to a belt sander you ll find it very helpful for this part of the project The fretwire is soft enough metal to work very easily with a sanding belt Be careful however not to gouge the edge of the ...

Page 12: ...flush to the END BLOCK and then switch to a sharp razor knife to make the longer cut across the grain Several passes should get through it and you can clean up any roughness with a file or sanding block Obviously if you trimmed your TOP panel flush with the END BLOCK earlier you can skip this step b Test the fit of the PEGHEAD to the END BLOCK as shown in these photos showing various perspectives ...

Page 13: ... this page to see how we clamp the FRETBOARD in place Don t be tempted to add more clamps in the middle you d end up pressing the TOP down and making the FRETBOARD and TOP concave This is all the clamping pressure you need When you have everything ready apply glue to the underside of the FRETBOARD only on the flat areas that will contact the TOP of the instrument as shown and clamp the FRETBOARD i...

Page 14: ...tboard to avoid getting varnish or lacquer on the playing surface because it can get gummy under the fingers as you play After the finish dries you can remove the tape and wipe one light coat of Linseed Oil on the playing surface INSTALLING ROSETTES OPTIONAL _____25 If you prepared your sound holes for rosettes now is a good time to glue those in place before applying the finish Test the rosettes ...

Page 15: ...It is best to purchase a can of liquid DEFT to brush on as a sealer coat first and then use an aerosol can of the same product to spray on the final coats The advantage of this finish is its quick drying time but the disadvantage is the strong odor of the toxic lacquer fumes OUR BEST ADVICE AVOID GLOSS FINISHES unless you are an expert with spray equipment Glossy finishes show off every speck of d...

Page 16: ...n drill 1 16 pilot holes for the tiny screws in the back side taking care not to drill all the way through the PEGHEAD INSTALLING STRINGS _____31 Now you can install the strings Attach each string to the dulcimer by slipping the ball end into the hole near the tail end of the FRETBOARD and poking it in to about the proper depth to line up with the notches in the BRIDGE We like hiding the ends of t...

Page 17: ...s are installed check their height above the frets to make sure they will be easy to play The ideal string height would be about 1 16 above the first fret near the PEGHEAD and about 1 8 above the 17th fret nearest the strum hollow We recommend adjusting the height at the NUT first Use a file to cut the notches deeper in the NUT to lower the strings being careful not to cut too deeply as it is diff...

Page 18: ...om the nut with the other hand That note should sound exactly one octave above the same string when plucked in the open position vibrating at full length If the octave note is a little too high sharp then slide the bridge a little toward the tail of the instrument If the octave sounds too low flat compared to the open string then slide the bridge toward the strum hollow Make adjustments until you ...

Page 19: ... 13 pan Bake for exactly 29 minutes no more no less MONSTER COOKIES Big Batch Ingredients 1 lb butter 4 sticks 2 lbs brown sugar 4 2 3 cups 4 cups granulated sugar 12 eggs 1 Tbsp vanilla 1 Tbsp corn syrup 8 tsp baking soda 3 lbs peanut butter 18 cups or more rolled oats Oatmeal 1 lb M M candies 1 lb chocolate chips Baking Instructions Pre heat oven to 350 degrees Mix butter sugars eggs vanilla syr...

Page 20: ...you have fun right from the start We like the CD and DVD included in this package to give you auditory and visual reinforcement Complete Children s Dulcimer Method by Mara Washburn The mountain dulcimer is especially well suited for children to learn Dr Washburn filled this book with good old favorites that children have loved to sing through the ages She starts off with just melody lines showing ...

Reviews: