


R1.
POWER
ON/OFF button
R2.
ZOOM
: To access the zoom
function
R3.
SUBTITLE
: To change the
subtitle setting( HDTV mode)
R4.
REC
: Record button
R5.
◄
,
►
,
▲
,
▼
: To navigate
through the on-screen menu.
◄
: Volume down (during
playback)
►
: Volume up (during playback)
ENTER
: To confirm the selection.
R6.
SETUP
: To enter the Setup menu
R7.
FAV
: To show your favorite
channel (for HDTV mode)
R8.
TV/RADIO
: To switch between
TV and radio channels (for HDTV
mode)
R9.
EXIT
: To exit current menu and
return to previous menu
R10.
DISPLAY
: To display the
informaion of current signal.
R11.
VOL+/-
: To adjust volume.
R12.
SOURCE
: To fast access
USB mode when watching TV
program.
R13.
0…9
: Number entry
R14.
MUTE
: To mute or restore sound.
R15.
REPEAT
: To select playmode: repeat one, repeat all and random.
R16.
MODE
: To adjust LCD setup (Brightness, Contrast or Colour) and standby time.
R17.
AUDIO
: To select different sound mode
R18. : Play /pause
R19. : stop button
R20. Return button
R21.
EPG (Electronic program guide)
: To show the preview of the program picture (for
HDTV mode)
R22.
TTX
: To turn on / off the teletext information (for HDTV mode)
R23.
/
: To go to previous or next option.
R24.
/
: To start reverse or forward accelerated playback.
R25. Color buttons (
red, green, yellow, blue
): To activates the function according to
different color shows on the display.
M-335 TV
GB - 1
Please read the instruction carefully
before operating the unit.
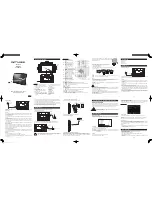
LOCATION OF CONTROLS
Main Unit
GB - 2
GB - 3
GB - 6
GB - 7
GB - 8
GB - 5
Portable TV
User Manual
REPLACING BATTERY FOR THE REMOTE CONTROL
1. Push the button toward right.
2. Pull the battery loader out.
3. Insert one “CR2025” size battery with the positive side (+) facing up.
4. Replace the cover.
The remote control operates on 1pc “CR2025” lithium battery
(included). To power up the remote control, remove the insulation
tab from the back of unit.
Remote control
GB - 9
GB - 4
Before throwing any batteries away, consult your distributor who may be
able to take them back for specific recycling.
NOTES:
- Never recharge the batteries, apply heat to them or take them apart.
- If the remote control is not going to be used for a long time, remove the battery to avoid
damage caused by battery leakage corrosion.
CAUTION:
Danger of explosion if battery is incorrectly replaced. Replace only with the
same or equivalent type.
WARNING
Do not ingest the battery, Chemical Burn Hazard
(The remote control supplied with) This product contains a coin/ button cell battery. If
the coin/ button cell battery is swallowed, it can cause severe internal burns in just 2
hours and can lead to death.
Keep new and used batteries away from children.
If the battery compartment does not close securely, stop using the product and keep it
away from children.
If you think batteries might have been swallowed or placed inside any part of the body,
seek immediate medical attention.
ACCESSORIES
Remote control x1
AC adapter x1
Car plug x1
DVB-T antenna x1
The supplied AC adaptor is suitable for use on AC mains supplies of 100-240V AC and
should only be connected to a mains supply within these parameters.
Cautions:
• The AC adaptor included with this unit is for its use only. Do not use it with other
equipment.
• Turn off the unit before unplugging the AC adaptor from the unit so as to avoid the unit
being damaged.
• When the unit is not going to be used for long time, disconnect the AC adaptor from
the AC outlet.
• Be sure to use it near the wall outlet and easily accessible. If a malfunction occurs,
disconnect the plug from the wall outlet at once.
• AC adaptor is used as the disconnect device. It shall remain readily operable and should
not be obstructed during intended use. To be completely disconnected the apparatus
from supply mains, the AC adaptor of the apparatus shall be disconnected from the
mains socket outlet completely.
• Never use an AC adaptor that is damaged, route power lead in a safe manner and
make sure it is not subjected to trapping or pinching. If the power lead is damaged refer
to a qualified service agent.
POWER SUPPLY
Using the AC adaptor
Using car plug
CONNECTIONS
Disconnect all devices from the main supply before connecting.
1. Connecting external antenna
* Connect with DVB-T antenna (for outdoor reception)
* Connect with 75 ohm transferring antenna cable (for indoor cable TV)
Connect the the 75 ohm antenna cable (not included) to public antenna for TV.
2. Connecting the A/V cable (not included)
Note: AV OUT is only available in HDTV or USB Mode.
3. Connecting to the Amplifier
4. HDMI (High Definition Multimedia Interface)
The high definition image and sound can be transferred to the external TV. Use the
HDMI cable (not included ) to connect the portable TV to the external TV which has
HDMI input jack. Select “RAW HDMI ON” under “OPTION” in setup menu on portable
TV. Then enable HDMI input signal on your external TV.
If you connect the DVB-T antenna, set the antenna setting “ON”. While
connect 75ohm transferring antenna, set the antenna setting “OFF”. (Refer
to the “DVB-T SETUP MENU/ Channel Search”.)
USING HEADPHONES / EARPHONES (NOT INCLUDED)
Maximum output voltage ≤ 150mV
HEADPHONE VOLUME WARNING
Connect earphones with the volume set low and increase it if required. Prolonged listening
through some earphones at high volume settings can result in hearing damage. When
headphones/earphones are connected, no sound will be emitted from the unit’s speaker.
Caution: Avoid listening to sound at levels which may be harmful to your ears.
BASIC OPERATION
MODE MENU SETTING
To adjust LCD setup (Brightness, Contrast or Colour) and Standby time, press
MODE
button when watching a program (in HDTV mode) or playing audio/video file in USB.
* STANDBY
This function allows you to select the standby setting:
OFF
: The unit will not switch to standby mode.
3H (HOURS)
: If no button is pressed within 3 hours, the unit will switch to standby mode
automatically.
4H (HOURS)
: If no button is pressed within 4 hours, the unit will switch to standby mode
automatically.
* RESET
To restore the mode menu setting to default setting.
Select “RESET”, then press
►
button.
FIRST TIME INSTALLATION
After all connections have been made properly, switch on the TV. Slide the
ON/OFF
switch to
ON
position to turn on the unit. If you are using the TV for the first time or just
restored it to factory default, the Main Menu will appear on your TV screen.
Navigating the setup menu
1. Press
SETUP
to display the setup main menu in HDTV mode.
2. Press ◄ / ► to select a menu icon.
3. Press ▲/▼ to select one of the available options under a menu icon.
4. Press ► to select an option.
5. Press
EXIT
to return to menu icon selection, press
EXIT
again to exit from the setup
menu.
OSD Language
Press ▲/▼ to select [OSD Language] and press ◄ , ► to select an language.
Country
Press ▲/▼ to select [Country] and press ◄ , ► to select your country of residence.
Note: Less or no channel could be received if “Country” setting is incorrect.
Channel Search
Press ▲/▼ to select [Channel Search] and press ► or
ENTER
to begin Automatic channel
search. Once channel tuning is complete, you are now ready to watch TV.
If no channel is found during the channel searching process, to adjust the antenna position
to obtain optimal TV signal.
Note
:
* If installation has been already finished or the program list is not empty, installation
guide may not appear.
* The settings could be modified in DVB-T menu.
DVB-T SETUP MENU
English
WARNING: Disconnect this car power adaptor when not in use. Not for use in
24V vehicles.
Cautions
• Use only the included 12V car power adaptor. Use of any other 12V car power adaptor
could damage the unit.
• The 12V car power adaptor included is for use with this unit only. Do not use it with
any other equipment.
• In the interest of traffic safety, drivers should not operate the unit or view videos while
driving.
• Make sure the unit is fastened correctly to prevent from falling in the vehicle in the
event of an accident.
• When the inside of the cigarette lighter socket is dirty with ashes or dust, the plug
section may become hot due to poor contact. Be sure to clean the cigarette lighter
socket before use.
• After use, disconnect the car power adaptor from both the unit and cigarette lighter socket.
SAFETY WARNING!
On no account should this unit be used by the driver of a moving motor vehicle, or left
unsecured in the vehicle whilst driving. If this unit is being used by a passenger in your
vehicle, be sure that it is secured or held safely, and does not obstruct any safety device
(i.e. airbag, seat belt etc.) that is fitted.
Using the Built-in battery
The unit has a built-in rechargeable battery (lithium-ion). Charge the built-in battery before
using it for the first time. The charging indicator will change from red to green when the
battery becomes fully charged.
Warnings:
• To charge the battery, just connect the AC adaptor.
• Recharge the built-in battery when you are ready to use it again.
• While using the built-in battery, the environmental temperature should be 5°C (41°F)
to 35°C (95°F).
• To get the longest service life of the built-in battery, charge at indoor-temperature.
• The built-in battery in this device may present a risk of fire or chemical burn if mistreated.
Do not disassemble, heat above 100°C (212°F), or incinerate.
• The unit should not be exposed to excessive heat such as sunshine, fire or the like.
• When discarding the unit, environmental problems must be considered and local rules
or laws governing the disposal of such products must be strictly followed.
• When the built-in battery power is low, “
” will blink on display.
1.
SETUP
: To enter the Setup menu.
2.
ENTER
: To confirm the selection.
3.
EXIT
: To exit current menu and return
to previous Menu.
4. ▲: Upward
5. ▼: Downward
6.
VOL-
, ◄: Volume down; leftward.
7.
VOL+
, ►: Volume up; rightward
8. TFT-LCD display
9.
Charging indicator: The charging
light will change from RED to GREEN
when the battery becomes fully
charged.
10. Power ON indicator: When the
unit is switched ON, the light will
illuminate.
11. Remote sensor
12. Antenna socket
13. HDMI jack
14. USB port
15.
AV OUT
jack
16.
COAXIAL
jack
17. Earphones jack
18.
ON/OFF
switch
19. DC IN 9-12V jack
20. Stand
To prevent possible hearing damage, do not listen at high volume
levels for long periods.
Installation Guide
Note: Make sure to use the cable with correct plug.
PTM-3850 IB MUSE 001 REV0 - GB.indd 1
2017/3/31 17:05:46