How To Install
How To Install
12
13
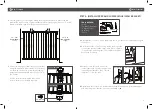
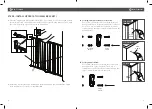
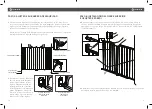
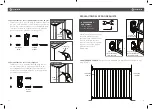
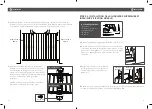
STEP 5: SETTING YOUR GATE
1.
The gap between the gate to the wall should be less than 2.25" (57mm). If necessary,
adjust the upper and lower hinge adjustment rods using the wrench and hex key to its
appropriate lengths. Then tighten the nut against the tube by using the wrench.
Next, Install the gate into the opening by simultaneously inserting the gate’s upper
and lower hinge pins down into the hinge wall brackets until it clicks.
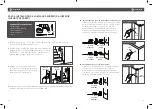
2.
On the catch side of the gate, loosen the nut around the lower adjustment rod using
the wrench. Extend the adjustment rod by turning it clockwise until it is seated in the
lower catch bracket on the wall. Then, tighten the nut against the tube by using
the wrench.
Upper hinge pin
Adjustment
Rod
<2.25" (<57mm)
<2.25" (<57mm)
Lower catch
bracket
Lower hinge pin
1 way Lower
catch bracket
OR
2 way Lower
catch bracket
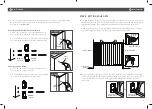
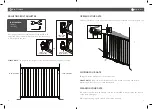
3.
After selecting the wall bracket, determine whether or not there is a stud behind the
drywall at the locations you plan to install the lower catch wall bracket.
Proceed to either
4a
or
4b
.
4a. For Drywall Without Stud / Plasterboard:
Drill a 7/32”(5.5mm) hole into the drywall at each
pencil mark. Insert a drywall anchor into each hole.
Use a screwdriver or drill to insert the screws through
the lower catch wall bracket into the drywall anchor.
4b. For Drywall with Stud:
Drill a 5/64”(2mm) pilot hole into the stud at each
pencil mark (no anchor needed).
Use a screwdriver or drill to insert the screws through
the lower catch wall bracket into the stud.
Medium
screw
Medium
screw
Drywall
anchor
4a. Plasterboard
4a. Drywall
4b. Stud
7/32"
5.5mm
7/32"
5.5mm
5/64"
2.0mm
Summary of Contents for Extending XL
Page 28: ......


