background image

(1) This machine is specially designed for indoor use. Please do not install or 

use it outdoors.

(2) Please do not install it in place that cannot bear the weight of this product 

or in places that are inclined or uneven.

(3) Do not use or please combustible materials, inflammables and volatile 

items such as thinners around/inside this product.

Page 05

Page 06

IMC01 Banknote Counter User Manual  Version 1.09

IMC01 Banknote Counter User Manual  Version 1.09

2.3 Installation Instructions

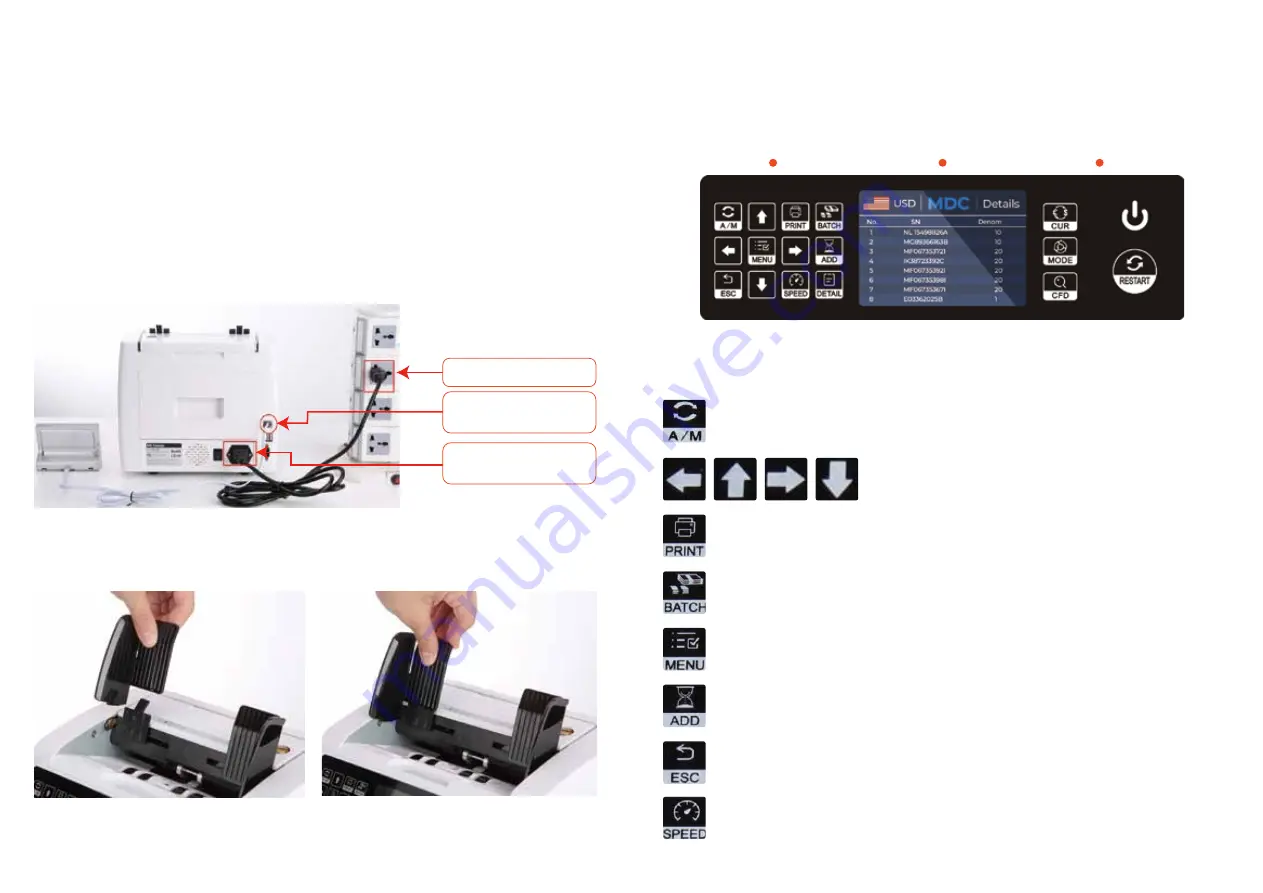
3.0  Display and Operation Interface

3.1 Display Appearance

3.2 Operational Instructions for Function Keys

2.3.1 Installation Warnings

2.3.2 Power Supply Connection

2.3.3 Banknote Guider Installation

Power Supply

External Display

Connector

Power Cord

Connector

Figure 2-2 Power and External Display Connection

Figure 2-3 Banknote Guider

Figure 3-1 Display Appearance

Operational Keys

Display Area

Operational Keys

Print key, to print the counted banknotes information.

Batch key, to select the batch number.

Menu key, to enter the menu interface by long pressing the key until a beep 

sound.

Add key, to switch on/off the accumulation function.

Return key, to return to the previous interface.

Direction keys.

Auto on key, to switch on/off the automatic operation. Auto: automatically

counting as long as there is banknote on the hopper. Manual: manually 

counting by press the restart key.

Speed key, to select the different available counting speeds.

Summary of Contents for IMC01

Page 1: ...Munbyn More choice for your growing business IMC01 Banknote Counter User Manual 1 09...

Page 2: ...mbe 4 6 Print Information 4 6 1Printer prints banknote data 4 6 2Data transfer to PC 4 7 CFD Level 4 8 Face Function 4 9 ORI Function 5 1 Service Menu 5 1 1 Read Sensor Values 5 1 2 CIS Calibration 5...

Page 3: ...e Guider TFT LCD Display Stacker Impeller Touch Panel Handle of Back Cover Speaker Switch On Off Power Cord Jack RS232 Printer Port USB Port External Display Port Hopper Handle Adjustable Screw Bankno...

Page 4: ...ndard Install at the hopper Used for the CIS calibration Clean the machine Clean the CIS or the other sensors The backup fuse for the power protection USB flash drive with IMC01 manual and troubleshoo...

Page 5: ...arnings 2 3 2PowerSupplyConnection 2 3 3BanknoteGuiderInstallation Power Supply External Display Connector Power Cord Connector Figure 2 2 Power and External Display Connection Figure 2 3 Banknote Gui...

Page 6: ...on or multi currency mode for counting 3 3 Display Interface Currently selected currency SN option Counting mode Accumulation status CFD level Counting speed Batch Number Number of banknotes Counted a...

Page 7: ...de In this mode the IMC01 will count the banknotes of the same denomination of the selected curren cy with the first banknote counted as a reference and save the detail infor mation of the counted ban...

Page 8: ...tomatically adjusted to the main inter face as shown in the Figure 4 10 Example Put a handful of USD into the IMC01 hopper to count The interface of the IMC01 displays as Figure 4 11 at the end of cou...

Page 9: ...default setting of SN reading is on Every time the IMC01 resets the setting is reset to be on state Press the key to select the batch number in the banknote counting inter face the screen display is...

Page 10: ...ehopperthatarefaceupwillendupinthestacker andtheothernoteswillend up in the reject pocket Total number and value will be displayed on the main screen This function is available by pressing the ORI key...

Page 11: ...n the MDC or SDC mode press the key upon the completion of counting to enter the interface shown in the following figure to check the details of count ing As shown in Figure 4 22 if the SN reading is...

Page 12: ...ial port tool as shown in the figure below This is a tutorial video link for transferring IMC01 data to a computer http munbyn biz DatatransfertoPC The data is transmitted to the computer for display...

Page 13: ...nput the password the interface showed in Figure 5 3 will be displayed Use the cursor to select with sub menu you want to enter and press MENU button to confirm and press ESC button to quit Note After...

Page 14: ...shown in Figure 5 4 the sensors values are only for engineer to check whether any sensor has a malfunction If you meet any problem about use please take a photo of this page and contact us If you mee...

Page 15: ...e accumulated to the next batch This feature is still in internal testing After enabling this function the old version of banknotes will be rejected and it is not recommended to enable it Switch the b...

Page 16: ...are operating You are available to check the version information This is for production and professional servicing purpose As shown in Figure 5 13 press the menu key to reset all of the settings you c...

Page 17: ...e upgrade files in the root directory of the USB Flash Drive Insert the USB Flash Drive into the USB interface at the rear of the machine Make sure the power is off before insert the USB Flash Drive T...

Page 18: ...finished After starting the machine it will go on self check automatically If the preset window shows the error code or tell you to clean the sensors generally speak ing it is because of dust on the s...

Page 19: ...of Countable Notes Thickness of Countable Notes Power Consumption Power Supply Weight Dimension Double note detection half note detection chain note detection US CA version USD EUR CAD MXN GBP EU UK v...

Reviews: