


RASFinder RF300E/RF310E User Guide
RF300E/RF310E
44
network’s backbone.
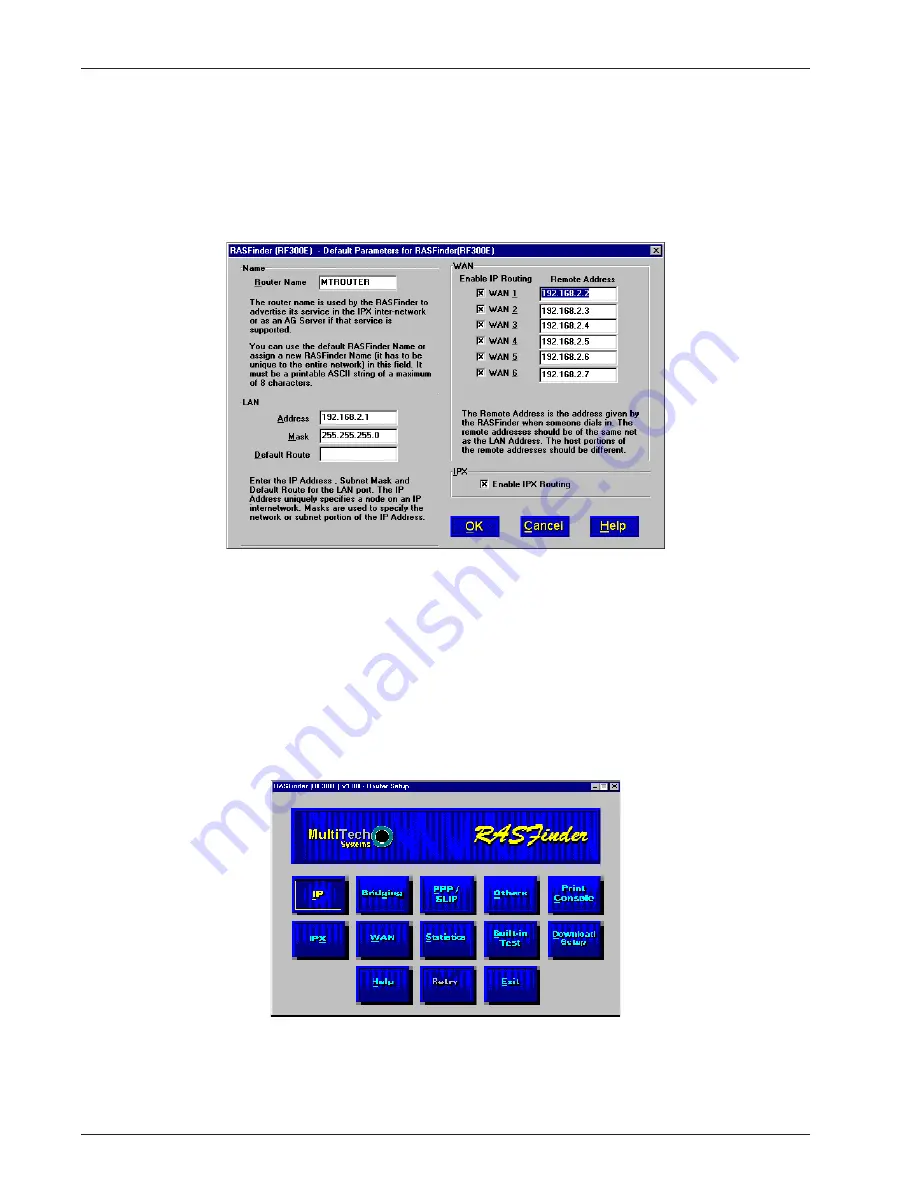
In this typical RAS application, the IP network address is 192.168.2.xxx. For the purpose of this
discussion, we are assigning the IP address 192.168.2.10 to the Ethernet port on the RASFinder.
After this address is entered into the IP Address field of the Default Parameters dialog box, the next
six sequential IP addresses (192.168.2.11 thru 192.168.2.16) are assigned to the WAN ports. These
six IP addresses, in the same network (with the Ethernet LAN), are associated with the respective
WAN ports so that when the remote users dial into the WAN port, they always appear (to the rest of
the IP network) at these respective addresses.
At this point, the software will be downloaded to the RASFinder and then you will need to go in
through the main menu to set up your ISDN connection to your Public Switched Telephone Network
(PSTN) and then establish your remote user data base.
To establish your ISDN connection with your local PSTN (either the North American version or the
European version), you may have to enter some ISDN parameters, e.g., switch type used by the
PSTN, SPIDs and Directory Numbers for North America or ISDNs and sub addresses for European
and the Rest of the World (ROW). During the provisioning of the ISDN connection with your local
PSTN, the local telephone company established some ISDN parameters for your local connection. A
space is provided in Before You Start Loading your Software to document these parameters. Now, in
order to load this informtion into your RASFinder, you need to bring up the Main Menu and click on
the WAN button.
From the WAN Port Setup dialog box, click on the Advanced tab to bring up the WAN Port Setup
dialog box with the ISDN TA Control group highlighting wan 1. To establish your ISDN parameters,
click on the Edit button and the ISDN Parameter Configuration dialog box is displayed.
Summary of Contents for RASFinder RF300E
Page 5: ...Remote Access Device Chapter 1 Introduction and Description ...
Page 11: ...Remote Access Device Chapter 2 Installation ...
Page 14: ...RASFinder RF300E RF310E User Guide RF300E RF310E 14 ...
Page 15: ...Remote Access Device Chapter 3 Software Loading and Configuration ...
Page 35: ...Remote Access Device Chapter 4 RASFinder Software ...
Page 72: ...RASFinder RF300E RF310E User Guide RF300E RF310E 72 ...
Page 73: ...Remote Access Device Chapter 5 Client Setup ...
Page 90: ...RASFinder RF300E RF310E User Guide RF300E RF310E 90 ...
Page 91: ...Remote Access Device Chapter 6 RAS Dial Out Redirector ...
Page 99: ...Remote Access Device Chapter 7 Remote Configuration and Management ...
Page 108: ...RASFinder RF300E RF310E User Guide RF300E RF310E 108 ...
Page 109: ...Remote Access Device Chapter 8 Service Warranty and Tech Support ...
Page 113: ...Remote Access Device Appendixes ...


