


PRO SERIES WALK-BEHIND TROWELS • OPERATION MANUAL — REV. #0 (9/21/17) — PAGE 27
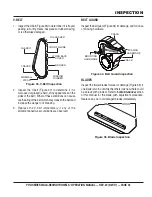
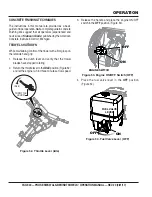
Fresno Brush Installation
1. Using a 7/16" wrench, remove the two 1/4-20 × 3/4"
screws, 1/4-20 hex nuts and 1/4" lock washers located
at the top of each brush arm (Figure 23).
Figure 23. Brush Arm Hardware Removal
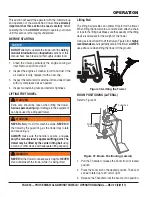
2. Slide the 1/4-20 × 1/2" screws that were removed in
step 1 into the brush channel as shown in Figure 24.
NOTICE
Positioning of the fresno brush and brush arms relative
to the fresno blade is determined by the operator.
BRUSH
ARM
REMOVE
HEX NUTS,
LOCK WASHERS,
AND SCREWS
Figure 24. Fresno Brush Installation
3. Align the brush mounting hardware with the brush
arm (Figure 24). Once correctly positioned, secure the
brush arm to the brush channel by tightening the 1/4"
hex nut. Repeat for the opposite side.
BRUSH ARM HARDWARE
INSTALLATION IS
IDENTICAL FOR BOTH SIDES.
1
1
1/4-20 × 1/2"
SCREW
BRUSH
ARM
1/4" LOCK
WASHER
BRUSH CHANNEL
1/4-20
HEX NUT
NOTES:
1
SET-UP


