background image

TempoLink Smart Assistant

Operation Manual

I

 11 

I

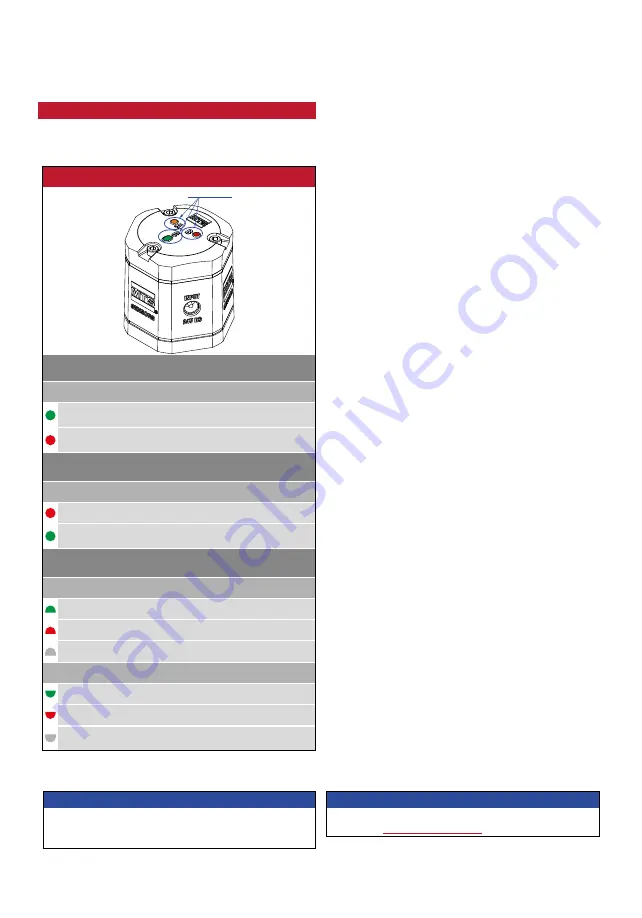
Fig. 18: LED connection status

10.  LEDs of TempoLink smart assistant

Three LEDs in the lid of the TempoLink smart assistant 

display the current status of the tool:

TempoLink smart assistant LEDs

Status LEDs

LED A

Communication between TempoLink smart assistant and sensor

LED color

Information

Green Flashing Data transfer between TempoLink smart 

assistant and sensor

Red

ON

No connection between TempoLink smart 

assistant and sensor

LED B
Communication between TempoLink smart assistant and website

LED color

Information

Red

ON

Website not accessed

Green Flashing Data transfer between TempoLink smart 

assistant and website

LED C 
USB & Wi-Fi connection

LED color (up)

Information

Green

ON

USB connection exists

Red

ON

USB connection error

OFF No USB connection

LED color (down)

Information

Green

ON

Wi-Fi activated on TempoLink smart assistant

Red

ON

Wi-Fi error on TempoLink smart assistant

OFF Wi-Fi deactivated on TempoLink smart assistant 

(USB connection exists)

NOTICE

Initialization of the Wi-Fi connection or USB connection 

takes a few seconds. After initialization, the corresponding 

LED C lights up.

NOTICE

German version of the operation manual is available on our 

homepage: 

www.mtssensors.com

Summary of Contents for Temposonics TempoLink Smart Assistant

Page 1: ...GENERATION I AM V THE NEW Temposonics Magnetostrictive Linear Position Sensors TempoLink Smart Assistant Operation Manual...

Page 2: ...oLink smart assistant to power supply 6 6 1 Using the plug in power supply with plug adapters 6 6 2 Using the cable for insertion in an existing sensor power supply with sensor mating connector and ba...

Page 3: ...mation required for correct operation provided in the product documentation NOTICE 2 1 Intended use This product may be used only for the applications defined under item 1 and item 2 and only in conju...

Page 4: ...egularly and provide documentation of the checks 7 Before applying power ensure that nobody s safety is jeopardized by starting machines 2 4 Safety instructions for use in explosion hazardous areas Th...

Page 5: ...1 A D 6 0 Cable with M16 female connector 6 pin for connection type D60 Analog part no 254 989 1 DELIVERY TempoLink smart assistant kit TempoLink smart assistant Power supply or cable for insertion i...

Page 6: ...ries V sensor of 30 m OUTP UT INPU T SENS OR 24V DC 5 Connection of TempoLink smart assistant to R Series V sensor OUTP UT INPU T SENS OR 24V DC OUTP UT INPU T SENS OR 24V DC 6 Connection of TempoLink...

Page 7: ...USB connector to the port labeled USB on the TempoLink smart assistant Next connect the USB type A connector to a free USB port of the computer The USB connection simulates a network card In the folde...

Page 8: ...Use the dialog to navigate to the location where you saved the firmware update file and select the update tar file The selected file is displayed To execute the update click the SUBMIT button Fig 12 N...

Page 9: ...By clicking the red arrow in the left information about the sensor statistics are displayed depending on the connected sensor Odometer Total distance travelled by the position magnet Magnet cycles To...

Page 10: ...ial number and order code 9 4 Menu Item Parameters The Parameter menu includes information about the operational settings and the statistics settings of the connected sensor The displayed parameters d...

Page 11: ...mart assistant and website LED color Information Red ON Website not accessed Green Flashing Data transfer between TempoLink smart assistant and website LED C USB Wi Fi connection LED color up Informat...

Page 12: ...com JAPAN Branch Of ce Phone 81 3 6416 1063 E mail info jp mtssensors com www mtssensors com MTS Temposonics and Level Plus are registered trademarks of MTS Systems Corporation in the United States M...

Reviews: