


5
•
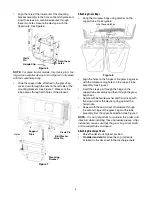
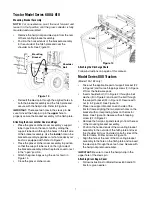
Align the hole at the lower end of the mounting
bracket assembly to the hole on the hitch plate and
insert the clevis pin, mentioned earlier, through
these two holes. Secure the clevis pin with the
hairpin clip. See Figure 6.
Figure 6
NOTE:
For some tractor models, this clevis pin is too
large. Use a smaller clevis pin (E in Figure 2) in its place
with the same hairpin clip.
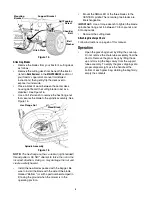
•
Slide the support tube, attached to the grass bag
cover, down through the hole on the left side of the
mounting brackets. See Figure 7. Make sure the
tube passes through both holes of the bracket.
Figure 7
Attaching Grass Bags
•
Hang the two grass bags using notches on the
support tube. See Figure 8.
Figure 8
•
Align the holes on the hinges of the grass bag cover
with the corresponding holes on the support tube
assembly. See Figure 7.
•
Insert the clevis pin through the hinge on the
support tube assembly and then through the grass
bag cover.
•
Secure with belleville washer and hairpin clip with
the crown side of the washer going against the
hairpin clip.
•
Repeat with the second set of hardware through
the second hinge of the grass bag and the tube
assembly from the opposite direction. See Figure 7.
NOTE:
It is very important to maintain this order and
direction while installing these hardware pieces. After
installation, make sure that the grass bag cover pivots
on the support tube and opens.
Attaching Discharge Chute
•
Raise the deck to its highest position.
•
On older models:
Remove the clip, if already
installed on the deck next to the discharge chute
Clevis
Pin
Hairpin Clip
Align these
holes
Support
Holes
Mounting
Tube
Bracket
Clevis Pin
Bell Washer
Click Pin
Use these notches
Summary of Contents for OEM-190-180
Page 9: ...9 NOTES ...


