


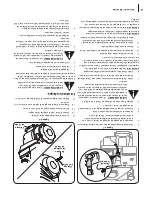


Vue du dessus
de l’indicateur
du niveau de
carburant
Niveau de carb
urant
t
/FSF
NQ
MJTT
F[Q
BTFYD
FTTJWF
NF
OUMFSÏT
FSW
PJS JMO
FEPJUQ
BT
ZBWP
JSEF
TTF
ODFEBOTM
FHP
VMP
UEFSF
NQ
MJTT
BH
F7
ÏSJ
GJF
[
FO
TVJUFRVFM
FCP
VDI
POFT
UCJF
OFOQ
MBDFF
UTF
SSÏËGP
OE
t
'BJUFTBU
UFO
UJPOE
FOFQ
BTSFO
WFS
TF
SEF
TTF
ODFF
OGBJT
BOUM
F
QMF
JO
-FTÏDMBC
PV
TTVSFTFUM
FTWBQ
FVSTE
FTT
FO
DFQ
FVWF
OU
TFO
GMBNN
FS7
ÏSJ
GJF
[RVFM
FTÏDMBC
PV
TTVSFTPOUT
ÏDI
ÏBWB
OU
EFN
FUUSFM
FNPUFVSF
ONBSDIF
t
²WJUF
[UPV
UDP
OUB
DUSÏ
QÏ
UÏP
VQSP
MP
OH
ÏEFM
FTT
FO
DFB
WFDMB
QF
BVFUO
FSFTQJSF
[QBTM
FTWBQ
FVSTE
FTT
FO
DF
Plein d
’essence
AV
ERTIS
SEMEN
T
6OBEVMUFE
PJUGBJSFM
FQMF
JO
EFTT
FO
DF/
FQF
SN
FUU
F[+
".
"*4ËEFTF
OGBOU
TEF
GBJSFM
FQMF
JO-FTW
BQFVS
TEF
TTF
ODFT
PO
UUSÒT
JOGMBNNBC
MFTF
UQFV
WFOUF
YQ
MP
TF
S&MM
FTQFV
WFOUT
F
EÏ
QMBD
FSF
UTFOG
MBNNF
STJVOFÏ
UJODF
MMFP
VVOF
GMBNN
FTFUSP
VWFN
ÐN
FËQMVTJFVS
TQJF
ET1
PV
S
ÏWJUF
SUPV
UFCMF
TTVSFHSBW
FPVN
PSUF
MMFTVJ
WF[M
FT
JOTUSVD
UJPO
TD
JE
FTTPV
T
t
/VUJMJT
F[1
"4E
FTT
FO
DFD
PO
UFOBOUEVQ
MP
NC
t
-FTT
FO
DFE
PJUÐUSFQ
SPQ
SFF
UGSB
ÔDIF/
V
UJMJTF
[
+"
."*4E
FMF
TTF
ODFRVJSFT
UFEFMBT
BJTP
OQSÏ
DÏE
FO
UF
PVRVJBÏ
UÏFOUSF
QP
TÏ
FMP
OH
UFN
QT
t
/FN
ÏMBO
HF
[+"
."*4M
FTT
FO
DFF
UMIVJM
F
t
/VUJMJT
F[Q
BTEF
TTF
ODFD
PO
UFOBOUEVN
ÏUIBO
PM
BMD
PP
MEFC
PJT
-BJTT
F[M
FNPUFVSSF
GSPJEJ
SQF
OEBOUE
FVYNJOVUFTB
WBOUE
F
GBJSFM
FQMF
JO
1MBD
F[M
FNPUFVSËM
FY
UÏS
JFVSEBOTVOFO
ESPJUC
JFOB
ÏSÏ
/F
UUPZF
[MFTBM
FOUP
VSTEVD
BQV
DI
POEVSÏT
FSW
PJSE
FTT
FO
DF
FUE
ÏWJTT
F[
MF
6UJMJT
F[VOD
PO
UFOBOUSP
VH
FIP
NP
MP
HV
ÏQP
VSM
&4
4&/
$&
QP
VSGBJSFM
FQMF
JO7
FST
F[M
FO
UFN
FOUF
UÏWJUF
[EFSF
OWF
STF
S
EFM
FTT
FODF
REMA
RQ
UE
4VSMF
TSÏTF
SWPJS
TB
WFD
VO
JO
EJD
BUFV
SEFOJ
WFB
V
EFD
BSC
VSB
OUSF
NQMJTT
F[M
FSÏTF
SWP
JSKVTR
VËD
FRVFM
F
DBS
CVS
BOUBUUF
JHO
FMFSF
QÒ
SFjG
VF
MGVMMx
7PJSMB'
JHVSF
5PVTBVUSFTSÏT
FSW
PJS
TEFD
BSC
VSB
OUS
FN
QMJT
TF[
MF
SÏ
TFS
WPJ
S
KVTRV
ËQ
PFOE
FTTPVTE
FMBCBT
FEVHPV
MPUE
FSFN
QMJTT
BHF
QPVSMBJTT
FSE
FMBQMBD
FQ
PVSM
FY
QBOTJP
OEVDBS
CVS
BOU
1SFOF
[
TPJOE
FOFQ
BTSFN
QMJSF
YDFTTJ
WFN
FOU
3F
NF
UUF
[MFD
BQV
DI
POF
OQMBD
FFUT
FSSF
[MFC
JFO
&TTV
ZF[
UPVUFÏ
DMBCP
VTTVSFE
FTT
FO
DFB
WBOUE
FSFN
FUUSFM
FNPUFVS
FONBSDI
F4JEFM
FTT
FO
DFBÏ
UÏSFO
WFS
TÏ
FO
FNF
UUF
[QBTM
F
NP
UFVSFONBSDI
F%Ï
QMBD
F[M
ÏRVJQ
FN
FO
UQP
VSM
ÏM
PJHOF
S
EFM
FTT
FO
DFSF
OWF
STÏ
F²W
JUF
[EFDSÏ
FSUP
VUFÏ
UJODF
MMFP
V
GMBNN
FBWB
OURVFM
FTWBQ
FVSTT
FTPJF
OUEJTTJQÏ
FT
7ÏS
JGJ
F[RV
FMBTP
VQ
BQ
FEFD
BSC
VSB
OUTJMF
OFTUFT
UCJF
O
PVWFS
UF
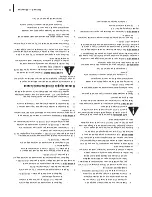
Alimentation élec
trique
AV
ERTIS
SEMEN
T
/&UJSF
[1"
4TVSMBDP
SE
FEV
EÏ
NBS
SFVSRVBOEM
FNPUFVSUP
VSO
F7
PUSF("3
"/5
*&
1063
3"
*5³
53
&"//6-²&
ATT
EN
TIO
N:
#JFORV
FMBMP
OHV
FVSEFMBS
BMMP
OH
F
QV
JTTFW
BSJF
SMBS
BMMP
OH
FFMMF
N
ÐN
FEPJUÐ
USFDP
OÎV
F
QP
VS"Ë
WP
MUT
NJTFËMBUF
SSFF
UDMBTTJGJ
ÏF
QP
VSVUJMJTBUJP
OËMF
YUÏ
SJFVS
Figure
3-4
Figure
3-5
REMA
RQ
UES
#SBO
DI
F[UP
VKP
VST
EB
CP
SEMFD
PSE
POÏ
MF
DUS
JRV
FË
MBQSJ
TFEVN
PUFVSQ
VJTCSB
ODI
F[
MFËMBQ
SJT
FNVSBM
F7PJSMB
'JH
%Ï
UFSN
JOF
[MFU
ZQ
FEFQ
SJT
FEFD
PV
SBOUËMB
RV
FMMFW
PV
TBMMF
[
CSBO
DIF
SMFD
PSE
POÏ
MF
DUS
JRV
FBWB
OUEFN
FUUSFM
FNPUFVSF
O
NBSDIF$
PO
TVMUF[MBT
FDUJP
Oj.PUFVS
TÏRVJQ
ÏTEV
OEÏ
NBS
SFVS
ÏMF
DUS
JRVFxEBOTM
FDIBQJUSFj6UJMJT
BUJPOxE
FDFU
UFOPUJD
F
EVUJMJT
BUJPO
8
S
ECTI
ON
3—
M
ONTA
GE
Summary of Contents for 165-SUC
Page 24: ...Notes 21...


