MTD 165-SUC Operator'S Manual Download Page 15

4. 

Visually inspect the spark plug. Discard the spark plug 

if there is apparent wear, or if the insulator is cracked or 

chipped.  Replace the plug if the electrodes are pitted, 

burned or fouled with deposits.

5. 

Clean the spark plug with a wire brush if it is to be reused.

6. 

Measure the plug gap with a feeler gauge. Correct as 

necessary by bending side electrode. See Fig. 6-3. The gap 

should be set to 0.030 in. (0.76mm).

7. 

Check that the spark plug washer is in good condition

8. 

Thread the spark plug in by hand to prevent cross-

threading.

9. 

After the spark plug is seated, tighten with a spark plug 

wrench to compress the washer.

NOTE: 

When installing a new spark plug, tighten 1⁄2 turn 

after the spark plug seats to compress the washer. When 

reinstalling a used spark plug, tighten 1⁄8-1⁄4 turn after the 

spark plug seats to compress the washer.

NOTE: 

The spark plug must be securely tightened. An 

improperly tightened spark plug can become very hot and 

may damage the engine.

Air Filter

NOTE: 

Not all engines have air filters, such as engines used for 

snow throwers.  Service the air filter if one is present.
Paper filters cannot be cleaned and must be replaced once a 

year or every 10 operating hours; more often if used in extremely 

dusty conditions. 

WARNING! 

Never use gasoline or low flash point 

solvents for cleaning the air cleaner element. A fire 

or explosion could result.

NOTE: 

Never run the engines that have air filters  without them. 

Rapid engine wear can result.
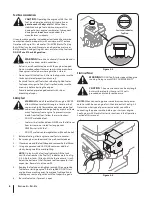
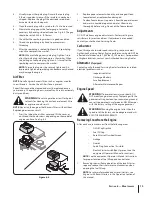
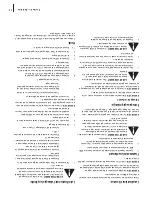
1. 

Press the tab on the air filter cover and lift the cover, or 

un-thread the thumbscrews, depending on the model of 

engine you have. See Fig. 6-4.

2. 

Replace paper element when dirty or damaged. Clean 

foam element or replace when damaged. 

3. 

To clean foam element, separate it from the paper element 

and wash in liquid detergent and water. Allow to dry 

thoroughly before using. Do not oil the foam element.

Adjustments

DO NOT make any engine adjustments. Factory settings are 

satisfactory for most conditions. If adjustments are needed, 

contact your Authorized Servicing Dealer.

Carburetor

If you think you carburetor needs adjusting, see your nearest 

Authorized Servicing Dealer. Engine performance should NOT be 

affected at altitudes up to 7,000 feet (2,134 meters). For operation 

at higher elevations, contact your Authorized Servicing Dealer

Alternator 

(if equipped)

Contact your Authorized Servicing Dealer for alternator related 

electrical problems such as:

• 

Inoperative Starter

• 

Discharged Battery

• 

Fuse Replacement

• 

Alternator Maintenance/Repairs

Engine Speed

WARNING! 

To avoid serious injury or death, DO 

NOT modify engine in any way. Tampering with the 

governor setting can lead to a runaway engine and 

cause it to operate at unsafe speeds. NEVER tamper 

with the factory setting of the engine governor. 

WARNING! 

Running the engine faster than the 

speed set at the factory can be dangerous and will 

VOID THE ENGINE WARRANTY.

Removing Snow from the Engine

After each use, remove snow from the following areas:

• 

Oil Fill Cap Dipstick

• 

Fuel Fill Cap

• 

Recoil Starter/Flywheel Screen

• 

Linkage

• 

Guards

• 

Spark Plug Connection (if visible).

• 

Electric Starter Switch Box, if present (see the 

equipment Operator’s Manual instructions). 

NOTE: 

See the equipment Operator’s Manual instructions 

for proper location of fuel fill cap and control lever.

1. 

Removing snow will ease operation of the recoil starter 

rope and reduce the risk of water contamination when 

opening the fuel fill cap.

NOTE: 

For more information about recoil starters, see 

Engine’s with Recoil Starters in the Operation Section of 

this manual.

Figure 6-4

15

S

ection

 6 — M

aintenance

Summary of Contents for 165-SUC

Page 1: ...ion Maintenance Troubleshooting Warranty WARNING READ AND FOLLOW ALL SAFETY RULES AND INSTRUCTIONS IN THIS MANUAL BEFORE ATTEMPTING TO OPERATE THIS MACHINE FAILURE TO COMPLY WITH THESE INSTRUCTIONS MA...

Page 2: ...xperts Choose from the options below Visit us on the web at www mtdcanada ca Call a Customer Support Representative at 800 668 1238 Write us at P O Box 1386 97 Kent Avenue Kitchener Ontario Canada N2G...

Page 3: ...oper instruction 5 Keep the area of operation clear of all persons particularly small children and pets Stop machine if anyone enters the area Preparation 1 Thoroughly inspect the area where the equip...

Page 4: ...ulleys sprockets etc must be securely attached Maintenance Storage 1 Keep the engine in safe working order 2 Allow the engine to cool at least five minutes before storing Never tamper with safety devi...

Page 5: ...ble and operate Symbol Description READ THE OPERATOR S MANUAL S Read understand and follow all instructions in the manual s before attempting to assemble and operate WARNING GASOLINE IS FLAMMABLE Allo...

Page 6: ...ave a threaded oil fill dipstick cap Follow the instructions next that apply to your engine model Checking Oil Level on Engines with Quarter Turn Oil Fill Caps NOTE Be sure to check the oil while on a...

Page 7: ...es with Threaded Oil Fill Caps NOTE Be sure to check the oil while on a level surface with the engine stopped To avoid engine damage it is important to Check oil level before each use and every 5 oper...

Page 8: ...eath from fuel fires follow these instructions DO NOT use leaded fuel Fuel must be fresh and clean NEVER use fuel left over from last season or stored for long periods NEVER mix oil with fuel DO NOT u...

Page 9: ...fuel Recoil Starter Handle Pull the starter handle to start the engine Fuel Shut Off Valve If equipped is used for controlling the flow of fuel between usage and transport storage Electric Starter Ou...

Page 10: ...Dealer To avoid serious burn injuries or damage to your engine DO NOT attempt to start or troubleshoot this engine in any other way for example DO NOT use starting fluid DO NOT spray flammable vapors...

Page 11: ...O CHOKE position Momentarily move choke control back to FULL CHOKE position Next move the choke control to 2 CHOKE position until engine runs smoothly Finally move the choke control to the NO CHOKE po...

Page 12: ...e Stop engine in accordance with the equipment Operator s Manual WARNING To avoid unsupervised engine operation especially by children NEVER leave the engine unattended while running Always turn off t...

Page 13: ...intenance To prevent accidental start up disconnect the spark plug boot NOTE If engine must be tipped to transport equipment or to inspect or remove grass keep spark plug side of engine up Transportin...

Page 14: ...lug and tighten securely 10 Clean area around the oil drain plug 11 Remove the oil fill cap dipstick 12 Fill with the recommended oil See Set Up Section NOTE DO NOT overfill oil filler Doing so may re...

Page 15: ...n damaged 3 To clean foam element separate it from the paper element and wash in liquid detergent and water Allow to dry thoroughly before using Do not oil the foam element Adjustments DO NOT make any...

Page 16: ...tion of debris around muffler could cause a fire Inspect and clean before every use Fuel Storage WARNING NEVER store engine with fuel in the fuel tank inside a building with potential sources of ignit...

Page 17: ...e cylinder to prevent corrosion during storage 7 Remove the rag from the spark plug hole 8 Install the spark plug 9 Carefully disconnect the spark plug wire from the grounding post if provided 10 Conn...

Page 18: ...ust gap or replace 6 Move throttle to FAST Run position Engine runs erratically 1 Spark plug wire loose 2 Spark plug scorched defective or electrode gap is set incorrectly 3 Stale fuel 4 Engine runnin...

Page 19: ...2 951 10649A 731 05632 951 10358 270 SUA N A 951 10292 951 10649A 731 05632 951 10358 270 VO 951 10794 951 10292 951 10649A 731 05632 951 10358 270 VU 951 10794 951 10292 951 10649A 731 05632 951 1035...

Page 20: ...668 1238 or at http www mtdcanada com GENERAL EMISSIONS WARRANTY COVERAGE MTD Consumer Group Inc warrants to the ultimate purchaser and each subsequent purchaser that the outdoor equipment is 1 desig...

Page 21: ...replacement of the part That notwithstanding any adjustment of a component that has a factory installed and properly operating adjustment limiting device is still eligible for warranty coverage Furthe...

Page 22: ...ette situation tout ajuste ment d une pi ce quip e d un dispositif de limitation correctement install et en bon tat de fonctionnement demeure admissible la garantie De plus cette garantie se prolonge...

Page 23: ...ttp www mtdcanada com PROTECTION OFFERTE PAR LA GARANTIE CONCERNANT LES MISSIONS MTD Consumer Group Inc garantit l acheteur au d tail initial et chaque acheteur successif 1 que la machine a t con ue c...

Page 24: ...Notes 21...

Page 25: ...z t l charger un livret contenant la liste compl te des pi ces d tach es adressez vous au Service apr s vente la page 2 Pr parez le num ro de mod le et le num ro de s rie de votre machine Vous les tro...

Page 26: ...l cartement ou remplacez la bougie 6 Placez l obturateur la position Rapide Marche le cas ch ant Le moteur tourne de fa on irr guli re 1 Le fil de la bougie est desserr 2 La bougie est endommag e d f...

Page 27: ...nt tourner le moteur jusqu ce qu il tombe en panne d essence AVERTISSEMENT Ne laissez jamais un moteur en marche sans surveillance 2 Changez l huile Voir la section Vidange d huile plus haut dans ce c...

Page 28: ...TVSWFJMMBODF FU OF GBJUFT 4 UPVSOFS un moteur dans un endroit clos 3 Proc dez l entretien de l al sage du cylindre conform ment aux instructions suivantes Lubrification de l al sage du cylindre AVERTI...

Page 29: ...du moteur court terme saisonnier Nettoyage du moteur Si le moteur a fonctionn laissez le refroidir pendant au moins une demi heure avant de le nettoyer Avant de nettoyer le moteur enlevez le couvercle...

Page 30: ...en mousse ou SFNQMBDF MF T JM FTU FOEPNNBH 7PJS MB JH 2 Remplacez la cartouche en papier si elle est sale ou endommag e Nettoyer la cartouche en mousse ou replacez la au besoin 3 Pour nettoyer la car...

Page 31: ...instructions suppl mentaires Voir la Figure 6 2 Nettoyez les alentours du capuchon d huile 5 Placez un r cipient recyclable homologu sous le bouchon de vidange de l huile si pr sent 6 Retirez le bouc...

Page 32: ...le c t du moteur avec la bougie reste sur le dessus Le transport ou l inclinaison du moteur du c t de la bougie peut provoquer de la fum e des d marrages difficiles l encrassement de la bougie ou la s...

Page 33: ...briser la glace ne faire que si le d marreur est gel Si le moteur ne d marre pas apr s trois tentatives r p tez MFT QBSBHSBQIFT FU FTTBZF OPVWFBV 8 Quand le moteur d marre t D placez la commande du v...

Page 34: ...le moteur ne d marre pas apr s trois tentatives r p tez les paragraphes 1 8 8 Quand le moteur d marre t L chez le bouton du d marreur t D placez la commande du volet de d part la QPTJUJPO j 0 x KVTRV...

Page 35: ...dans cette notice d utilisation adressez vous une station technique agr e Pour viter toute blessure grave ou tout d g t au moteur n essayez pas de mettre le moteur en marche d une autre fa on Par exe...

Page 36: ...r pour faciliter les d marrages par temps froid Bo te de commutation lectrique Elle exige l utilisation d une rallonge 3 fiches pour l ext rieur et une prise de courant de 120 volts Bouton de d marrag...

Page 37: ...UJMJTF VO DPOUFOBOU SPVHF IPNPMPHV QPVS M 44 QPVS GBJSF MF QMFJO 7FSTF MFOUFNFOU FU WJUF EF SFOWFSTFS EF M FTTFODF REMARQUE 4VS MFT S TFSWPJST BWFD VO JOEJDBUFVS EF OJWFBV EF DBSCVSBOU SFNQMJTTF MF S...

Page 38: ...er de la salet de la poussi re ou de l eau p n trer dans le r servoir N UTILISEZ PAS DE L ESSENCE E15 ou E85 AVERTISSEMENT L essence est un produit tr s inflammable qui risque d exploser dans certaine...

Page 39: ...de l huile d un quart de tour IMPORTANT Assurez vous de placer la machine sur une surface plane et d arr ter le moteur avant de v rifier le niveau d huile Pour viter d endommager le moteur il est imp...

Page 40: ...minutes avant de refaire le plein 7 35 44 5 o 0 09 3 0 Ne faites jamais fonctionner un moteur l int rieur ou dans un b timent mal ventil Les gaz d chappement contiennent du monoxyde de carbone un gaz...

Page 41: ...rnir un pare tincelles pour le pot d chappement de cette machine Ne faites jamais d border le r servoir Remplissez le r servoir jusqu au rep re Full sur l indicateur de niveau du carburant qui est pla...

Page 42: ...s vapeurs risquent d exploser Vous pouvez tre gri vement bless si des claboussures sur votre peau ou sur vos v tements s enflammaient Rincez votre peau et changez imm diatement de v tements 1 Arr tez...

Page 43: ...net soit aupr s du concessionnaire votre localit Service apr s vente Veuillez NE PAS retourner la machine au d taillant qui vous l vendue sans vous adresser d abord au service apr s vente Nos technici...

Page 44: ...AVERTISSEMENT PRI RE DE LIRE TOUTES LES INSTRUCTIONS FIGURANT DANS CETTE NOTICE D UTILISATION AVANT D ESSAYER DE VOUS SERVIR DE CETTE MACHINE LE NON RESPECT DE CES INSTRUCTIONS PEUT ENTRA NER DES BLE...

Reviews: