MT Vision ICM-100 User Manual Download Page 14

4. Operation

4. Operation

10

11

ENGLISH

ENGLISH

2010/04/27     15:35:23

00:00:04

00:03:50

15:53:00     CH2

15:53:03     CH2
15:56:40     CH2
15:59:03     CH2
16:05:17     CH2

15:53:00     CH2

20110127

0001/0006

?

PLAYBACK

0001/0002

2010-04-26
2010-04-26

?

For playback video

Press the 

t

 or 

u

 button to select your desired video, and then 

press OK button to playback.
Pause: 

press the OK button once to pause, press again to  


resume play.

Fast Forward: press and hold on the 

u

 button for about 2 seconds.

Rewind: 

press and hold on the 

t

 button for about 2 seconds  


(In the fast-forward or rewind mode, press the OK  


button to return to normal play mode.).

Stop/Exit: 

press the MENU button for view pictures:


Press the 

t

 or 

u

 button to select your desired video, 


press OK button to view and press again to exit.

* In the real-time monitoring mode only, playback can be conducted
by play button.

Deleting Folder

Deleting a folder is done in the same way as deleting a single file.

How to enter the Setting Mode

In real-time monitoring mode, press the MENU button.

Language Setting

1.  In the setting mode, press the or button to select ‘SYSTEM SET-

TING’, and then press OK button.

2.  Press the or button to select ‘Language’, and then press OK but-

ton, the following interface will appear.

3.  Press the or button to select your desired language.
4.  Press OK button to confirm and exit.

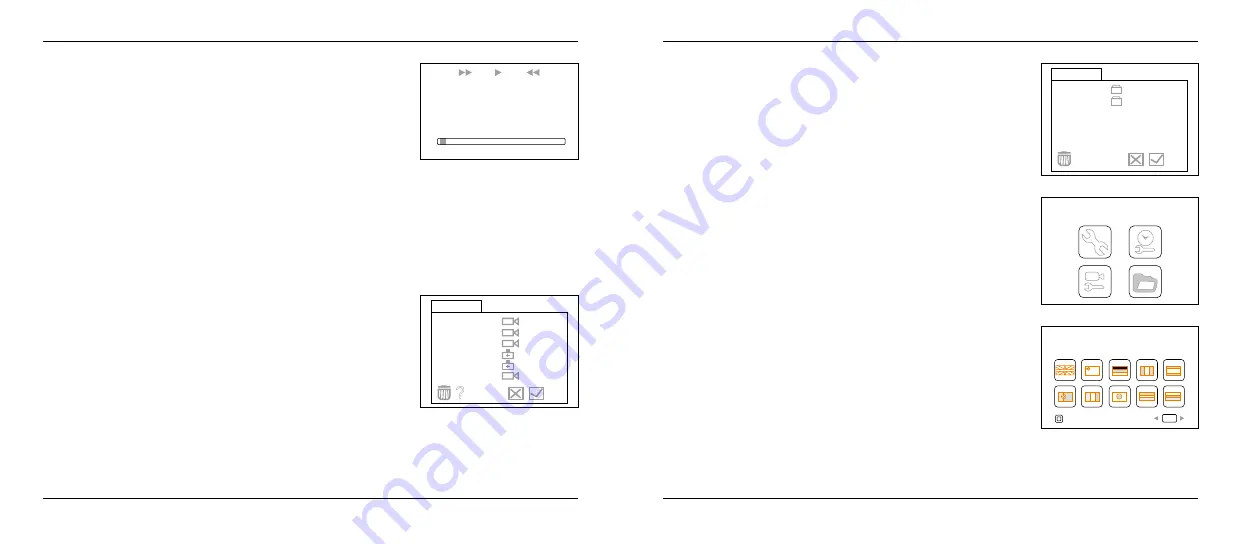
Deleting Video/Picture

1.  In real-time monitoring mode, press the button to toggle to the 

video/picture folder.

2.  Press the or button to select your desired folder, and then press 

OK button.

3.  Press the or button to select your desired file, and then press 

button on the top of the monitor.

4.  Press the or button to toggle between and , that is, to cancel or 

delete. Once you have highlighted your desired selection, press 
the OK button.

* In real-time monitoring mode only, deleting video/picture can be
conducted by button.

SYSTEM  SETTING

English

Language

OK

Summary of Contents for ICM-100

Page 1: ...Bedienungsanleitung Inspektionskamera ICM 100 ...

Page 2: ...oll TFT LCD Monitor abnehmbar Bildschirmanzeigemenü für den Betrieb Videoaufnahme unterstützt bis zu 32 GB Micro SD Karten Einstellbare Helligkeit der auf der Linse angebrachtem LED Licht Nützliches Zubehör Haken Spiegel und Magnet Leichtes und handliches Design flexibel und bequem nutzbar Lieferumfang Flexibler 9mm Schlauch mit Objektiv Handteil LCD Monitor Hacken Magnet Spiegel Gummiring Bedienu...

Page 3: ...Sie das Batteriefach und legen Sie vier 4 AA Batterien mit der richtigen Polarität in die dafür vorgesehenen Vertiefungen wie auf dem Batteriefach beschrieben ein 3 Setzen Sie das Batteriefach und die Batteriefachabdeckung wieder ein Befestigung des flexiblen Schlauchs am Griff Zur Verbindung der flexiblen Schlauchkamera mit dem Griff Steuergerät vergewissern Sie sich zuerst dass die beiden Enden ...

Page 4: ...ufgefordert ab wird der Monitor trotzdem weiter aufgeladen Befestigung des Monitors für den kabelgebundenen Gebrauch Die IC 10 unterstützt den kabelgebundenen Gebrauch durch das Befestigen des Monitors am Ka meragriff SD Karten einlegen Nachdem Sie die SD Karte erfolgreich in den SD Karten schacht eingelegt haben erscheint ein SD Kartensymbol auf dem Bildschirm sollte dies nicht der Fall sein er s...

Page 5: ...eichert Erscheint Speicher voll auf dem LCD Bildschirm bedeutet dies dass der Speicher der SD Karte voll ist Battery Capacity Current Date Time Time Stamp Recorded Time Symbol für Videos Symbol für Fotos Multiple of the Current Video to Enlarge SD Card icon Recording Signal Strength Foto machen 1 Drücken Sie die Foto Taste im Echtzeit Modus um ein Foto zu machen Hinweis Erscheint Speicher voll auf...

Page 6: ...rn Drücken Sie die Menü Taste im Echtzeit Modus Spracheinstellungen 1 Drücken Sie die t oder u Taste in den Einstellungen um Syste meinstellungen auszuwählen und drücken Sie dann die OK Taste 2 Drücken Sie die t oder u Taste um Sprache auszuwählen und drücken Sie dann die OK Taste Das nebenstehende Menü wird erscheinen 3 Drücken Sie die t oder u Taste um die gewünschte Sprache auszuwählen 4 Drücke...

Page 7: ...wählt drücken Sie die OK Taste zum Bestätigen und drücken Sie die Menü Taste zum Verlassen Ereigniswiedergabe 1 Drücken Sie die t oder u Taste in den Einstellungen um Ereigniswiedergabe auszuwählen und drücken Sie dann die OK Taste 2 Gehen Sie wie im Nutzerhandbuch unter Wiedergabe von Video Bild Löschen von Video Bild und Löschen von Ordnern beschrieben vor Werkseinstellungen wiederherstellen 1 D...

Page 8: ...Laden Sie den Monitor 2 Ersetzen Sie die Batterien im Handteil 3 Drücken Sie den Resetknopf um das Gerät neu zu starten Monitor wird nicht geladen 1 Adapterkabel nicht richtig eingesteckt 2 Adapter nicht an die Stromver sorgung angeschlossen 1 Vergewissern Sie sich dass der Adapter richtig einge steckt ist 2 Vergewissern Sie sich dass der Adapter richtig in der Steckdoese eingesteckt ist Bild ist ...

Page 9: ...and 1 1 Januar 2015 Technische Änderungen Druckfehler und Irrtümer vorbehalten Megasat Werke GmbH Industriestraße 4a D 97618 Niederlauer www mtvision tv info mtvision tv User manual Inspection Cam ICM 100 ...

Page 10: ... Manufactured and tested to IP67 waterproof standard 3 5 TFT LCD detachable mountable monitor built in rechargeable Li battery Video recording capability supports up to 32GB micro SD card Adjustable brightness on lens mounted LED light Lightweight handheld design flexible and convenient to use Delivery 9mm flexible tube with lens Handle with LCD screen Hook Magnet Mirror Rubber ring User manual 1 ...

Page 11: ...ry cover as illustrated below 2 Remove battery compartment and insert four 4 AA batteries into their appropriate slots with proper orientation as indicated on the battery compartment 3 Reinstall battery compartment and replace battery cover To Attach Flexible Tube with Handle To connect the flexible tube camera with control handle first make sure that the keyed end of the tube is aligned with the ...

Page 12: ...he provided adap ter to charge and the charging icon will flash on the LCD screen Turned off the charge without any prompt but the monitor is charging To Install Monitor for Wired Use IC 10 supports wired use by connecting the monitor to the camera handle To Insert SD Card After SD card is inserted into SD card slot successfully an SD card icon will appear on the LCD screen otherwise the no SD car...

Page 13: ...Full appears on the LCD screen indica tes that the SD card memory is full Battery Capacity Current Date Time Time Stamp Recorded Time Indicates video file Indicates picture file Multiple of the Current Video to Enlarge SD Card icon Recording Signal Strength Taking photos 1 In real time monitoring mode press the photo button to take a photo Note In real time monitoring mode only taking photos can b...

Page 14: ... button Deleting Folder Deleting a folder is done in the same way as deleting a single file How to enter the Setting Mode In real time monitoring mode press the MENU button Language Setting 1 In the setting mode press the or button to select SYSTEM SET TING and then press OK button 2 Press the or button to select Language and then press OK but ton the following interface will appear 3 Press the or...

Page 15: ...our desired selection is made press OK button to confirm and exit Event Playback 1 In the setting mode press the t or u button to select EVENT PLAYBACK and then press OK button 2 Refer to user manual instructions on Playback of Video Picture deleting Video Picture and dele ting Folder for guidance Default Setup 1 In the setting mode press the t or u button to select SYSTEM SETTING and then press O...

Page 16: ...olutions Tool will not start 1 Monitor not charged 2 Batteries need charging 1 charge monitor 2 replace batteries in control handle 3 press the reset button to start Monitor will not charge 1 Adapter cable not attached properly 2 Adapter not connected to power 1 make sure adapter cable is connected between monitor and adapter 2 make sure adapter is securely plugged into wall socket Image too dark ...

Page 17: ...Status 1 1 January 2015 Technical changes misprint and errors reserved Megasat Werke GmbH Industriestraße 4a D 97618 Niederlauer www mtvision tv info mtvision tv ...

Reviews: