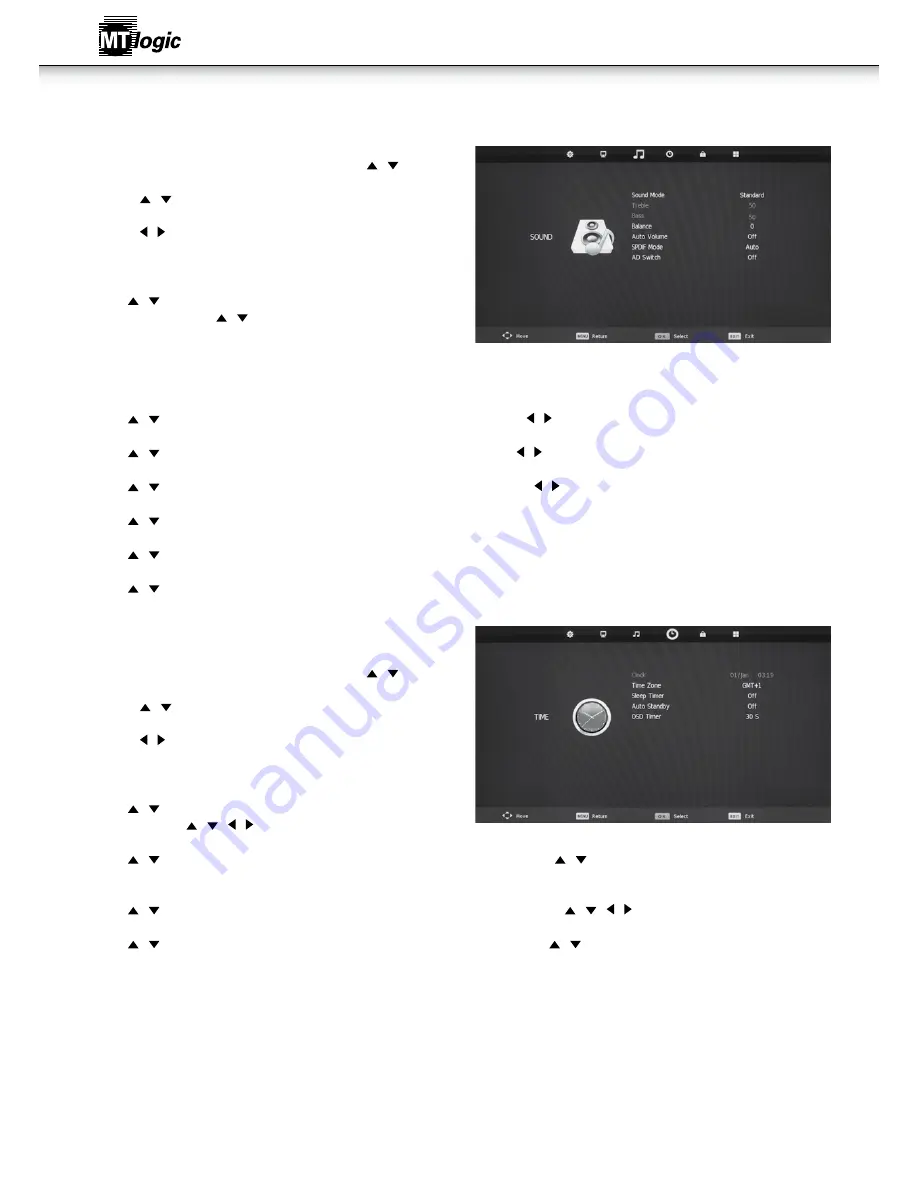
background image

30

sound Menu


sound Menu

•  Press MENU button to display the main menu. Press   /   button to 

select Sound in the main menu, it will highlight the first option.
1. Press   /   button to select the option that you want to adjust in the 

SOUND menu.

2.  Press   /   button to adjust.
3. After finishing your adjustment, Press MENU button to save and 

return back to the previous menu. 

sound Mode

•  Press   /   button to select Sound Mode, then press OK button to 

enter sub-menu. Press   /   button to select.

•  (Available Sound modes: Standard, Music, Movie, Sports, Personal).
•  You can change the value of Treble and Bass when the sound is in 

Personal mode.

•  TIPS: You can press S.MODE button on the remote control to change the Sound Mode directly.

treble

•  Press   /   button to select Treble, then press OK button to enter sub-menu. Press   /   button to adjust.

Bass

•  Press   /   button to select Bass, then press OK button to enter sub-menu. Press   /   button to adjust.

Balance

•  Press   /   button to select Balance, then press OK button to enter sub-menu. Press   /   button to adjust. 

auto volume

•  Press   /   button to select Auto Volume, then press OK button to select On of Off.

spdiF Mode

•  Press   /   button to select SPDIF MODE, then press OK button to select Auto\ PCM\ Off .

ad switch

•  Press   /   button to select AD Switch, then press OK button to select On of Off.

tiMe Menu


time Menu

•  Press MENU button to display the main menu. Press   /   button to 

select TIME in the main menu, it will highlight the second option.
1. Press   /   button to select the option that you want to adjust in the 

LOCK menu.

2.  Press   /   button to adjust.
3.  After finishing your adjustment, Press MENU button to save and 

return back to the previous menu. 

time zone

•  Press   /   button to select Time Zone, then press OK button to enter 

sub-menu. Press   /   /   /   button to select time zone.

sleep timer

•  Press   /   button to select Sleep Timer, then press OK button to enter sub-menu. Press   /   button to select.  

(Available options are: Off, 10 min, 20 min, 30 min, 60 min, 90 min, 120 min, 180 min, 240 min). 

auto standby

•  Press   /   button to select Auto Standby, then press OK button to enter sub-menu. Press   /   /   /   button to select.

osd timer

•  Press   /   button to select OSD Timer, then press OK button to enter sub-menu. Press   /   button to select.  

(Available options are: 5s, 10s, 15s, 20s, 25s, 30s).

Instruction Manual

Summary of Contents for LE-427119MT

Page 1: ...NL Gebruiksaanwijzing en Instruction manual LE 427119MT ...

Page 2: ...iening Bediening van het menu Kanaal menu Beeldmenu Geluidsmenu Tijdmenu Vergrendelmenu Installatiemenu EPG PC schermmenu Bediening media Installatie van netwerk en applicaties Startscherm Instellingen Toepassingen Systeemherstel Het bekijken van 3D Belangrijke veiligheidsinformatie voor het bekijken van inhoud in 3D Hoe werkt Theater 3D 3D kijkafstand en hoek Probleemoplossing technische onderste...

Page 3: ...en Plaats de LED TV niet in de nabijheid van meubels bekleding of elektronische producten Het product is niet ontworpen voor inbouw en mag daarom niet in een omsloten ruimte worden geplaatst zonder deugdelijke ventilatie Plaats het apparaat niet in de nabijheid van direct zonlicht of warmtebronnen zoals CV radiatoren kachels of andere apparaten inclusief adapters en versterkers die warmte generere...

Page 4: ...et monteren van de TV aan een wand 1 LegdeTVmethetschermnaarbenedenopeenschone vlakke ondergrond LegdeTVopeenzachtoppervlak zoalseentapijt vloerkleedofdekenomkrassenenschadeaanhetschermtevoorkomen 2 Bevestig de voet aan de TV door de meegeleverde schroeven erin te steken en vast te draaien met een kruiskopschroevendraaier 3 Zet de TV met bevestigde standaard rechtop op een vlakke horizontale en st...

Page 5: ...het weergeven van films muziek of foto s APP USB 1 2 Aansluiten van een USB drive voor het weergeven van films muziek foto s of het gebruik van Apps en voor het aansluiten van een draadloze muis en of toetsenbord Functietoetsen achterzijde Menu Menu weergeven op het scherm Kanaal Wijzig het kanaal Volume Verhoog of verlaag het geluidsvolume van de TV SOURCE Wijzig het ingangsapparaat Iedere keer d...

Page 6: ...CH Ga een kanaal omhoog of omlaag 30 ROOD Druk deze toets om naar het rode onderdeel of naar de rode pagina te gaan 31 GROEN 3D Druk deze toets om naar het groene onderdeel of naar de groene pagina te gaan Activeren 3D inhoud 32 GEEL L R Druk deze toets om naar het gele onderdeel of naar de gele pagina te gaan Past de L R beelden van 3D films aan om het beste 3D effect te verkrijgen 33 BLAUW Druk ...

Page 7: ...toets op de afstandsbediening te drukken 4 Schakel het apparaat in 5 Als u gereed bent om het aangesloten apparaat te gebruiken druk dan de toets SOURCE op de afstandsbediening en selecteer het soort aansluiting HDMI RGB enz van het menu op het scherm Druk OK 6 Controleer onderstaande lijst met soorten apparatuur voor speciale aanwijzingen Kabel TV zonder externe decoder alleen bij rechtstreekse k...

Page 8: ...uk de of SOURCE toets om de gewenste ingangsbron te selecteren Druk de OK toets om de ingangsbron in te voeren Druk de EXIT toets om het menu te verlaten DTV kanaal menu Druk de MENU toets om het hoofdmenu weer te geven Druk de toets om in het hoofdmenu KANAAL te selecteren de eerste optie wordt gemarkeerd 1 Druk de toetsen om in het KANAAL menu de optie te selecteren die u wilt aanpassen 2 Druk d...

Page 9: ... te keren naar het vorige menu Beeldstand Druk de knop om Beeldstand Picture Mode te selecteren en druk dan de OK toets om naar het submenu te gaan Druk de toetsen om de optie te selecteren Beschikbare beeldstanden Persoonlijk Dynamisch Standaard Mild U kunt met het beeld in persoonlijke stand de waarde voor contrast helderheid kleur en scherpte aanpassen TIPS U kunt de PMODE toets op de afstandsb...

Page 10: ... de toets om de instellingen aan te passen Lage tonen Druk de knop om Lage tonen Bass te selecteren en druk dan de OK toets om naar het submenu te gaan Druk de toets om de instellingen aan te passen Balans Druk de knop om Balans Balance te selecteren en druk dan de OK toets om naar het submenu te gaan Druk de toetsen om de instellingen aan te passen Automatische volumeregeling Druk de knop om Auto...

Page 11: ...n de groene toets op uw afstandsbediening Voer het ingestelde wachtwoord in om het programma te ontgrendelen Druk de OK toets om de instellingen op te slaan en daarna de menutoets om terug te keren naar het vorige menu Ouderlijk toezicht Druk de toetsen om Ouderlijk toezicht Parental Guidance te selecteren en druk dan de OK toets om naar het submenu te gaan om de gewenste optie te selecteren Besch...

Page 12: ...de OK toets om het automatisch aanpassen te starten H compensatie Druk de toetsen om de optie H compensatie H Offset te selecteren en druk dan de OK toets om naar het submenu te gaan Druk de toetsen om de instellingen aan te passen V compensatie Druk de toetsen om de optie V compensatie V Offset te selecteren en druk dan de OK toets om naar het submenu te gaan Druk de toetsen om de instellingen aa...

Page 13: ...USIC te selecteren en druk dan de OK toets om de keuze te bevestigen Druk de Menu toets om het terug te keren naar het vorige menu of menu verlaten om het menu te verlaten Druk de toetsen om de schijf te selecteren die u wilt bekijken en druk dan de OK toets om de keuze te bevestigen Druk de toetsen om de optie terugkeren te selecteren om terug te keren naar het vorige menu Wanneer een geselecteer...

Page 14: ...et wilt kiezen kunt u deze stap overslaan door Overslaan Skip te drukken U kunt de netwerkinstellingen ook vinden in de functie Instellingen Settings Selecteren draadloos netwerk Wi Fi Bij gebruik van Wi Fi dient u een Wi Fi toegangspunt te selecteren Bij gebruik van Ethernet toont het scherm de status van de ethernet verbinding Instellen van de juiste tijdzone Handmatig instellen tijd Als er geen...

Page 15: ... BROWSER Hier vindt u het startscherm van de voorgeïnstalleerde webbrowser VIDEO MUSIC PHOTO Met deze functies kunt u al uw mediabestanden afspelen SETTINGS Hier vindt u snelkoppelingen naar de belangrijkste instellingen van de Smart TV Handmatig datum instellen Configuratie Druk de pijltjestoetsen om het icoon te selecteren en dan de OK toets om naar het subscherm te gaan nL Gebruiksaanwijzing ...

Page 16: ...l Om ook muziek foto s en ander gegevens te wissen dient de SD kaart te worden gewist Opslaginstellingen Totale ruimte Beschikbare ruimte Wissen USB opslag Beschikbare ruimte interne opslag Taal toetsenbord Selecteren taal Gebruikerswoordenboek Android toetsenbord Datum tijd Date time Automatisch Instellen datum Selecteren tijdzone Instellen tijd 24 uurs klok gebruiken Over module Status Modelnumm...

Page 17: ...ijke volwassene dient regelmatig een kijkje te nemen bij kinderen die gebruikmaken van de 3D functie Als een kind aangeeft dat het last heeft van vermoeide ogen hoofdpijn duizeligheid of misselijkheid laat u het kind stoppen met het kijken naar 3D beelden en rust nemen Gebruik de 3D bril niet voor andere doeleinden als gewone bril zonnebril veiligheidsbril enzovoort Maak geen gebruik van de 3D fun...

Page 18: ... 3D bril op en geniet van de film Het verkrijgen van het beste 3D beeld Als u de beste 3D kijkervaring wilt hebben bevelen wij aan dat u de TV installeert zoals in onderstaande voorbeelden is aangegeven Alle kijkers ervaren de best mogelijke 3D beelden als de juiste kijkafstand en kijkhoek worden aangehouden Voor goede beeldkwaliteit is het bij het bekijken van 3D inhoud belangrijk dat u recht naa...

Page 19: ...dat het dempen is uitgeschakeld Controleer de geluidsinstellingen Zie Aanpassen van de geluidsinstellingen op pagina 18 Zorg ervoor dat de luidsprekers aan staan Controleer de audioaansluitingen van externe apparatuur Blu Ray speler game console kabel kastje die op de TV is aangesloten Als u een antenne gebruikt kan de signaalsterkte van het kanaal te laag zijn Zorg ervoor dat de antenne goed is a...

Page 20: ...or het beste signaal Als ik de bron wijzig wijzigt het volume De TV onthoudt het volume van iedere ingang Als het volume van de nieuwe ingang hoger of lager is dan het volume van de vorige bron kan het verschil duidelijk waarneembaar zijn Gebruik de Volume Op Neer toets op de afstandsbediening om het volume aan te passen Als ik de bron wijzig wijzigt het de maat van het beeld De TV onthoudt de bee...

Page 21: ...sinstructies of de verpakking biedt informatie over de wijze waarop het product moet worden weggegooid De materialen zijn recycleerbaar zoals door de desbetreffende markeringen wordt aangeduid Door recyclen het recyclen van materialen of andere vormen van hergebruik van oude apparatuur levert u een belangrijke bijdrage aan de bescherming van het milieu Raadpleeg de lokale instanties voor meer info...

Page 22: ...peration Operation menu Channel Menu Picture Menu Sound Menu Time Menu Lock Menu Setup Menu EPG PC screen menu Media operation Install network and applications Home page Settings Applications System restore How to view 3D Important safety information for viewing 3D content How 3D works 3D viewing distance and angle Troubleshooting Technical support Technical specifications For more information ple...

Page 23: ...ot insert any foreign objects metals or flammable objects into the TV which may cause electric shock or fire Do not place the LED TV close to other furniture furnishing or electronic products This product is not designed for built in installation do not place in an enclosed place without proper ventilation Keep this product away from direct sunlight or any heat sources such as radiator heaters sto...

Page 24: ...lation To install your TV on a wall 1 Place the TV screen down on a clean flat surface To prevent scratches or damage to the screen place the TV on a soft surface such as carpet rug or blanket 2 Using a Phillips head screwdriver attach the base to the TV by inserting and tightening the included screws 3 Move the TV with attached stand into an upright position and place on a flat level and stable s...

Page 25: ...ive to play movies music or photos APP USB 1 2 Connect a USB drive to play movies music or photos or apps and for using an wireless mouse and or keyboard Back Side Function Keys Menu Display on screen menu Channel Up Down Change the channel Volume Left Right Increase or decrease the loudness of the TVs audio SOURCE Change the input device With each press of the button the TV will display a differe...

Page 26: ... volume 29 CH Change the channel up and down 30 RED Press this button to into the red item or page 31 GREEN 3D Press this button to into the green item or page Activate 3D content 32 YELLOW L R Press this button to into the yellow item or page Adjust 3D movie L R images to achieve best 3D effect 33 BLUE Press this button to into the blue item or page 34 PVR Press this button to record the current ...

Page 27: ... the TV on by pressing the Power Standby button on the remote 4 Turn your device on 5 When you are ready to use your newly connected device press the SOURCE button on the remote and select the connection type HDMI RGB etc from the on screen menu Press OK 6 Check the list of devices connection types below for special instructions Cable TV without cable box directly from wall Perform a channel scan ...

Page 28: ...he Power Standby button on the remote The TV powers on 2 Select input source Press SOURCE button to display the input source list Press or SOURCE button to select the input source you want Press OK button to enter the input source Press EXIT button to quit DTV Channel Menu Press MENU button to display the main menu Press button to select CHANNEL in the main menu it will highlight the first option ...

Page 29: ...n to select Picture Mode then press OK button to enter sub menu Press button to select Available Picture mode Personal Dynamic Standard Mild You can change the value of contrast brightness colour and sharpness when the picture is in Personal mode TIPS You can press P MODE button on the remote control to change the Picture Mode directly Contrast only personal Press button to select Contrast then pr...

Page 30: ...olume Press button to select Auto Volume then press OK button to select On of Off SPDIF Mode Press button to select SPDIF MODE then press OK button to select Auto PCM Off AD Switch Press button to select AD Switch then press OK button to select On of Off Time Menu Time Menu Press MENU button to display the main menu Press button to select TIME in the main menu it will highlight the second option 1...

Page 31: ...ss OK button to save setting and menu button to back to the previous menu Parental Guidance Press button to select Parental Guidance then press OK button to enter sub menu to select Available options are Off 4 18 Key Lock Press button to select Key Lock then press button to select On or Off The keyboard will be disabled if you set Key Lock On Setup Menu Setup Menu Press MENU button to display the ...

Page 32: ... press OK button to enter sub menu Press button to adjust V Offset Press button to select V Offset then press OK button to enter sub menu Press button to adjust Size Press button to select Size then press OK button to enter sub menu Press button to adjust display size Phase Press button to select Phase then press OK button to enter sub menu Press button to adjust Position Reset Press button to sel...

Page 33: ...en press OK button to enter Press button to select return option to back to the previous menu When highlighting the option you select the file information will appear on the right and music will be previewed in the center Press button to select the file you want to watch in the file selecting menu then press OK button to add the file to playlist press media button to diaplay and operate file detai...

Page 34: ...t network type If you do not want to choose your network you can skip this step by press Skip You will also find the network settings in function Settings Select Wireless network Wi Fi If choose Wi Fi select a Wi Fi Access Point When choosing Ethernet the screen will show Ethernet connection status Set up the correct Time Zone Setup time manually If network is not connected setup the date and time...

Page 35: ...installed applications BROWSER Here you will find the start screen of the pre installed webbrowser VIDEO MUSIC PHOTO With these functions you can play all your media files SETTINGS Here you will find your short cuts to you r most important Smart TV settings Setup date manually Configuration Press the arrow buttons to select the icon and OK the sub screen Instruction Manual ...

Page 36: ...torage settings Total space Available space Erase USB storage Available space of internal storage Language Keyboard Select language User dictionary Android keyboard Date time Automatic Set date Select time zone Set time Use 24 hour format Select date format About module Status Model number Android version Kernel version Build number Wi Fi IP address Wi Fi MAC address Ethernet IP address Ethernet M...

Page 37: ...e 3D function If there are any reports of tired eyes headaches dizziness or nausea have the child stop viewing 3D TV and rest Do not use the 3D Glasses for other purposes such as general eyeglasses sunglasses protective goggles etc Do not use the 3D function or 3D Glasses while walking or moving around If you use the 3D function or 3D Glasses while walking or moving around you can injure yourself ...

Page 38: ...ut on your 3D glasses and enjoy the movie Getting the Best 3D Picture For the best 3D viewing experience recommends that you install the TV In the examples below all of the viewers are experiencing the best possible 3D with the viewing distance and viewing angle in mind When viewing 3D content it is important that you view the TV straight on or some of the 3D effect may be lost For your TV we reco...

Page 39: ...s the MUTE button on the remote to ensure mute is off Check the audio settings See Adjusting the Audio Settings on page 18 Ensure the speakers are set to On Check the audio connections of external devices Blu ray player game console cable satellite box that are connected to the TV If you are using an antenna the signal strength of the channel may be low Ensure your antenna is connected securely to...

Page 40: ...The TV remembers the volume level on each input source If the volume level on the new input source is higher or lower than the level on the source you switch from the difference may be noticeable Use the Volume Up Down buttons on the remote to adjust the volume When I change source the display image changes size The TV remembers the viewing mode on each input source If the viewing mode on the new ...

Page 41: ...liances The symbol on the product the instructions for use or the packing will inform about methods for disposal The materials are recyclable as mentioned in its marking By recycling material recycling or other forms of re utilization of old appliances you are making an important contribution to protect our environment Please inquire at the community administration for the authorized disposal loca...

Page 42: ...42 LE 427119MT http mtlogic com le 427119mt ...

Reviews: