mspa Carlton M-CA062 Owner'S Manual Download Page 15

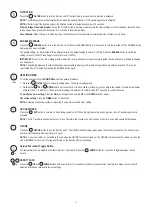
Spa Tub and Air Bladder Repair

Use the enclosed repair patch to repair any puncture:

1.  Clean and dry the area to be repaired thoroughly

2.  Apply the glue to the PVC patch and quickly attach it onto the damaged surface. (Glue is not included)

3.  Smooth the surface to remove any air bubbles and allow it dry for 5-10 minutes

NOTE

: Glue is not included.
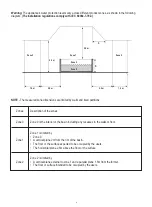
1

3

2

pin hole

pin hole

15

Storage and Preparation for Future Use

1.  Drain and clean the spa by following the  “Drainage” and “Spa Cleaning” sections.

2.  Reserve the set up instructions to deflate and  disassemble the spa tub, spa 

     control unit and air bladder.

3.  Make sure all the spa components and accessories are thoroughly clean and 

     dry before storage.  Air-dry the spa tub in the mild sun for an hour before folding.

4.  Fold the spa tub loosely and avoid any sharp  corners to prevent damage or 

     leakage to the spa  liner.

5.  Prepare new additional cartridge for next time use.

6.  Store the spa and accessories in a dry, temperature-controlled environment, 

     between 0°C and 40°C (32°F - 104°F). We recommend storing the spa with 

     desiccant.

7.  The original packaging is recommended for storage.

8.  After long-term storage, fill the spa with clean water and sanitizer, and turn on the 

     FILTER for at least 1 hour before use.
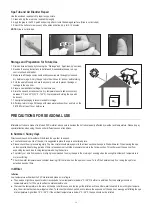
SUN

®

Direct sunshine and hot weather will both lead the spa liner to expand.

To extend the service life of the spa, it is suggested to place the spa in a sheltered place. 

Please check the air pressure regularly. The manometer should always point to the Green section when spa is filled with water. When leaving the spa 

outdoors unattended for long periods of time, release some air until the manometer points to the Yellow section. This will prevent the spa liner from 

expanding too much due to rising temperature during the daytime.

To protect your skin from sunburn, it is highly recommended to enjoy the spa in the morning or evening when the sunlight is milder and temperature is 

more comforting.

Check the water temperature and consider lowering it for the times when the spa is not in use. Turn off the heater entirely if not using the spa for an 

extended period of time.

PRECAUTIONS FOR SEASONAL USE

In Summer / Sunny days

Inflation

Low temperature will harden the PVC material and make it more fragile.

The new spa might have been stored or transported at a low temperature (below 4°C / 39°F) before it is unfolded. Put the package indoors or 

somewhere warm for 12 hours to soften the material before use. 

The lower the temperature is, the more air the spa tub will require, and the longer the inflation will take. After water is heated to a much higher tempera-

ture, the air inside the chamber will get swollen. To shorten the inflation period, and to reduce the expansion of the spa liner, we suggest inflating the spa 

at a temperature higher than 15°C / 59°F. If the ambient temperature is below 0°C / 39°F, the spa should not be inflated.

In Winter

Inflatable hot tubs are made of reinforced PVC material, whose nature decides the hot tubs are easily affected by weather and temperature. Please do pay 

special attention when using the spa under different seasonal conditions.

Summary of Contents for Carlton M-CA062

Page 1: ...change the specifications and appearance of its products which may result in updates to the instruction manual without prior notice M CA062 Carlton M OT062 Otium PLEASE DO NOT RETURN THE PRODUCT TO T...

Page 2: ...MSpa Welcome CONTENT Safety precautions Specifications Product overview First use and set up preparation Spa set up Controller operation Water maintenance and chemicals Drainage cleaning and storage P...

Page 3: ...ugs to connect the unit to the electrical supply provide a properly located outlet This appliance with its incorporated heating elements must be connected to a grounded mains supply socket with a supp...

Page 4: ...ian before using a spa h Persons using medication should consult a physician before using a spa since some medication may induce drowsiness or affect the heart rate blood pressure or circulation i Che...

Page 5: ...spa is not in use store it away immediately or keep it in an enclosed area Open the spa top lid when the Bubble function is on In order to avoid a hazard due to the inadvertent resetting of the therma...

Page 6: ...and fixed partitions Zones Zone 0 Zone 1 Zone 2 Description of the zones Zone 0 is the interior of the basin including any recesses in the walls or floor Zone 1 is limited by Zone 0 A vertical plane 2...

Page 7: ...terial AC 220 240V 50Hz 2300W 2200W 3 Levels Level 1 300W Level 2 500W Level 3 720W 1800L h 5 5W 30 50mg h 220 240V 225W 75W x 3 sets 6 high efficiency hydro jets 2000uW Rhino Tech reinforced PVC PVC...

Page 8: ...vide an adequate drainage system around the spa to deal with overflow water and splashes Provider a convenient water supply for filling the spa that complies with any local water regulations and whose...

Page 9: ...und cloth with the bubbles facing down over the cleared area where you intend to set up your spa 1 Press the UP button and the BUBBLE button at the same time to start auto inflation 2 The inflation wi...

Page 10: ...tub with fresh water to a level between MIN and MAX marked on the inside of the spa wall 1 Open the air valve c on the spa pool Ensure that you select the black one Open the air valve a on the bladde...

Page 11: ...is activated When the light is green the water is at the set temperature and the heating system is at rest 2 Pressing the UP or DOWN button will cause the LED to flash When it is flashing you can adj...

Page 12: ...R button to enter pre setting mode The button displays green 2 Pressing the UP or DOWN button will cause the LED to flash While it is flashing you can adjust the number of hours before heater activati...

Page 13: ...the buckle cover to prevent pollution 4 Use spa chemicals to maintain the proper water conditions Spa damage resulting from the misuse of chemicals or the mismanagement of spa water is not covered by...

Page 14: ...before refilling with clean water IMPORTANT Do not use steel wool hard brushes or abrasive cleaners Deflation Instructions Spa deflation 1 Unscrew the valve completely to deflate the spa 2 Once defla...

Page 15: ...The manometer should always point to the Green section when spa is filled with water When leaving the spa outdoors unattended for long periods of time release some air until the manometer points to th...

Page 16: ...ove do not turn on the bubble function This is because the rain in the air is also sucked into the pump causing the bubble generator to get damp and rusty which could result in malfunction and void yo...

Page 17: ...ated the leak clean and dry the leaking area then use the repair patch supplied with your spa Check the repair section on P15 Change the water Extend the filtration time Clean or replace the filter ca...

Page 18: ...ing flood or other external causes This warranty is valid only in the country of purchase in such countries where MSpa sells and services the same model with identical technical specifications Warrant...

Reviews: