background image

4 1

You may now open and save files on other computers once your
computers are connected together on a network.  You will also be
able to specify particular folders or disk drives to share and even
password to protect them.  Please verify that each computer has
a unique name and common workgroup name, if you had previ-
ously given your Windows

®

 98SE/ME/2000/XP computers

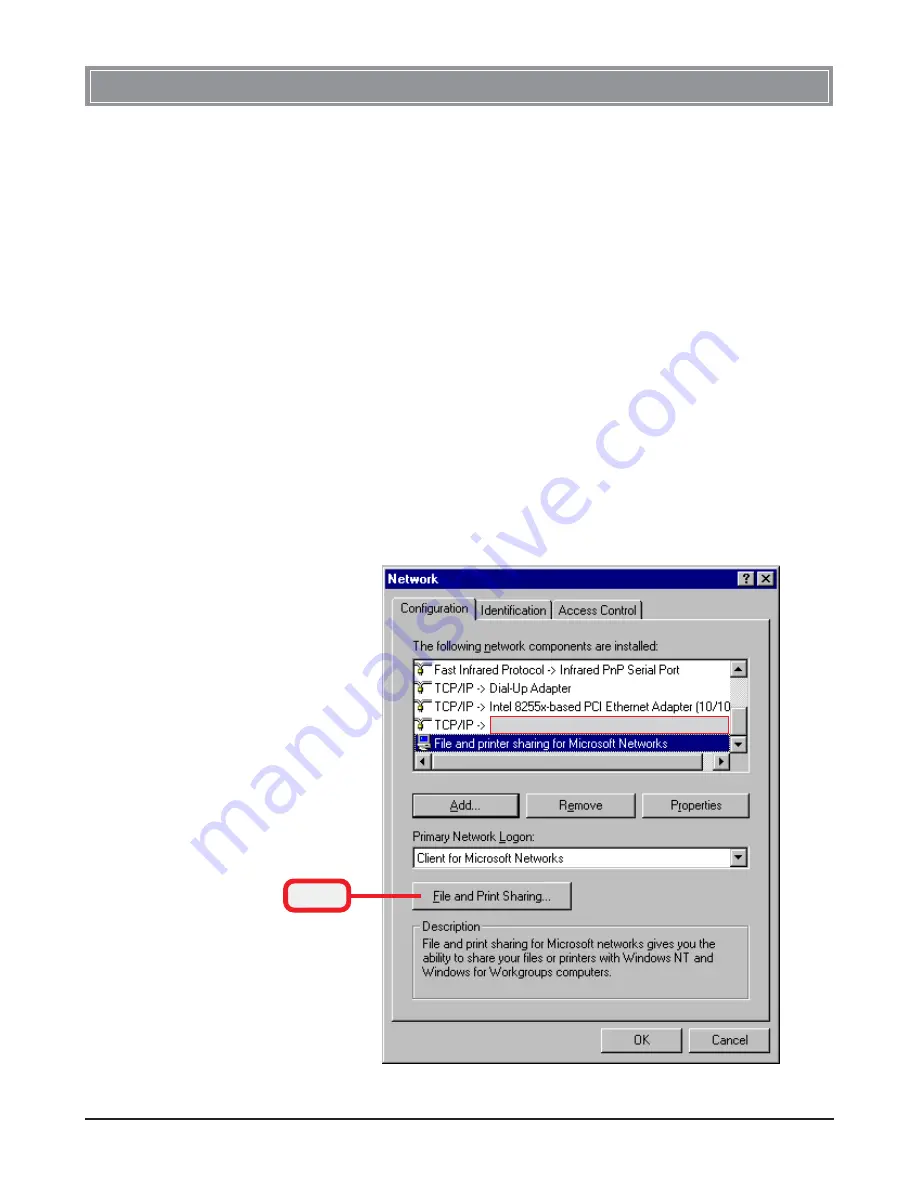
names.  Follow the steps below to share specific files and folders
with other computers on your network.


1.

On your Windows desktop, right-click 

My Network

Place

 icon and select 

Properties

 from the shortcut

menu.


 2.

You will configure your computers network settings
in this dialog.  It is also available through the

Network

 icon in the 

Control Panel

.


  3.

Click the 

File and Print Sharing

 option.

>>> 5.6  Sharing Files

Click

Your Wireless LAN adapter model

Summary of Contents for MS-6825

Page 1: ...i MSI PC54G MS 6825 Wireless 11g PCI Card User s Guide G52 C6825X6...

Page 2: ...n with any other antenna or transmitter 4 Changes or modifications to this unit not expressly approved by the party responsible for compliance could void the user authority to operate the equipment Co...

Page 3: ...and warnings on the equipment should be noted 6 Never pour any liquid into the opening that could damage or cause electrical shock 7 If any of the following situations arises get the equipment checke...

Page 4: ...ireless Network Utility describes the MSI Wireless Network Utility that lets you configure your product to connect the network quickly and easily Chapter 5 Network Connection helps you to build your n...

Page 5: ...1 Introduction 15 4 1 1 The MSI Wireless LAN Icon 15 4 1 2 Changing the Control Setting for Windows XP only 17 4 2 Networking 19 4 2 1 Infrastructure Mode 19 4 2 2 Ad hoc Mode 22 4 3 Encryption 25 4 4...

Page 6: ...1g or 11 5 5 2 1Mbps IEEE802 11b With PC54G you can roam between conference room and office without being disconnected the LAN cables in addition sharing files and printers can be easy tasks The PC54G...

Page 7: ...art of the network only for the duration of a communications session Users in the network can share files print to a shared printer and access the Internet with a shared modem In this kind of network...

Page 8: ...ge the bandwidth to maximize bandwidth utilization Addi tionally the Access Point enables users on a wireless LAN to access an existing wired network allowing wireless users to take advantage of the w...

Page 9: ...k Modulation Types CCK 5 5 and 11Mbps DQPSK 2Mbps DBPSK 1Mbps IEEE 802 11g Auto Fallback OFDM 54 48 36 24 18 12 9 6Mbps Operating Channels 13 channels maximum 3 non overlapped channels 25MHz bandwidth...

Page 10: ...Transmitter Output Power 15dBm Operating system Microsoft Windows 98SE ME 2000 XP Environmental Operating Temperature 0 55O C Operating Humidity 0 95 non condensing Dimensions WxDxH 127 3 x 77 6 x 18...

Page 11: ...ntents Unpack the package and check all the items carefully If any item contained is damaged or missing please contact your local dealer as soon as possible Also keep the box and packing materials in...

Page 12: ...ing the external antenna External Antenna Golden Finger ACT LED GREEN indicating the networking status by ON The PC54G is connected Flash The PC54G is searching for available Access Point or receiving...

Page 13: ...8...

Page 14: ...mainboard Hardware Installation Remove the computer cover Locate the available PCI slot on your mainboard Step 1 NOTE TURN OFF your system and disconnect the power cable before installing the PC54G P...

Page 15: ...curing the PC54G with a bracket screw Connect the external antenna to the connector on the PC54G s bracket If your are not skilled at installing the PCI adapter please ask the vendor or an experienced...

Page 16: ...will ask you to insert the Setup CD to copy files during the installation Please NOTE that the PC54G should be installed into your computer before installing the driver and utility Then the operating...

Page 17: ...your CD drive in the Open box and click OK to launch the Setup program manually The main screen of Setup program will appear as below Click the Install Software button Step 1 Click The welcome screen...

Page 18: ...If you use Windows 98SE ME you may be asked to insert the Windows Setup CD during the installation Please insert the Setup CD by the on screen instruction to continue the installation MSI Wireless LA...

Page 19: ...14...

Page 20: ...convenient and powerful utility that allows you to set up configure and know your networking status easily and clearly 4 1 Introduction The MSI Wireless LAN icon Not connected to the network Connected...

Page 21: ...tch to Gateway Mode optional If your MSI wireless LAN adapter supports Software Gateway function you can see this item in the sub menu and which allows you to use your MSI wireless adapter as a virtua...

Page 22: ...r MSI wireless adapter it is recommended to use the MSI Wireless Network Utility to control your wireless LAN Click Double click To change the control setting 1 Right click the MSI Wireless LAN icon a...

Page 23: ...Properties window will appear as below 4 Uncheck the Use Windows to configure my wireless network settings option Then click OK 5 Now you can use MSI Wireless Network Utility to configure your networ...

Page 24: ...rastructure mode allows your computer to communicate with the other computers in the network through an Access Point The following tasks should be done before you configure the settings The Access Poi...

Page 25: ...d then click Configure to set up the selected network You can click Refresh to search the available Access Points in the network again Click WEP settings Only the network administrator can change the...

Page 26: ...in the Preferred Networks field If it contains two or more networks in the list you can use Move up Move down to set the priority 5 Click OK to complete the configuration and an icon indicating conne...

Page 27: ...le wireless adapter If you want to use the network in Ad hoc mode All the computers connected should be set to Ad hoc mode The computers have the same SSID network name setting To configure the settin...

Page 28: ...puter ad hoc network wireless access points are not used option and click OK to enable the Ad hoc mode 2 You can build up the Ad hoc network by clicking Add in the Preferred Networks field Click Enter...

Page 29: ...signated administrator of the network Any computer can access the network by selecting Connect in the Wireless Network Connection window connected 5 Click OK to complete the configuration and an icon...

Page 30: ...the identical sequence with the key settings on the Access Point In the wireless network environment the administrator can set up password Network Key to protect the network from being attacked or un...

Page 31: ...ansfer speed for best perfor mance and longest range automatically Radio Set to On to activate the radio SSID Means Service Set Identifier a unique name shared among all points in a wireless network I...

Page 32: ...s field The available options are Long It is set to 144 bits Short It is set to 72 bits Auto The card supports an auto detection feature it will automatically select the Preamble Type depending on the...

Page 33: ...28 In the Information tab you can get some information about the manufacturer hardware and software 4 5 Information...

Page 34: ...elements are required for all computers if you want to connect to a network Client for Microsoft Network TCP IP File and printer sharing for Microsoft Networks To check the required elements are inst...

Page 35: ...tion icon to open the Network Connection window 3 Right click the Wireless Network Connection icon and click Properties from the shortcut menu 4 The Wireless Network Connection Properties window appea...

Page 36: ...he computer In the Computer name box This will be the name of this computer used by other computers on your network to communicate with Please NOTE that each computer s name must be unique on a partic...

Page 37: ...ter Name tab Under Windows 2000 XP 1 Right click My Computer icon on your Windows desktop and click Properties from the shortcut menu Right click Select Your computer s name Your computer will belong...

Page 38: ...s as below Enter a Computer Name select Workgroup and enter the name of your workgroup Please NOTE that each computer s name must be unique on a particular network to avoid confusion 5 Click OK to sav...

Page 39: ...ed Subnet Mask is 255 255 255 0 Under Windows 98SE ME 1 Go to Start Settings Control Panel 2 Double click the Network icon 3 The Network window appears as below Select TCP IP your Wireless LAN adapter...

Page 40: ...35 Check this Enter a fixed IP address and Subnet Mask 5 Click OK Then click Yes when prompted to reboot the computer 4 a Configuring a dynamic IP address 4 b Configuring a fixed IP address Check this...

Page 41: ...der Windows 2000 XP 1 Click Start and choose Control Panel to open the Control Panel window 2 Double click the Network Connection icon to open the Network Connection window 3 Right click the IEEE802 1...

Page 42: ...37 Check this 6 Click OK to complete the configuration 5 a Configuring a dynamic IP address 5 b Configuring a fixed IP address Enter a fixed IP address and Subnet Mask Check this...

Page 43: ...nipcfg here 3 The IP Configuration screen will appear click More Info to bring up a screen containing detail information of your wireless network adapter Check the configuration of IP Address Subnet M...

Page 44: ...sk and Default Gateway are correct Under Windows 2000 XP 1 Go to Start Run 2 Type cmd in the Open box and click OK 3 A DOS prompt window appears Type ipconfig all and press Enter to display IP informa...

Page 45: ...ws 2000 XP in the Open box and click OK 3 A DOS prompt window appears Type ping 210 59 147 160 or any URL address which is the IP address of the Gateway in this case and press Enter You will get reply...

Page 46: ...u had previ ously given your Windows 98SE ME 2000 XP computers names Follow the steps below to share specific files and folders with other computers on your network 1 On your Windows desktop right cli...

Page 47: ...ich means you can share a folder that both you and your family member colleague needs to access occasionally You can also share your CD ROM drive for others to use if your other computers do not have...

Page 48: ...field is optional which can be used to further de scribe the disk drive or folder for others in the network Access Type This option allows you to designate how much someone else can do with this share...

Page 49: ...so by double clicking the My Network Place icon on your Windows desktop or inside Windows Explorer 13 Navigate to the computer with the shared disk drive or folder recognized by the Computer Name you...

Page 50: ...5 Available Networks 20 Index C D E F CCK 4 Channel 4 26 Command 40 Computer Identification 31 Country 27 DBPSK 4 DOS 39 DQPSK 4 DSSS 4 Dynamic IP Address 34 Encryption 4 25 File and Print Sharing 41...

Page 51: ...E802 11g 1 Information tab 28 Infrastructure mode 3 19 InstallShield Wizard 11 Internet 1 29 Key index 25 Key length 25 LAN 26 Link Quality 26 Local Area Network 2 MSI Wireless LAN icon 15 Power save...

Page 52: ...er 26 Signal Strength 26 Speed 26 SSID 26 Status tab 26 Subnet Mask 34 W S T R Radio 26 Range 22 RTS CTS Threshold 4 TCP IP 29 34 WEP 4 20 winipcfg 38 Wireless Network Connection 17 Wireless Network C...

Reviews: