background image

MZ62

-stereomicroscope user manual

[email protected]

www.m-shot.com

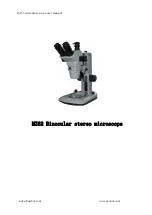
MZ62 Binocular stereo microscope

Summary of Contents for MZ62

Page 1: ...Guangzhou Micro shot Technology Co Ltd MZ62 Binocular Stereo Microscope User Manual www m shot com sales mshot com ...

Page 2: ...MZ62 stereomicroscope user manual sales mshot com www m shot com MZ62 Binocular stereo microscope ...

Page 3: ...nt door or removing the light box please make sure the power is switched off 2 Do not use or place the instrument in hot dank or dusty environment for a long time The appropriate working temperature is from 0 to 40 The relative humidity shall be 20 to 85 25 Attention Do not soak the instrument into water or other liquids Attention Do not put the provided accessories on the main frame or other tran...

Page 4: ... 4 Adjusting the vision and focus 4 5 Adjusting the pupil distance 5 6 Installing and removing the reticle 5 7 Using the auxiliary objective 5 8 Installing the type C camera tube and digital camera 5 9 Focusing the the digital camera 6 IV Use of the base 7 1 Each part name 7 2 Operating 7 V Main Specifications 8 1 MZ62 Optical Specifications 8 2 MZ62 Auxiliary Objective Specifications Optional 8 V...

Page 5: ... When using filming and camera equipment to ensure the stability the main body o of the microscope shall be settled upright with a incline of less than 3 7 When using the type C connector for a camera the chip size should be smaller than 2 3 and the weight should be lighter than 2 5 kg II Maintenance and service 1 All the lens shall be kept clean The tiny dusts can be blew away by a blowing balloo...

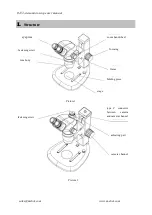
Page 6: ...s mshot com www m shot com I Structure eyepiece zoom handwheel fastening screw focusing lens body frame holding piece stage fastening screw type C connector between camera and camera channel adjusting part camera channel Picture 1 Picture 2 ...

Page 7: ...tion sequence Before installation make sure the connection surfaces are clean When installing prevent the surface of each lens from being dirty or scratched First connect the type C connector with the camera and then fix the camera to the camera channel type C camera type C connector camera channel eyepiece lens body fastening screw holding piece stage frame Picture 2 ...

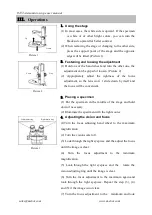
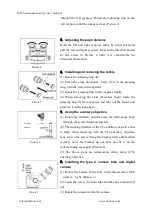
Page 8: ...f and the focus will be convenient 3 Placing a specimen 1 Put the specimen in the middle of the stage and hold down if necessary 2 Illuminate the specimen with the light source 4 Adjusting the vision and focus 1 Turn the focus adjusting hand wheel to the maximum magnification 2 Turn the vision scale to 0 3 Look through the right eyepiece and the adjust the focus until the image is clear 4 Turn the...

Page 9: ... rotate the pressing ring off from eyepiece and take out the board and preserve it with clean paper 7 Using the auxiliary objective 1 Rotate the auxiliary objective into the microscope body through the screw thread downward 2 The working distance of the 0 5x auxiliary objective lens is large when observing with the 0 5x auxiliary objective lens loosen the screw fixing the bracket with a 4mm Allen ...

Page 10: ...focus adjustment to the maximum magnification until the image on the monitor is clear 2 Rotate the focus adjustment to the minimum magnification and the adjust the focusing ring on the camera tube until the image on the monitor is clear 3 Turn the focus adjustment to the maximum magnification and check if the image is clear If not repeat the step 1 and 2 until the image is clear Picture 8 ...

Page 11: ...e brightness of the transmitted illumination of the base or the upper light source As shown by the icons on the base the knob controls the upper light source and the knob controls the lower light source Turn the brightness adjustment knob turn it clockwise to increase the brightness and vice versa to decrease the brightness 2 Replace the fuse 1 Unscrew the fuse set from the back of the base with a...

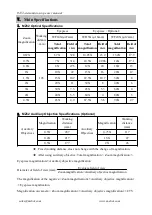
Page 12: ...80X 3 4 5X 45X 4 9 67 5X 3 6 90X 2 7 2 MZ62 Auxiliary Objective Specifications Optional Auxiliary Objectives Magnification Working distance mm Auxiliary Objectives Magnification Working distance mm 0 3X 287 0 75X 117 0 4X 217 1 5X 47 0 5X 177 2X 26 Fixed working distance does not change with the change of magnification After using auxiliary objective Total magnification Zoom magnification Eyepiece...

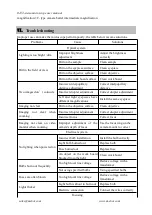
Page 13: ...ifferent magnifications Install the same eyepiece Imaging not clear Dirt on the objective surface Clean objective Imaging not clear when zooming Incorrect diopter adjustment Correct diopter adjustment Incorrect focus Correct focus Imaging not clear on video monitor when zooming Improper adjustment of the camera s depth of focus Use the focus ring on the camera mount to correct Electrical system No...

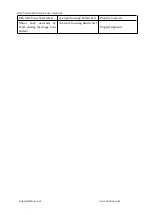
Page 14: ... manual sales mshot com www m shot com Inflexible focus hand wheel Too tight focusing hand wheel Properly loosen it Mirror body descends by itself causing the image to be unclear Too loose focusing hand wheel Properly tighten it ...

Page 15: ...era Inverted Upright Stereo Fluorescence Microscopes Polarizing Metallurgical Biological Microscope LED fluorescence illuminators for upright inverted stereo microscope Customization and modification of research microscopes and microscope accessories For more microscope knowledge and skills please visit our official website ...

Reviews: