background image

MSA 

USING THE COMPRESSED AIR BREATHING APPARATUS 


AirMaXX classic 

15


3.  Using the Compressed Air Breathing Apparatus 


Warning! 

The compressed air breathing apparatus may only be put into use in a 

fully maintained and tested condition. If malfunctions or defects are 

noticed prior to use, do not use the compressed air breathing apparatus 

under any circumstances. 

Get the apparatus checked and repaired by an authorised service 

centre. 


3.1.  Prior to the First Use 

Prior to the first use, the apparatus must be prepared for the number and types of 

compressed air cylinders. Afterwards, when changing compressed air cylinders 

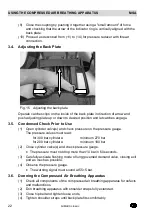
(without attached bumpers) that have the same diameter, the closed loop of the 

tension strap is increased or again tightened by opening or closing the tension 

clamp. A readjustment of the length of the tension strap and a loosening of the 

Velcro closure then is no longer required. 
(1)  Before installing the threaded handwheel, check that the O-ring inside the 

handwheel high pressure socket is present and free of damage. If the O-ring 

is damaged, it must be replaced before the SCBA is used. 

(2)  Thread the handwheel into the cylinder thread. The handwheel should be 

hand-tight (no tools should be used). 

3.2.  Connecting One Compressed Air Cylinder 


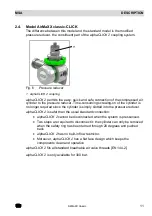
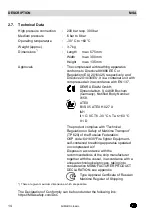
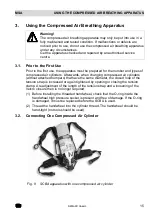
Fig. 9 

SCBA apparatus with one compressed air cylinder 

Summary of Contents for AirMaXX classic

Page 1: ...Operating Manual AirMaXX classic SCBA Basic Apparatus Order N 10084770 05 ...

Page 2: ...MSA Europe GmbH Schlüsselstrasse 12 8645 Rapperswil Jona Switzerland Product of Germany MSA All rights reserved ...

Page 3: ...linder 16 3 2 1 2 Connecting One Compressed Air Cylinder 16 3 2 2 Pressure Reducer with alphaCLICK 2 18 3 2 2 1 Installing Quick Connect Adaptor to Cylinder 18 3 2 2 2 Connecting One Compressed Air Cylinder 19 3 3 Connecting Two Compressed Air Cylinders 20 3 3 1 Pressure Reducer with Thread Connection 20 3 3 1 1 Preparing the Apparatus for Use with Two Compressed Air Cylinders 20 3 3 1 2 Connectin...

Page 4: ...k 30 4 8 Overhaul 30 4 9 Storage 30 4 10 Malfunctions 30 5 Compressed Air Cylinders with alphaCLICK 2 31 5 1 Changing of Compressed Air Cylinders to alphaCLICK 2 31 5 2 Filling of Compressed Air Cylinders with alphaCLICK 2 32 6 Accessories 34 6 1 Compressed Air Cylinders 34 6 1 1 Compressed Air Cylinders 34 6 1 2 Valves 34 6 1 3 T Pieces 34 6 2 Lung Governed Demand Valve Full Face Mask 34 7 Orderi...

Page 5: ...ions applicable in the user s country must be taken into account for a safe use Alternative use or use outside this specifications will be considered as non compliance This also applies especially to unauthorised alterations to the apparatus and to commissioning work that has not been carried out by MSA or authorised persons Danger This product supports life and health Inappropriate use maintenanc...

Page 6: ...ICU S version with key instead of the pressure gauge Retrofitting is possible through MSA or authorized service centres Fig 1 AirMaXX classic compressed air breathing apparatus all options 1 Pressure gauge line 9 Catch clip 2 Shoulder strap 10 Push lock 3 Cylinder separator 11 Whistle 4 Cylinder retaining strap 12 Pressure reducer 5 Cylinder support 13 Medium pressure line 6 Tension clamp 14 Hip b...

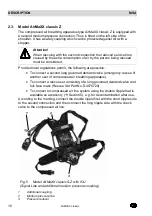
Page 7: ...uge line 4 Medium pressure line The pressure reducer is mounted in the lower area of the back plate Fig 2 On the pressure reducer there is a relief valve a warning device the pressure gauge line and the medium pressure line The pressure reducer reduces the cylinder pressure to approx 7 bar and the relief valve activates on non permitted pressure rise to prevent damage insuring the continued supply...

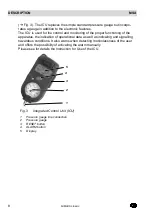
Page 8: ...ioning of the apparatus the indication of operational data as well as indicating and signalling hazardous conditions It also warns when detecting motionlessness of the user and offers the possibility of activating the alarm manually Please see for details the Instruction for Use of the ICU Fig 3 Integrated Control Unit ICU 1 Pressure gauge line connection 2 Pressure gauge 3 RESET button 4 ALARM bu...

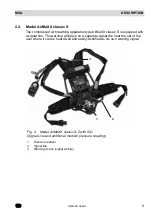
Page 9: ...ed with a signal line The warning whistle is on a separate signal line near the ear of the user where it can be heard well and easily identified as his own warning signal Fig 4 Model AirMaXX classic S Z with ICU Signal Line and additional medium pressure coupling 1 Pressure reducer 2 Signal line 3 Warning device signal whistle 2 1 3 ...

Page 10: ...o connect a second lung governed demand valve emergency rescue of another user of compressed air breathing apparatus To connect a rescue set consisting of a lung governed demand valve and full face mask Rescue Set Part No D4075720 To connect to compressed air line system using the double nipple that is available as accessory Section 5 e g for decontamination after use According to the marking conn...

Page 11: ...inder is no longer required since the cylinder is simply slotted into the pressure reducer alphaCLICK 2 is safer than the usual standard connection alphaCLICK 2 cannot be disconnected when the system is pressurised Two steps are required to disconnect it the cylinder can only be removed when the safety ring has been turned through 20 degrees and pushed back alphaCLICK 2 has no built in flow restri...

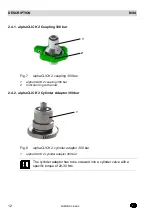
Page 12: ...g 300 bar 1 alphaCLICK 2 coupling 300 bar 2 Indicator ring with arrow 2 4 2 alphaCLICK 2 Cylinder Adaptor 300 bar Fig 8 alphaCLICK 2 cylinder adaptor 300 bar 1 alphaCLICK 2 cylinder adaptor 300 bar The cylinder adaptor has to be screwed into a cylinder valve with a specific torque of 20 30 Nm 1 2 1 ...

Page 13: ... harness chrome plated buckles and protecting channels for the lines on the shoulder straps It is also available as the standard model and in the S Z and all combinations thereof 2 6 AirMaXX classic Combinations Of course all combinations of the above mentioned versions are possible Retrofitting is possible through MSA or authorized service centres ...

Page 14: ...ed Body Number 0158 ATEX BVS 05 ATEX H 027 X IM1 II 1 G IIC T6 30 C Ta 60 C II 1 D The product complies with Technical Regulation on Safety of Maritime Transport TP 620 of the Russian Federation OKP code 641830 Fire fighter Equipment self contained breathing apparatus operated on compressed air Dispose in accordance with the recommendations of the ship manufacturer together with the vessel in acco...

Page 15: ...ir cylinders Afterwards when changing compressed air cylinders without attached bumpers that have the same diameter the closed loop of the tension strap is increased or again tightened by opening or closing the tension clamp A readjustment of the length of the tension strap and a loosening of the Velcro closure then is no longer required 1 Before installing the threaded handwheel check that the O ...

Page 16: ...reathing apparatus details 1 Cylinder separator 3 Cylinder support 2 Cylinder retaining strap 4 Tension clamp 3 2 1 2 Connecting One Compressed Air Cylinder 1 Place compressed air breathing apparatus horizontally so that the back face is uppermost Fig 10 2 Bring cylinder separator 1 into a horizontal position opposite the tension clamp 4 until it catches 3 Check gasket on pressure reducer high pre...

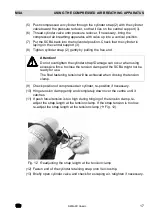
Page 17: ... cylinder strap Damage can occur when using excessive force to close the tension clamp and the SCBA might not be ready for use The final fastening tension will be achieved when closing the tension clamp 9 Check position of compressed air cylinder re position if necessary 10 Hinge tension clamp gently and completely down over the centre until it catches 11 If push force tension is too high during h...

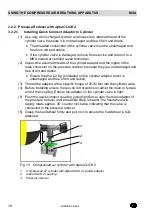
Page 18: ...nd free of dirt and debris Ensure that the O ring is installed on the cylinder adaptor and it is undamaged and free of dirt and debris 3 Thread the adaptor with a specific torque of 20 30 Nm into the cylinder valve 4 Before installing ensure there is no dirt or debris on either the male or female end of the coupling Ensure the adaptor on the cylinder valve is tight 5 Push the quick connect couplin...

Page 19: ...nder with the alphaCLICK 2 axially to the coupling and fit on the alphaCLICK 2 coupling Attention Never push the coupling system together using excessive force 7 Close the coupling by pushing it together using a small amount of force and checking that the arrow of the indicator ring is vertically aligned with the back plate 8 Tighten cylinder strap gently by pulling the free end Attention Do not o...

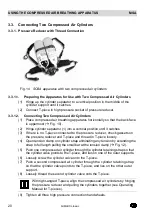
Page 20: ...cted to the pressure reducer check gaskets on the pressure reducer and T piece and thread in T piece loosely 4 Open tension clamp on cylinder strap eliminating any tension by extending the strap to full length pulling the small bar at the tension clamp Fig 12 5 Push one compressed air cylinder through the cylinder retaining strap so that the cylinder valve points to the T piece and lies on one of ...
Page 21: ...essary 3 3 2 Pressure Reducer with alphaCLICK 2 1 If necessary screw the alphaCLICK 2 cylinder adaptor with a specific torque of 20 30 Nm into the T piece 2 Hinge cylinder separator 3 into a vertical position until it catches 3 Open tension clamp on cylinder strap and extend the strap Fig 12 4 Push one compressed air cylinder through the cylinder retaining strap so that the cylinder valve points t...
Page 22: ...Use 1 Open cylinder valve s and check pressure on the pressure gauge The pressure values must read for 300 bar cylinders minimum 270 bar for 200 bar cylinders minimum 180 bar 2 Close cylinder valve s and check pressure gauge The pressure must not drop more than 10 bar in 60 seconds 3 Carefully activate flushing mode of lung governed demand valve closing exit port as much as possible 4 Observe the ...

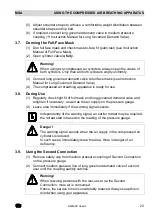
Page 23: ...or use 3 8 During Use 1 Regularly check tight fit of full mask and lung governed demand valve and retighten if necessary as well as the air supply on the pressure gauge 2 Leave area immediately if the warning signal sounds Independently of the warning signal an earlier retreat may be required the retreat start is based on the reading of the pressure gauge Danger The warning signal sounds when the ...

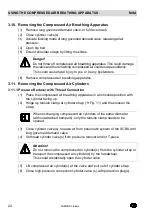
Page 24: ...sure Reducer with Thread Connection 1 Place the compressed air breathing apparatus in a horizontal position with the cylinder facing up 2 Hinge up tension clamp at cylinder strap Fig 11 and thus loosen the strap When exchanging compressed air cylinders of the same diameter without attached bumpers only the tension clamp needs to be opened 3 Close cylinder valve s release air from pneumatic system ...

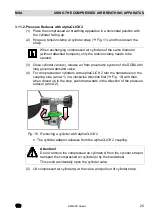
Page 25: ...atic system of the SCBA with lung governed demand valve 4 For compressed air cylinders with alphaCLICK 2 turn the handwheel on the coupling side arrow 1 in a clockwise direction first Fig 16 and then when closed up to the stop push downwards in the direction of the pressure reducer arrow 2 Fig 16 Removing a cylinder with alphaCLICK 2 The cylinder adaptor releases from the alphaCLICK 2 coupling Att...

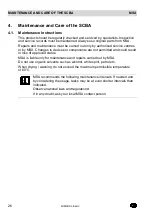
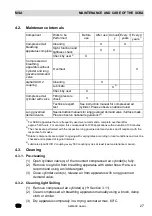
Page 26: ...es or by MSA Changes to devices or components are not permitted and could result in loss of approved status MSA is liable only for maintenance and repairs carried out by MSA Do not use organic solvents such as alcohol white spirit petrol etc When drying washing do not exceed the maximum permissible temperature of 60 C MSA recommends the following maintenance intervals If needed and by considering ...

Page 27: ...mend a complete overhaul after approx 540 hours For example this corresponds to 1080 applications with a duration of 30 minutes 2 The checks are performed with the respective lung governed demand valves and if required with the respective full masks 3 Rubber components are subject to ageing with varying rates according to local conditions and must be checked and replaced at regular intervals 4 Lub...

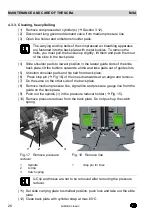
Page 28: ...outwards a little and take pads out of guide slots 5 Unbutton shoulder pads and hip belt from back plate 6 Press stop pin Fig 16 of the lines downwards at an angle and remove 7 Do the same on the other side of the back plate 8 Remove medium pressure line signal line and pressure gauge line from the guide on the back plate 9 Push out the spindle 1 in the pressure reducer holder Fig 15 10 Remove pre...

Page 29: ...ucer on the back plate ensure the correct setting of the lines The lines length between the stop pin on the upper part of the back plate and the pressure reducer should be 350 mm 4 5 Visual Function and Tightness Check 1 Visually check the high pressure O rings Section 4 7 2 Attach the compressed air cylinder s to the back plate Section 3 2 or 3 3 3 Check all parts of the compressed air breathing ...
Page 30: ...f the pressure reducer may only be performed by MSA or an authorised service centre Attention Pressure reducers are completed with a lead seal Where the lead seal is missing or damaged it cannot be guaranteed that they are ready for use or that they correspond to the approval status Optimal use of the compressed air breathing apparatus is not assured in this case 4 9 Storage Store in a dry place f...

Page 31: ...uses the advantages of the innovative coupling system The alphaCLICK 2 cylinder adaptor is not equipped with a flow restrictor Fig 19 Changing to alphaCLICK 2 1 alphaCLICK 2 cylinder adaptor 2 Cylinder valve Attention When changing the compressed air cylinder s do not hold on to the handwheel of the cylinder valve This could unintentionally open the cylinder valve through which compressed air at h...
Page 32: ...ressed air cylinder is simply plugged into the alphaCLICK 2 filling coupling of the filling panel The compressed air cylinders are filled with the help of an operating lever which has to be operated depending on the design of the filling panel for each individual cylinder or centrally for the station Warning When filling air cylinder s using the filling panel secure non used alphaCLICK 2 filling c...

Page 33: ...ing lever 5 Once the compressed air cylinder has been filled close the cylinder valve 6 Depressurise the connection between the filling panel and the cylinder 7 Turn the handwheel of the alphaCLICK 2 filling coupling on the filling panel clockwise first and upon reaching the stop press in the direction of the filling panel The cylinder adaptor is released from the alphaCLICK 2 filling coupling 8 R...
Page 34: ...0 l and 6 8 l composite cylinders Section 7 4 6 1 2 Valves The cylinder valves that screw into the cylinders are type approved according to EN 144 The handwheels are protected against impacts They must be fully open for use The ratchet valve can be closed only by additionally pulling the handwheel This prevents it from closing accidentally 6 1 3 T Pieces The T pieces allow two compressed air cylin...

Page 35: ...ure AutoMaXX N 10023686 For facepieces from the 3S Ultra Elite series Positive Pressure Standard Thread Connection M45X3 AutoMaXX AE 10023687 for full face masks 3S PF Ultra Elite PF and G1 M45x3 Positive Pressure Plug in Connection AutoMaXX AutoMaXX AS 10023688 For full face masks from the 3S PS MaXX Ultra Elite PS MaXX series and G1 PS MaXX Positive Pressure Plug in Connection ESA AutoMaXX ESA 1...

Page 36: ...r Cylinders Composite 6 litre 300 bar filled D5103947 6 litre 300 bar empty D5103976 6 8 litre 300 bar filled D5103962 6 8 litre 300 bar empty D5103979 6 8 litre 300 bar filled with flow restrictor 10015961 6 8 litre 300 bar filled with ratchet valve D5103973 6 8 litre 300 bar empty with ratchet valve D5103980 6 9 l 300 bar filled 10055167 6 9 l 300 bar empty 10055168 6 9 l 300 bar filled with rat...

Page 37: ...0152624 Upgrade kit valve protection AirGo 10145942 Chest strap D4075822 Respi Hood rescue hood 10045764 Standard medium pressure line 10020783 Protection tunnel BSPP black left 10152627 SP eXXtreme protection tunnel black left 10145844 eXXtreme protection tunnel black right 10145845 alphaBELT Pro holding and rescue belt incl lanyard 10151246 alphaBELT Basic positioning belt without lanyard 101512...

Page 38: ...matics alphaCLICK 2 300 bar In case you want to upgrade your AirMaXX with the new SingleLine SL pneumatics and alphaCLICK 2 alpha SL CLICK upgrade set incl alphaCLICK 2 coupling set 300 bar pressure reducer manifold SingleLine in exchange for your old SCBA pneumatics 10076302 Upgrade Set alphaCLICK 2 300 bar In case you want to upgrade your existing MSA pneumatics with alphaCLICK 2 alphaCLICK 2 co...

Page 39: ...re gauge check 400 bar D5175825 Control pressure gauge class 0 6 for pressure gauge check 400 bar D5175867 Control pressure gauge class 1 6 medium pressure 10 bar D5175860 Control pressure gauge class 0 6 medium pressure 16 bar D5175866 alphaCLICK 2 test gauge up to 400 bar 10192641 alphaCLICK 2 filling couplings for filling panels 300 bar set including coupling 300 bar blind plug bushings for M 1...

Page 40: ...Because every life has a purpose For local MSA contacts please visit us at MSAsafety com ...

Reviews: