background image

3

GB

MOUNTING INSTRUCTIONS

Honda CB650R 2022-

Thank you for buying a MRA Windshield.

Read this manual carefully and check the parts list for completeness before you begin. We recommend

that you have your screen fitted by an authorised workshop.

Number

Article

Article No..

Required tools

1

MRA windscreen

---

3 and 5 mm Allen keys
Torx 40

1

Pair of brackets

11507

4

M5 rubber nuts

10629

4

12 x 5 x 0.5 mm plastic washers

10635

4

M5 x 20 mm oval-head screws

10673

4

3 mm spacer sleeves

10872

4

4.5 x 1.5 mm O-rings

10992

1

Edge protector with clamp sleeves

---

Mounting the windscreen onto the motorcycle:

1. Place the motorcycle on an even surface.
2. Disassemble the headlight’s two fastening screws (P1).
3. Carefully lift the headlight out of the lower bracket and unplug the cable connector.
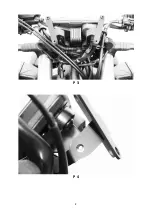
4. Unscrew the cable bracket’s two Allen screws (P2).
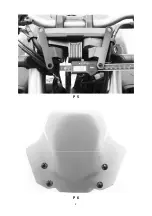
5. Fit the supplied retaining plates [11507] to the motorcycle using the two Allen screws, align

them and tighten the two Allen screws (P3, P4, P5).

6. Now take the headlight and plug the cable connector back into the headlight. Carefully insert

the headlight back into the lower bracket.

Tip

: Place a cloth over the headlight so it does not touch the retaining plates when it is

folded back!

7. Now carefully fold the headlight back so all the holes are aligned and refit and tighten the

two retaining screws (P6).

8. Take the MRA windscreen and insert the M5 x 20 mm oval-head screws [10673] with the

plastic washers [10635] through the holes and place the 3 mm spacers [10872] against these
from behind and secure these with the small O-rings [10992] (P7).

9. Insert the rubber nuts [10629] into the retaining plates and mount the MRA windscreen on

the retaining plates. Then tighten all the screws.

10.Attach the edge protector section on the windscreen and cut off any excess.
11.Slide the clamp sleeves over the ends of the edge protector section and lightly press these

together using a set of universal pliers so that the edge protector is clamped.

After installation, check that all of the screws are tight; tighten them up if necessary. Repeat this at

regular intervals. Clean the screen with water, neutral soap and a sponge. Do not use solvents, alcohol or

spirits to clean the screen as they will damage it.

MRA-Klement GmbH Siemensstr. 6 D-79331 Teningen Tel.: +49 7663 93890 Email: [email protected]

Summary of Contents for 4025066172917

Page 1: ... INSTRUCTIONS INSTRUCTIONS DE MONTAGE INSTRUCCIONES DE MONTAJE GUIDA AL MONTAGGIO HONDA CB650R 2022 NSPM by MRA Klement GmbH 07 2022 4025066173075 MRA Klement GmbH Siemensstr 6 D 79331 Teningen Tel 49 7663 93890 Email info mra de ...

Page 2: ...Sie den Scheinwerfer wieder vorsichtig in die untere Halterung ein Tipp Legen Sie ein Tuch über den Scheinwerfer sodass er beim Zurückklappen nicht an den Halteblechen streift 7 Klappen Sie jetzt den Scheinwerfer vorsichtig nach hinten sodass alle Bohrungen fluchten und montieren Sie die beiden Halteschrauben wieder und ziehen Sie sie fest P6 8 Nehmen Sie die MRA Scheibe und stecken Sie die M5X20m...

Page 3: ... Carefully insert the headlight back into the lower bracket Tip Place a cloth over the headlight so it does not touch the retaining plates when it is folded back 7 Now carefully fold the headlight back so all the holes are aligned and refit and tighten the two retaining screws P6 8 Take the MRA windscreen and insert the M5 x 20 mm oval head screws 10673 with the plastic washers 10635 through the h...

Page 4: ...seil Placez un chiffon sur le phare afin qu il ne frotte pas contre les tôles de maintien lorsqu il se rabat vers l arrière 7 Rabattez maintenant avec précaution le phare vers l arrière de manière à ce que tous les trous soient alignés et remontez les deux vis de maintien en les serrant P6 8 Prenez la rondelle MRA et insérez les vis à tête bombée M5X20mm 10673 avec les rondelles en plastique 10635...

Page 5: ...faro Inserire nuovamente con cautela il faro nel supporto inferiore Suggerimento Posizionare un panno sopra il faro in modo che quando viene ripiegato non strisci sulle lamiere di supporto 7 Adesso piegare con cautela il faro all indietro in modo che tutti i fori siano allineati e montare nuovamente le due viti di supporto e serrarle P6 8 Prendere il parabrezza MRA e inserire le viti a testa lenti...

Page 6: ...o Coloque un paño sobre el faro para que no se arañe con las chapas de sujeción al volver a insertarlo 7 Ahora incline el faro con cuidado hacia atrás para que todos los orificios estén alineados vuelva a montar los dos tornillos de sujeción y apriételos P6 8 Tome el parabrisas MRA e inserte los tornillos alomados M5X20mm 10673 con las arandelas de plástico 10635 a través de los orificios inserte ...

Page 7: ...7 P 1 P 2 ...

Page 8: ...8 P 3 P 4 ...

Page 9: ...9 P 5 P 6 ...

Page 10: ...10 ...

Reviews: