background image

16


LIMITED WARRANTY* ONE (1) YEAR 

WARRANTY IS ONLY VALID WITH A DATED PROOF OF PURCHASE 


1.  Your small kitchen appliance is built with precision, inspected and tested before leaving 
our factory.  
2.  It is warranted, to the original purchaser to be free from any manufacturing defects 
under normal use and conditions for one (1) year, cord excluded.  This Warranty applies 
only to the original purchaser of this product. 
3.  If you need to exchange the unit, please return it in its original carton, with a sales 
receipt, to the store where you purchased it. If you are past the stores allowed return policy 
period, please see the enclosed Warranty.   
4.  If you use your appliance for household use and according to instructions, it should give 
you years of satisfactory service.   
5.  During the one-year warranty period, a product with a defect will be either repaired or 
replaced with a new or reconditioned comparable model (at our option) when the product is 
returned to our Service Center.  (See the “Returns” section below).   
 6.  The repaired or replacement product will be in warranty for the remaining balance of the 
one-year warranty period and an additional one-month period. 
7.

  This limited warranty covers appliances purchased and used within the 50 

contiguous states plus the District of Columbia and does NOT cover: 

- Damages caused by unreasonable use, neglect, normal wear and tear, commercial use, 
improper assembly or installation of product. 
- Damages caused in shipping. 
- Damages caused by replacement or resetting of house fuses or circuit breakers. 
- Defects other than manufacturing defects. 
- Breakage caused by misuse, abuse, accident, alteration, lack of proper care and 
maintenance, or incorrect current or voltage.  
- Lost or missing parts of the product.  Parts will need to be purchased separately. 
- Damages of parts that are not electrical; for example: cracked or broken plastic or glass. 
- Damage from service or repair by unauthorized personnel. 
- Extended warranties purchased via a separate company or reseller. 
- Consumer’s remorse is not an acceptable reason to return a product to our Service 
Center. 
 
 
*One Year Limited Warranty valid only in the 

50 contiguous states plus the District of 

Columbia

excluding

 Puerto Rico and the Virgin Islands. 

This warranty is effective only if the product is purchased and operated in the USA; product 
usage which is in violation of the written instructions provided with the unit will void this 
warranty. 
For international warranty, please contact the local distributor. 
**Any instruction or policy included in this manual may be subject to change at any time. 


MAXI-MATIC, USA 

18401 E. Arenth Ave.  City of Industry, CA 91748 
Customer Service Dept:  (626) 912-9877 Ext: 120/107 MON-FRI 8am-5pm PST 
Website:  www.maxi-matic.com  email:  [email protected] 


Summary of Contents for EIM-404

Page 1: ...4Qt Electric Ice Cream Maker Maquina Para Hacer Nieve Model EIM 404 Instruction Manual Before operating your new appliance please read all instructions carefully and keep for future reference ...

Page 2: ... or sold by the product manufacturer as a risk of fire electrical shock or serious personal injury may result 11 Plug the product into a standard 120V AC electrical outlet only 12 Do not plug or unplug the product from the electrical outlet with a wet hand 13 Never operate this product while you are standing sitting in a damp or wet area 14 To avoid a circuit overload do not operate another electr...

Page 3: ...ere it can unintentionally be pulled on or tripped over by children or pets POLARIZED PLUG If this appliance is equipped with a polarized plug one blade is wider than the other please follow the below instructions To reduce the risk of electrical shock this plug is intended to fit into a polarized outlet only one way If you are unable to fit the plug into the electrical outlet try reversing the pl...

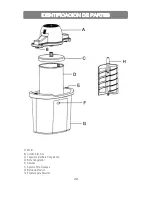
Page 4: ...3 A Electric Motor B Power Cord C Canister Lid D Freezing Canister E Bucket Locking Slots F Drainage Hole G Plastic Bucket H Mixing Spatula PARTS IDENTIFICATION ...

Page 5: ...OR ANY OTHER LIQUID AT ANY TIME 1 Using your favorite recipe prepare the necessary ingredients per recipe instructions 2 Pour the prepared and chilled ice cream mixture into the chilled ice cream canister Do not fill more than 2 3 full 3 Insert the Blending Spatula and make sure the bottom of the spatula is fixed in the center of the bottom of the canister Figure 1 4 Place the lid on the canister ...

Page 6: ...very fresh so it will be more of a soft serve texture 18 If a harder consistency is desired transfer the contents to a freezable container and freeze for 3 4 hours HELPFUL TIPS NOTES 1 Make sure to use ice that is crushed inside the bucket Ice should be small coarse pieces 2 As the canister is turning make sure to periodically mix the salt and ice together by using the plastic stirrer every 10 15 ...

Page 7: ...e the salt water residue Rinse and dry thoroughly to ensure the salt does not corrode the metal accessories or parts DO NOT WASH BUCKET IN DISHWASHER 3 Wash the plastic canister lid and mixing spatula in warm soapy water and dry thoroughly DO NOT WASH PARTS IN DISHWASHER 4 Wash the freezing canister in warm soapy water and dry thoroughly Never freeze the canister while it is still wet CAUTION DO N...

Page 8: ...r several minutes it will start to thicken into custard At this point remove the pan from the heat add the cocoa powder using a sifter and mix well ensuring any lumps of cocoa powder have dissolved Leave the mixture to chill 3 Once chilled mix until slushy Add the heavy cream and make sure it mixes in well Transfer the mixture to the ice cream maker and freeze according to the instructions CHOCOLA...

Page 9: ... form over the back of your spoon remove the saucepan from the heat Let mixture cool completely 3 When the custard base is completely cooled stir in heavy cream and transfer to a chilled bowl For best results refrigerate the mix for at least 3 hours overnight if you have the time Transfer the mixture into ice cream maker and freeze according to the instructions STRAWBERRY ICE CREAM 4 LBS FRESH STR...

Page 10: ...to ice cream maker and freeze according to the instructions CRUNCHY PECAN MAPLE SYRUP ICE CREAM 2 CUPS PECAN NUTS CHOPPED 8 OZ BUTTER CUP BROWN SUGAR 2 OZ MAPLE SYRUP 6 CUPS MILK 6 CUPS DOUBLE HEAVY CREAM 1 Using a frying pan slowly melt the butter then add the chopped pecan nuts Sprinkle on the sugar stir and cook on a medium heat for approx 3 4 minutes until the nuts are crisp NOTE Cooking on to...

Page 11: ... Remove the saucepan from the heat and allow to cool completely 2 When the mixture is cooled stir in the heavy cream chopped pecan nuts and vanilla extract Transfer the complete mixture into ice cream maker and freeze according to the instructions HONEY ICE CREAM 10 EGG YOLKS 4 CUPS MILK 4 CUPS DOUBLE HEAVY CREAM 1 CUP HONEY 2 TEASPOONS VANILLA EXTRACT 1 Beat together the egg yolks and honey in mi...

Page 12: ...MILK SHELLED AND BLANCHED 3 CUPS DOUBLE HEAVY CREAM 1 TSP VANILLA EXTRACT 1 CUPS SUGAR 1 TSP ALMOND EXTRACT Blanched if you have time blanching can help the recipe place the nuts in a heatproof bowl and pour boiling water over them After 1 2 minutes carefully drain and peel Ensure you dispose of the hot water safely 1 In a blender place the eggs milk sugar and all the nuts and blend until you get ...

Page 13: ...dissolved Bring to a boil for approx 5 to 8 minutes until you have syrup and remove from heat and let cool completely about 3 to 5 hours 2 Mash or purée the strawberries and strain if desired to remove the seeds 3 Melt the gelatin powder by mixing it with 4 to6 tablespoons of water over a boiling pan and stir it Then add the strawberry purée mixture and the lemon juice into the syrup mixture When ...

Page 14: ...wl and stir in the lemon juice and sugar water mix Transfer the complete mixture into ice cream maker and freeze according to the instructions LEMON SORBET 2 CUPS SUGAR 4 CUPS FRESH LEMON JUICE 4 CUPS WATER 8 TSP LEMON ZEST 1 In a saucepan mix together the sugar water and lemon zest Heat gently stirring constantly until the sugar has dissolved Bring to a boil for approx 5 to 8 minutes until you ha...

Page 15: ...ILLA EXTRACT 1 Place the milk sugar and vanilla extract into a saucepan and stir constantly while heating the pan slowly to dissolve the sugar DO NOT BOIL Once the sugar has dissolved completely remove from the heat 2 Add the chopped chocolate to the pan and stir until fully melted Leave the whole mixture to cool then transfer into ice cream maker and freeze according to the instructions BANANA GE...

Page 16: ... CUP BUTTERMILK TSP FINE SALT ZEST OF 2 ORANGES 12 LARGE EGG YOLKS ZEST OF 2 LEMONS 3 CUPS HEAVY CREAM ZEST OF 2 LIMES 1 CUPS WHOLE MILK Optional 2 tablespoon white rum or vodka 1 Whisk the sugar salt and yolks in a heavy medium saucepan Gradually whisk in the cream Then whisk in the milk buttermilk and citrus zests Using a wooden spoon stir the custard constantly over medium heat until it thicken...

Page 17: ...umbia and does NOT cover Damages caused by unreasonable use neglect normal wear and tear commercial use improper assembly or installation of product Damages caused in shipping Damages caused by replacement or resetting of house fuses or circuit breakers Defects other than manufacturing defects Breakage caused by misuse abuse accident alteration lack of proper care and maintenance or incorrect curr...

Page 18: ...the unit and the problem you are having Enclose in an envelope and tape directly to the unit before the box is sealed and d Any parts or accessories related to the problem 3 Maxi Matic USA recommends you ship the package U P S ground service for tracking purposes We cannot assume responsibility for lost or damaged products returned to us during incoming shipment For your protection always carefull...

Page 19: ... gases o explosivos 9 Use únicamente accesorios manufacturados por el mismo fabricante con este producto de otra manera existe el riesgo de una descarga eléctrica o daños personales podría ocurrir 10 No toque las superficies calientes de este aparato Siempre utilice las agarraderas o botones 11 Nunca mueva este aparato cuando esté en operación 12 Nunca use ningún aparato con el enchufe dañado Si e...

Page 20: ... ser utilizada tenga muy en cuenta las siguientes recomendaciones Las especificaciones eléctricas especialmente el amperaje del cordón eléctrico a utilizar deberá de ser igual o de más amperaje que el especificado en el aparato a utilizar La extensión eléctrica deberá de ser colocada de una manera que no cuelgue de la mesa donde una mascota los niños o cualquier otra persona lo pueda jalar o trope...

Page 21: ...20 A Motor B Cordón Eléctrico C Tapadera del Bote Congelador D Bote Congelador E Ranuras F Agujero Para Desagüe G Balde de Plástico H Espátula para Mezclar IDENTIFICACION DE PARTES ...

Page 22: ... helado es muy blanda coloque el contenido en el congelador por 3 o 4 horas 5 Para recetas que requieran ingredientes pre cocinados es muy recomendado que los ingredientes sean preparados varias horas en adelantado para que la mezcla se enfríe y expanda PRECAUCIÓN No selle el agujero para desagüe F este sirve para drenar el exceso de sal y agua y deberá de estar destapado todo el tiempo Use cuidad...

Page 23: ...n el bote congelador D ya previamente frío No lo sobrellene a más de 2 tercios de su capacidad 4 Inserte la espátula para mezclar H en el agujero correspondiente en la tapadera C Coloque la tapadera C junta con la espátula para mezclar H sobre el bote congelador D asegurándose que la espátula H este colocada en el centro del bote de congelador D como en la IMAGEN 1 5 Apriete la tapadera C sobre el...

Page 24: ...balde plástico G empiece a derretirse entre aproximadamente 5 a 8 cm agregue mas hielo y sal de roca 14 Enchufe el aparato y permita que quede en operación por 45 minutos ADVERTENCIA Si el motor A se para prematuramente desenchúfelo del toma corriente para apagarlo quite cualquier obstrucción que exista y empiece otra vez 15 Una vez que el ciclo de batir haya terminado desconecte el aparato del to...

Page 25: ...duzca corrosión en los accesorios o partes de metal 3 Enjuague todas las partes y séquelas perfectamente antes de operar o almacenar 4 Lave el balde de plástico tapadera espátula y demás accesorios de plástico en agua caliente con jabón y después seque perfectamente 5 Lave el bote congelador en agua caliente con jabón y después seque perfectamente PRECAUCIÓN Nunca coloque el bote de aluminio dentr...

Page 26: ...cesivo negligencia uso y desgaste normal uso comercial montaje o instalación incorrecta del producto Los daños causados durante el envío Los daños causados por la sustitución o reposición de fusibles o disyuntores Defectos que no sean defectos de fabricación Rotura causada por mal uso abuso accidente alteración falta de cuidado y mantenimiento o incorrecta de corriente o voltaje Pérdida o falta al...

Page 27: ...delo de la unidad y el problema que tiene Encierre en un sobre y pegue directamente a la unidad antes de sellar la caja y d Todas las piezas o accesorios relacionados con el problema 3 Maxi Matic EE UU recomienda enviar el paquete de servicio terrestre de UPS para fines de seguimiento No podemos asumir la responsabilidad por productos perdidos o dañados devueltos a nosotros durante el transporte e...

Reviews: