background image


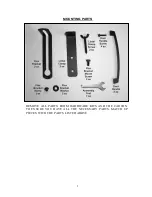
MOUNTING PARTS  


REMOVE  ALL  PARTS  FROM  HARDWARE  KITS  AND  THE  CARTON. 
TO  ENSURE  YOU  HAVE  ALL  THE  NECESSARY  PARTS,  MATCH  UP 
PIECES WITH THE PARTS LISTED ABOVE. 

Summary of Contents for Glass Screen

Page 1: ...to give you many years of trouble free service A few rules for the proper use and care of your Glass Screen are necessary for proper operation and satisfactory service Always use a grate for fires Place grate a minimum of 4 inches away from the glass When you have a large fire keep the doors open Do not allow burning coals or logs to contact glass Keep combustibles away from front of screen Do not...

Page 2: ...ompletely Wood smoke is a combination of unburned gases and a fog of unburned tar like liquids When these gases come in contact with a cool surface they will condense and form a nasty brown or black substance which has an unpleasant acrid odor This is creosote When ignited creosote makes an extremely hot fire The chimney connector and chimney should be inspected at least twice monthly during the h...

Page 3: ...than 1 2 square lf glass breaks into larger pieces it has been de tempered by too large a fire Replace all glass you suspect has been de tempered Replace with tempered glass only 2 Do not use ammonia based glass cleaner to clean the glass or the enclosure as these types of cleaners may damage the finish of your enclosure Minor finish scratches can be removed by applying lemon oil GENERAL SAFEGUARD...

Page 4: ... finish MR FLAME Inc shall not be liable for consequential or indirect damages which are caused by defects in its product by its repair or replacement Some states do no allow the exclusion limitation incidental or consequential damages so the exclusion or limitation in the preceding sentence may not apply to you If you need to take advantage of this limited warranty during the five year period sim...

Page 5: ...5 MOUNTING PARTS REMOVE ALL PARTS FROM HARDWARE KITS AND THE CARTON TO ENSURE YOU HAVE ALL THE NECESSARY PARTS MATCH UP PIECES WITH THE PARTS LISTED ABOVE ...

Page 6: ...IG A Put hex screws through slot in flex bracket Attach flex bracket to back of enclosure screwing bracket into proper hole DO NOT TIGHTEN Screw thumb screws into lintel clamps Put machine screws through slot in flex bracket and screw into lintel clamps DO NOT TIGHTEN Push enclosure firmly against fireplace so it overlaps evenly on both sides FIG B Attach lintel clamps to fireplace lintel bar and ...

Reviews: