background image

- 21 - 


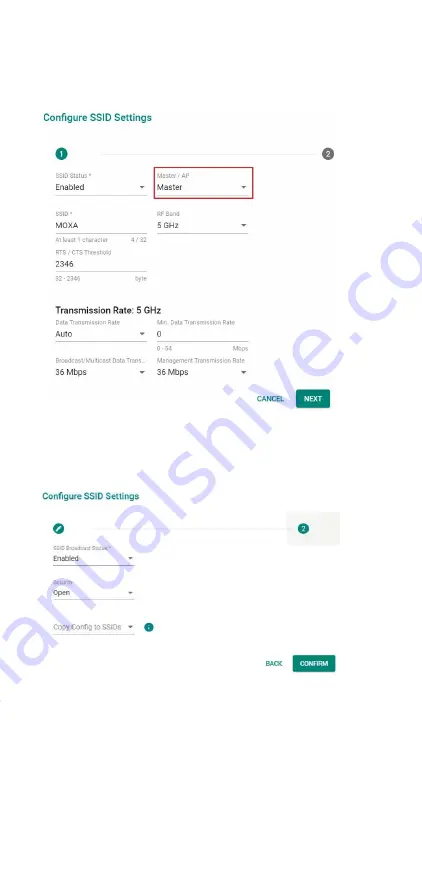
On the settings page, configure the 

SSID Status

Master/AP 

(select Master),

SSID

RF Band

RTS/CTS Threshold

, and 

Transmission Rate 

for the 5 GHz or 2.4 GHz band. When finished, 

click 

NEXT


On the second SSID Settings screen, configure the 

SSID 

Broadcast Status 

and 

Security 

type. From here, you can also 

copy the configuration over to the second SSID. When finished, 
click 

CONFIRM


Summary of Contents for AWK-4252A Series

Page 1: ...AWK 4252A Series Quick Installation Guide Moxa AirWorks Technical Support Contact Information www moxa com support 2022 Moxa Inc All rights reserved P N 1802032520012...

Page 2: ...ovides more flexibility and simplifies field site deployments Meanwhile backwards compatibility with 802 11a b g n makes the AWK 4252A the ideal solution for constructing a versatile wireless data tra...

Page 3: ...2 LAN1 2 4GHz 5 GHz SYS 4 Grounding screw MS5 5 Power connector 5 pin M12 A coded male 6 Digital IO connector 8 pin M12 A coded female 7 USB Type A connector 8 Console port RJ45 9 LAN2 10 100 1000Base...

Page 4: ...unting plates with the M5 screws as shown in the adjacent diagrams STEP 2 Mounting the AWK 4252A to a wall requires 4 screws Use the AWK 4252A device with the wall mounting plates attached as a guide...

Page 5: ...ws STEP 3 Once the screws are fixed into the wall insert the four screw heads through the large opening of the keyhole shaped apertures and then slide the AWK 4252A downwards as indicated on the right...

Page 6: ...ervice personnel or users have to pay special attention and take special precautions before handling this equipment Only authorized well trained professionals should be allowed to access the restricte...

Page 7: ...source please contact Moxa for further information NOTE If using a Class I adapter the power cord must be connected to a socket outlet with an earthing connection You can use the type of signal transm...

Page 8: ...f coupling currents from nearby lightning strikes a lightning arrester should be installed as part of your antenna system Ground the device antenna as well as the arrester properly to provide maximum...

Page 9: ...y output which consists of the two contacts These relay contacts are used to detect user configured events The two wires attached to the Relay contacts form an open circuit when a user configured even...

Page 10: ...he 10 100 1000BaseT X ports located on the AWK 4252A s front panel are used to connect to Ethernet enabled devices MDI MDI X Port Pinouts RS 232 Connection The AWK 4252A has one RS 232 8 pin RJ45 cons...

Page 11: ...e clamp ring screw nut seal and housing as follows STEP 3 Crimp the modular RJ plug to the cable Note that the use of a snagless cover shield or a strain relief boot is not recommended here After you...

Page 12: ...LAN port s 100 Mbps link is inactive 2 4G Green On Device is in Client Client Router Slave mode and has established a Wi Fi connection to an AP with a SNR value of 35 or higher Blinking Data is being...

Page 13: ...TION Do not locate the antenna near overhead power lines or other electric light or power circuits or where it can come into contact with such circuits When installing the antenna take extreme care no...

Page 14: ...t the AWK to the notebook or PC via the AWK s LAN port The LED indicator on the AWK s LAN port will light up when a connection is established Step 3 Set up the computer s IP address Choose an IP addre...

Page 15: ...wser and type https 192 168 127 253 in the address field to access the AWK s homepage If successfully connected the AWK s interface homepage will appear Click NEXT Step 5 Choose your country or region...

Page 16: ...d are case sensitive Step 6 Create a user account and password Enter the username password and email address for your user account and click CREATE After creating your account you will be automaticall...

Page 17: ...ername and password and click LOG IN The device will start initializing this may take several seconds Once the warning message has disappeared you can log in using your username and password First tim...

Page 18: ...Wireless Settings and select AP from the Operation Mode drop down list Step 2 Set up the AWK as an AP Click the ADD icon to create a new SSID On the settings page configure the SSID Status SSID RF Ban...

Page 19: ...ration over to the second SSID When finished click CONFIRM Configuring the AWK as a Client Step 1 Set the operation mode of the AWK to Client mode Go to Wi Fi Wireless Settings and select Client from...

Page 20: ...he AWK as a Master Step 1 Set the operation mode of the AWK to Master mode Go to Wi Fi Wireless Settings and select Master from the Operation Mode drop down list Step 2 Set up the AWK as a Master Clic...

Page 21: ...nd RTS CTS Threshold and Transmission Rate for the 5 GHz or 2 4 GHz band When finished click NEXT On the second SSID Settings screen configure the SSID Broadcast Status and Security type From here you...

Page 22: ...ep 1 Set the operation mode of the AWK to Slave mode Go to Wi Fi Wireless Settings and select Slave from the Operation Mode drop down list set the SSID and click Apply For more detailed configurations...

Page 23: ...is transmitter must be installed to provide a separation distance of at least 50 cm from all persons and must not be co located or operating in conjunction with any other antenna or transmitter This t...

Page 24: ...F La puissance de sortie rayonn e du dispositif sans fil est inf rieure aux limites d exposition aux radiofr quences d Innovation Sciences et D veloppement conomique Canada ISED Le dispositif sans fil...

Page 25: ...he bands 5250 5350 MHz and 5470 5725 MHz shall be such that the equipment still complies with the e i r p limit iii for devices with detachable antenna s the maximum antenna gain permitted for devices...

Reviews: