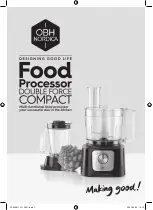
background image

7

Description 

a

Motor unit

a1

motor unit power outlet

a2

speed selector: position 0-1-2-Pulse 
(intermittent operation)

b

Transparent bowl assembly 

b1

pusher with measuring marks 

b2

lid with feeder tube 

b3

bowl

c

Spindle 

ACCESSORIES DEPENDING ON MODEL:

d

d1

metal blade

d2

plastic kneading blade

e

Vegetable cutting disc

. A/D : fine grating / thin slicing (reversible) .   

.C/H : coarse grating / thick slicing 

(reversible)

E

: French fries cutting disc

: grating disc for hard foods such as 

parmesan and coconut

f

Emulsifying disc

g

Citrus press

g1

cone

g2

filter

g3

juice collector 

g4

citrus press spindle 

h

Blender

h1

measuring cap

h2

lid

h3

jug

i

Juice extractor

i1

pusher

i2

lid

i3

filter ring 

i4

filter basket

j

Mini-chopper

j1

lid

j2

bowl

k

Grinder

k1

lid

k2

bowl

l

Mincer head gear block

m

Mincer head

ma

: metal mincer head

mb 

: plastic mincer head

m1

body

m2

screw

m3

blade

m4

screens (for mincing meat)
-

m4-1 

: : small-hole screen

m4-2 

: large-hole screen

m4-3

: medium-hole screen 

m4-4

: triangular-hole screen (for mincing  

vegetables) 

m5

nut

m6

removable tray 

m7

pusher

nSausage filler tube

o

Biscuit maker attachment

o1

support

o2

nozzle

p

Kebbe accessory

p1

ring

p2

Kebbe making end

q

Juice and coulis accessory

q1

sealing gasket

q2

screw

q3

filter

q3-1

: juice filter 

q3-2 

: coulis filter

q4

juice guide

q5

brush (bottle type)

r

Spatula

s

Storage drawer for accessories

MOULI GB  12/10/06  15:33  Page 7

All manuals and user guides at all-guides.com

Summary of Contents for Vita Compact

Page 1: ...1 MOULI GB 12 10 06 15 33 Page 1 All manuals and user guides at all guides com a l l g u i d e s c o m...

Page 2: ...2 c d1 d2 A D C H e E G f k2 j1 j2 i2 i1 g1 g2 g3 g4 i3 i4 k1 h1 h2 h3 b2 b1 b3 a1 a2 MOULI GB 12 10 06 15 33 Page 2 All manuals and user guides at all guides com...

Page 3: ...m6 ma m mb q m7 m6 m4 1 m4 3 m4 1 m4 4 m4 2 m4 2 o1 n m5 m4 m3 m2 m1 m5 m4 m3 m2 m1 o2 p1 p2 m7 q5 q4 q3 1 q3 2 q1 m5 q3 q2 r s MOULI GB 12 10 06 15 33 Page 3 All manuals and user guides at all guides...

Page 4: ...1c fig 2a fig 2b fig 2c fig 3 fig 4 fig 7 fig 6 fig 8 2 3 2 3 4 1 1 6 5 6 3 2 3 4 5 2 3 4 2 1 1 1 2 4 3 4 4 1 6 2 3 1 fig 5 1 6 4 5 5 5 2 3 5 MOULI GB 12 10 06 15 33 Page 4 All manuals and user guide...

Page 5: ...5 fig 9 fig 10a fig 10b fig 10c fig 10d fig 10e fig 10f fig 10g fig 11b fig 11a fig 11c 6 5 1 5 4 3 2 1 2 3 4 2 1 2 1 MOULI GB 12 10 06 15 33 Page 5 All manuals and user guides at all guides com...

Page 6: ...be close to or in contact with the hot partsof your appliance near a source of heat or over a sharp edge Do not use the appliance if the power cord or plug is damaged The power cord must be replaced b...

Page 7: ...ap h2 lid h3 jug i Juice extractor i1 pusher i2 lid i3 filter ring i4 filter basket j Mini chopper j1 lid j2 bowl k Grinder k1 lid k2 bowl l Mincer head gear block m Mincer head ma metal mincer head m...

Page 8: ...urning it toward the right The lid must be locked onto the bowl before locking the assembly onto the motor unit a 2 Removing the bowl and lids Unlock by turning the assembly toward the left Unlock the...

Page 9: ...the 2 position to start You can blend up to 1 litre of soup or stewed fruit in 20 seconds To blend soups to a fine smooth texture use the blender h attachment 4 Grate slice ACCESSORIES USED Bowl unit...

Page 10: ...e blender h3 without exceeding the maximum level indicated on the jug Put on the lid h2 with the measuring cap h1 and lock it on the jug Position the assembled jug h on the motor unit outlet a2 turn t...

Page 11: ...he bowl b3 then turn the assembly to the right to the stop To remove the bowl lid assembly turn the assembly toward yourself to release it unlock the lid the remove the mini chopper or grinder USAGE A...

Page 12: ...icer unit i ASSEMBLING THE ACCESSORIES Place the bowl b3 on the motor unit a without locking it Assemble the filter basket i4 with its filter ring i3 lower it into the filter basket to clip it on so t...

Page 13: ...lace the assembled head on the gear block assembly l USAGE AND PRACTICAL TIPS Prepare the entire quantity of food to be minced Remove bones cartilage and gristle Cut the meat or vegetables into pieces...

Page 14: ...skin off the filler tube and tie a knot Give your sausages the desired length by pinching and twisting the skin at the desired intervals Try to avoid trapping air during the filling operation so the s...

Page 15: ...or a2 to the 2 position to start For easier use if the food gets stuck in the mincer head m first unlock the motor block assembly l then but not from the motor unit a and remove the mincer head m 10g...

Page 16: ...m Wipe them clean with a damp sponge The blades on the accessories are very sharp Handle them with care 13 Storage A clever trick If your accessories become stained by food carrots oranges etc rub the...

Page 17: ...el disc for grating thick slicing disc C H Stainless steel disc for grating thin slicing disc A D Grinder Mini chopper Blender Transparent bowl Metal blade Plastic kneading blade Citrus press Juicer M...

Page 18: ...a sprinkle on a bit of oregano and grated gruyere cheese then drizzle a few drops of olive oil all around Place the prepared pizza on your greased floured baking sheet Bake for 15 to 20 min keeping an...

Page 19: ...the emulsifying disc Set at speed 2 and run for about 1 min Be careful not to keep it running for too long otherwise the cream could curdle Mayonnaise 200ml olive or sunflower oil or a mixture of bot...

Page 20: ...0 827676 MOULI GB 12 10 06 15 33 Page 20 All manuals and user guides at all guides com...

Reviews: