Installation
2 - 3
Mounting
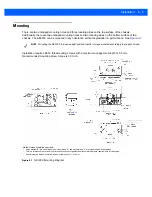
There are two untapped mounting holes and three locating aides on the top surface of the chassis.
Additionally, there are two untapped mounting holes and two locating aides on the bottom surface of the
chassis. The SE3300 can be mounted in any orientation without degradation in performance. See
.
Installation requires #2-32 thread-cutting screws with a maximum engagement depth of 5.5 mm.
Recommended mounting screw torque is 3.5 in-lb.
Figure 2-1
SE3300 Mounting Diagram
NOTE
Mounting the SE3300 in a non-upright position results in images rotated accordingly in snapshot mode.
Notes: Unless otherwise specified:
•
Holes marked "B" are mounting holes. Holes marked "A" and slots marked "C" are imager engine locating aides.
•
This is a reference drawing and is not intended to specify or guarantee all possible integration requirements for this engine.
•
All untoleranced dimensions follow a general tolerance of +/- 0.15 mm.
See
Summary of Contents for SE3300
Page 1: ...SE3300 INTEGRATION GUIDE ...
Page 2: ......
Page 3: ...SE3300 INTEGRATION GUIDE 72E 148589 01 Revision 8 September 2011 ...
Page 6: ...iv SE3300 Integration Guide ...
Page 10: ...viii SE3300 Integration Guide ...
Page 14: ...xii SE3300 Integration Guide ...
Page 18: ...1 4 SE3300 Integration Guide ...
Page 38: ...3 10 SE3300 Integration Guide ...
Page 44: ...4 6 SE3300 Integration Guide Figure 4 5 SE3300 to PL33XX Decoder 21 Pin Flex ...
Page 58: ...5 14 SE3300 Integration Guide ...
Page 68: ...6 10 SE3300 Integration Guide ...
Page 70: ...A 2 SE3300 Integration Guide ...
Page 72: ......
Page 73: ......

