background image


7


6.  OPERATING INSTRUCTIONS

IMPORTANT!

 Charge immediately after 

purchase and when battery level is below 

40%, to keep the internal battery fully 

charged and prolong battery life. Do not 

recharge unit for more than 12 hours.

POWERING ON

Press the ON/OFF power switch. The unit 

will initialize, and all icons on the LCD 

screen will activate. If normal function 

is detected, the screen will return to its 

normal display.

CHECKING THE LEVEL  

OF THE INTERNAL BATTERY

The Battery Capacity Indicator on the 

LCD display will show the battery’s charge 

level in 20-percent increments. For best 

performance, the battery capacity should 

be 20% or greater.

CHARGING THE INTERNAL BATTERY

NOTE:

 Do not use the unit while charging 

its internal battery.

AC adaptor

1. 

If the red AC Output LED is lit, press 

the AC Output button to turn off before 

charging. 

2. 

Connect the provided AC charger to 

the socket on the front of the unit. Plug 

the charger’s power cord directly into 

a live grounded 120V outlet. Charging 

will start automatically, and the   AC 

Adaptor Charging icon will show on 

the display.  

3. 

While the unit is charging, the rotating 

 Charging indicator will show on 

the display. When the internal battery 

is fully charged, all five bars of the  

Battery Capacity   indicator on the 

display will show. Complete charging 

will take approximately 5 hours. 

4. 

When the unit is fully charged, unplug 

the charger from the 120V outlet and 

then from the unit.

Solar Charging

Solar charging can be accomplished by 

plugging in a 30-36V solar panel (not 

included) into the Solar Charging Input port. 

The   Solar Charging icon will show on 

the display. For best results, face the panel 

toward the sun, away from curtains and 

windows. Charging by solar panel takes 

approximately 10 hours (on a sunny day).

POWERING A 12V DC DEVICE

NOTE:

 Do not power a 12V device while 

charging the internal battery. 

12V DC Output

1. 

Make sure the device to be powered is 

OFF before inserting the 12V DC plug 

into one of the two 12V DC output ports.

2. 

Plug the 12V DC device into one of the 

12V DC output ports and turn on the 

12V DC device (if required). The   

12V DC output icon and the rotating   

Discharging indicator will show on the 

display. 

3. 

When finished, turn off the DC device  

(if required) and unplug from the DC 

output port.

4. 

Recharge the unit when the battery 

level is below 40%.

12V DC Cigarette lighter plug

1. 

Make sure the device to be powered 

is OFF before inserting the 12V DC 

cigarette lighter plug into the 12V DC 

cigarette lighter socket.

2. 

Plug the 12V DC device into the DC 

cigarette lighter socket and turn on 

the 12V DC device (if required). The 

Cigarette Lighter Output icon and the 

rotating   Discharging indicator will 

show on the display.

3. 

When finished, turn off the DC device  

(if required) and unplug from the DC 

Cigarette Lighter socket.

4. 

Recharge the unit when the battery 

level is below 40%.

USING THE USB PORTS

The USB ports provide 1A, 2A and 2.4A  

at 5V DC.

1. 

Plug the device into one of the three 

USB ports on the front panel.

2. 

Turn on the USB device, if necessary. 

The   USB Output icon and the 

rotating   Discharging indicator will 

show on the display. 

3. 

When finished, turn off the USB 

device (if required) and unplug from 

the USB port.

4. 

Recharge the unit when the battery 

level is below 40%.

Summary of Contents for MT060

Page 1: ...tively Please read and follow these instructions and precautions carefully POR FAVOR CONSERVE ESTE MANUAL DEL USUARIO Y LEALO ANTES DE CADA USO En este manual le explica cómo utilizar la unidad de manera segura y confiable Por favor lea y siga las siguientes instrucciones y precauciones GARDER LE MANUEL D INSTRUCTION ET LISEZ LE AVANT CHAQUE UTILISATION Ce manuel explique comment utiliser l unité ...

Page 2: ...TIONS 5 ASSEMBLY INSTRUCTIONS 5 FEATURES 6 LCD SCREEN 6 OPERATING INSTRUCTIONS 7 MAINTENANCE AND CARE 9 WARNINGS 9 TROUBLESHOOTING 9 BEFORE RETURNING FOR REPAIRS 10 SPECIFICATIONS 10 REPLACEMENT PARTS 10 DISPOSAL INFORMATION 10 LIMITED WARRANTY 11 WARRANTY CARD 27 ...

Page 3: ... DE MONTAJE 12 CARACTERÍSTICAS 13 PANTALLA LCD 13 INSTRUCCIONES DE OPERACIÓN 14 MANTENIMIENTO Y CUIDADO 16 ADVERTENCIAS 16 LOCALIZACIÓN Y SOLUCIÓN DE PROBLEMAS 16 ANTES DE DEVOLVER A REPARACIONES 17 ESPECIFICACIONES 17 REPUESTOS 17 INFORMACIÓN DE ELIMINACIÓN 18 GARANTÍA LIMITADA 18 TARJETA DE GARANTÍA 27 ...

Page 4: ...NSTRUCTIONS D ASSEMBLAGE 19 ATTRIBUTS 20 ÉCRAN ACL 20 INSTRUCTIONS DE FONCTIONNEMENT 21 SOINS ET ENTRETIEN 23 AVERTISSEMENTS 23 DÉPANNAGE 24 AVANT DE RETOURNER POUR LES RÉPARATIONS 24 FICHE TECHNIQUE 25 PIÈCES DE RECHANGE 25 INFORMATION DE DISPOSITION 25 GARANTIE LIMITÉE 25 CARTE DE GARANTIE 28 ...

Page 5: ...he unit If repair is required contact Customer Service for assistance 1 11 To reduce risk of electric shock unplug the unit from the outlet before attempting any maintenance or cleaning Turning off controls will not reduce this risk 1 12 The unit gets uncomfortably warm during use and must have proper ventilation Ensure at least 3 in 7 5 cm air space is maintained on all sides of the unit 1 13 Do ...

Page 6: ...output ports 13 14 15 16 1 2 3 4 5 6 7 8 9 10 11 12 10 12V DC cigarette lighter output only port 11 AC output button 12 AC output LED indicator 13 Handle 14 Light button 15 Light 16 Cooling vents 5 LCD SCREEN AC ADAPTOR CHARGING BATTERY CAPACITY INDICATOR SOLAR CHARGING WARNING POWER OUTPUT INDICATOR AC OUTPUT CHARGING INDICATOR USB OUTPUT 12V DC OUTPUT 12V DC CIGARETTE LIGHTER OUTPUT ...

Page 7: ...ded into the Solar Charging Input port The Solar Charging icon will show on the display For best results face the panel toward the sun away from curtains and windows Charging by solar panel takes approximately 10 hours on a sunny day POWERING A 12V DC DEVICE NOTE Do not power a 12V device while charging the internal battery 12V DC Output 1 Make sure the device to be powered is OFF before inserting...

Page 8: ...e an extension cord from the inverter to the device without significantly decreasing the power being generated by the inverter For best operating results the extension cord should be 16 AWG 1 31 mm2 or larger and no longer than 50 feet WARNING RISK OF ELECTRIC SHOCK Incorrect operation of your inverter may result in damage and personal injury The inverter output is 110V AC and can shock or electro...

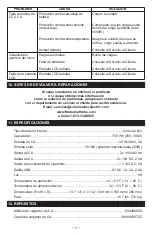
Page 9: ...erload 9 TROUBLESHOOTING PROBLEM CAUSE SOLUTION Power up failure Under voltage protection Abnormal load protection Damaged unit Recharge unit Remove loads and recharge unit Contact customer service Charger fault Unmatched charger Damaged charger Abnormal power supply or connection Use only the included charger Contact customer service for replacement Reconnect the charger If problem persists repla...

Page 10: ...r up to 200W AC output 2 x 110V 60 Hz DC output 2 x 12V DC 2 5A Cigarette lighter output 1 x 12V DC 5A USB output 5V DC 1A 2A 2 4A Light 1W Operating Temperature 14 113 F 10 45 C Storage Temperature 32 113 F 0 45 C Dimensions H x W x D 13 7 x 6 3 x 11 2 349 mm x 160 mm x 285 mm Weight 16 7 lbs 7 6 kg 12 REPLACEMENT PARTS AC charger module 93026980Z AC charger cable 3899003972Z 13 DISPOSAL INFORMAT...

Page 11: ...dified by anyone other than Manufacturer or if this unit is resold through an unauthorized retailer Manufacturer makes no other warranties including but not limited to express implied or statutory warranties including without limitation any implied warranty of merchantability or implied warranty of fitness for a particular purpose Further Manufacturer shall not be liable for any incidental special...

Page 12: ...comuníquese con Servicio al Cliente para recibir asistencia 1 11 Para reducir el riesgo de descarga eléctrica desenchufe la unidad del tomacorriente antes de intentar llevar a cabo cualquier actividad de mantenimiento o limpieza El simple apagado de los controles no reducirá este riesgo 1 12 La unidad se calienta considerablemente durante su uso y debe contar con ventilación adecuada Asegúrese de ...

Page 13: ...10 11 12 9 Puertos de salida de 12V de CC 10 Puerto de salida único de CC para encendedor de cigarrillos de 12V 11 Botón de salida de CA 12 Indicador LED de salida de CA 13 Manilla 14 Botón de luz 15 Luz 16 Ventilas de enfriamiento 5 PANTALLA LCD INDICADOR DE CAPACIDAD DE BATERÍA CARGA DE ADAPTADOR DE CA CARGA SOLAR ADVERTENCIA INDICADOR DE POTENCIA DE SALIDA SALIDA DE CA INDICADOR DE CARGA SALIDA...

Page 14: ... de carga solar Para mejores resultados apunte el panel hacia el sol lejos de cortinas y ventanas La carga mediante panel solar toma aproximadamente 10 horas en un día soleado ALIMENTACIÓN DE UN DISPOSITIVO DE CC DE 12V NOTA No alimente un dispositivo de 12V mientras carga la batería interna Salida de CC de 12V 1 Asegúrese de que el dispositivo que va a energizar esté apagado antes de insertar el ...

Page 15: ... desde el inversor al dispositivo sin disminuir significativamente la potencia que genera el inversor Para los mejores resultados de operación el cable alargador debería ser de 16 AWG 1 31 mm2 o mayor y no tener más de 50 pies de largo ADVERTENCIA RIESGO DE CHOQUE ELÉCTRICO El funcionamiento incorrecto de su inversor podría causar daños y lesiones personales El voltaje de salida del inversor es de...

Page 16: ...dos N A Falla de salida de CC Cada 3 segundos N A Falla de salida de CA Cada 4 segundos N A Sobretemperatura 3 pitidos cortos cada 3 segundos N A Sobrecarga 9 LOCALIZACIÓN Y SOLUCIÓN DE PROBLEMAS PROBLEMA CAUSA SOLUCIÓN Falla de encendido Protección contra subvoltaje Protección contra carga anómala Unidad dañada Recargue la unidad Retire las cargas y recargue la unidad Consulte al Servicio al Clie...

Page 17: ...IONES Si estas soluciones no eliminan el problema o si desea obtener más información sobre la solución de problemas póngase en contacto con el departamento de servicio al cliente para recibir asistencia Email services schumacherelectric com www MotorolaHome com o llame 1 833 334 9925 11 ESPECIFICACIONES Tipo de batería interna Iones de litio Capacidad 750 Wh 25V 30Ah Entrada de CA 147W 29 4V 5A En...

Page 18: ...én aprobados para su uso con este producto La presente Garantía Limitada será nula si el producto se utiliza en forma errónea se trata de manera inadecuada es reparado o modificado por personas que nos sean el Fabricante o si esta unidad es revendida a través de un vendedor minorista no autorizado El Fabricante no realiza ninguna otra garantía incluidas a título enunciativo las garantías expresas ...

Page 19: ... d une autre et amenez la à un technicien de réparation 1 10 Ne pas ouvrir l unité Si une réparation est requise communiquez avec le service à la clientèle pour directives 1 11 Pour éviter le danger de choc électrique débranchez l unité de la prise de courant avant de faire tout entretien ou nettoyage Seulement mettre l unité en arrêt ne réduira pas ce danger 1 12 La température de l unité s élève...

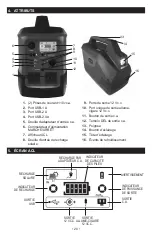
Page 20: ... 8 9 10 11 12 9 Ports de sortie 12 Vc c 10 Port unique de sortie allume cigare 12 Vc c 11 Bouton de sortie c a 12 Témoin DEL de sortie c a 13 Poignée 14 Bouton d éclairage 15 Tête d éclairage 16 Évents de refroidissement 5 ÉCRAN ACL RECHARGE PAR ADAPTATEUR C A INDICATEUR DE CAPACITÉ DES PILES RECHARGE SOLAIRE AVERTISSEMENT INDICATEUR DE PUISSANCE DE SORTIE SORTIE C A INDICATEUR DE RECHARGE SORTIE ...

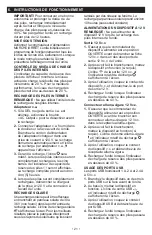
Page 21: ...d entrée de recharge solaire L icône de recharge solaire s affichera à l écran Pour les meilleurs résultats placez le panneau directement sous les rayons du soleil sans qu ils soient tamisés par des rideaux ou fenêtre La recharge par panneau solaire prend environ 10 heures sous soleil constant ALIMENTATION D UN DISPOSITIF À 12 V REMARQUE Ne pas alimenter de dispositif 12 V lors de la recharge des ...

Page 22: ...grand et une surcharge de l onduleur La surcharge de départ de chaque dispositif ne doit pas dépasser la puissance nominale de fonctionnement continu de l onduleur de 500 W Un cordon rallonge peut être utilisé entre l onduleur et le dispositif sans diminuer de façon appréciable la puissance pouvant être utilisée Pour une meilleure performance de fonctionnement des dispositifs utilisés le cordon de...

Page 23: ...n dessous de 40 7 2 Ne jamais utiliser l unité jusqu à ce que ses piles internes soient à plat 8 AVERTISSEMENTS AVERTISSEMENT AFFICHEUR ACL DURÉE CAUSE Alarme DEL Trois bips courts à chaque deux secondes durant 30 secondes DEL c a en clignotement Icône de piles faibles clignote durant 30 secondes 30 s avant interruption c a Mode économie Alerte préliminaire avant coupure c a Trois bips courts à ch...

Page 24: ...r le faisceau de câbles Si le problème persiste remplacer le panneau solaire Défaut de sortie c a c c Défaut de sortie c a c c Protection de basse tension des piles Protection de surintensité de décharge Protection de surchauffe Unité endommagée Recharger l unité S assurer que le total des charges est en dessous de la puissance maximale permise 500 W Arrêter l unité la laisser refroidir et puis la...

Page 25: ...e retour ou communiquez avec le détaillant où vous l avez acheté 14 GARANTIE LIMITÉE SCHUMACHER ELECTRIC CORPORATION 801 BUSINESS CENTER DRIVE MOUNT PROSPECT IL 60056 2179 DONNE CETTE GARANTIE LIMITÉE À L ACHETEUR D ORIGINE DU PRODUIT CETTE GARANTIE LIMITÉE N EST NI TRANSFÉRABLE NI CESSIBLE Schumacher Electric Corporation le Fabricant garantit ce génératrice pour un 1 an à partir de la date d acha...

Page 26: ...de vente anticipée d opportunité d affaires d achalandage d interruption des activités et tout autre préjudice ou dommage Chacune et toutes ces garanties autres que les garanties limitées incluses dans la présente sont expressément déclinées et exclues Certains états ne permettent pas l exclusion ou les limites sur les dommages indirects ou consécutifs ou la durée de la garantie implicite Les limi...

Page 27: ...____________________ Esta es la única garantía limitada expresa y el productor no autoriza ni otorga a alguien a realizar alguna otra obligación No existe ninguna otra garantía más que la descrita en el manual del dueño La tarjeta de garantía debe enviarse durante los primeros 30 días después de la compra El cliente debe mantener el recibo de compra ORIGINAL como comprobante el cual le otorga todo...

Page 28: ...er Electric Corporation 801 Business Center Drive Mount Prospect IL 60056 2179 É U Nom________________________________________________________________ Adresse_____________________________________________________________ Ville_____________________________Prov_______________ Code postal________ Tél ________________________Courriel__________________________________ Nom du magasin où vous avez acheté ...

Reviews: