


MH7601 BUTTONS AND
PORTS
PLACEMENT TIPS
We recommend placing your extender
midway between the router and the
desired WiFi coverage area. If you
have multiple extenders, evenly space
them throughout your home. See the
example below.
WAN/LAN Port
• For the router, connect the
Ethernet cable from this port
to your internet device (e.g.
modem)
• For an extender, this port can be
used as a second LAN port to
connect wired devices
USB-C Power
• Connect the supplied USB-C 5V
15W AC adapter
LAN Port
• LAN port to connect wired
devices
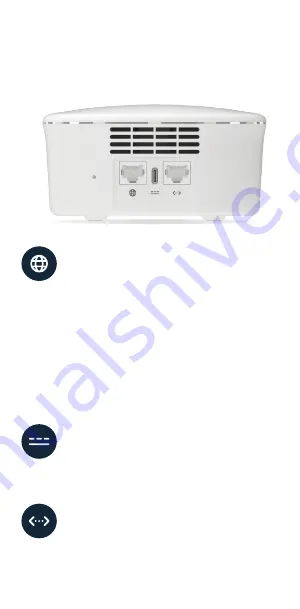
MH7601 BUTTONS AND
PORTS
WAN/LAN Port
• For the router, connect the
Ethernet cable from this port
to your internet device (e.g.
modem)
• For an extender, this port can be
used as a second LAN port to
connect wired devices
USB-C Power
• Connect the supplied USB-C 5V
15W AC adapter
LAN Port
• LAN port to connect wired
devices
LET’S GET STARTED
sync app
sync account
Set up your Motorola device
IN THIS PACKAGE
MH7601 router / extender
1st device set up will be the router
Power adapter
Ethernet cable
1 per package
MH7601 BUTTONS AND
PORTS
WAN/LAN Port
• For the router, connect the
Ethernet cable from this port
to your internet device (e.g.
modem)
• For an extender, this port can be
used as a second LAN port to
connect wired devices
USB-C Power
• Connect the supplied USB-C 5V
15W AC adapter
LAN Port
• LAN port to connect wired
devices
extender
1st device set up will be the router


