background image

Call Forwarding

  41

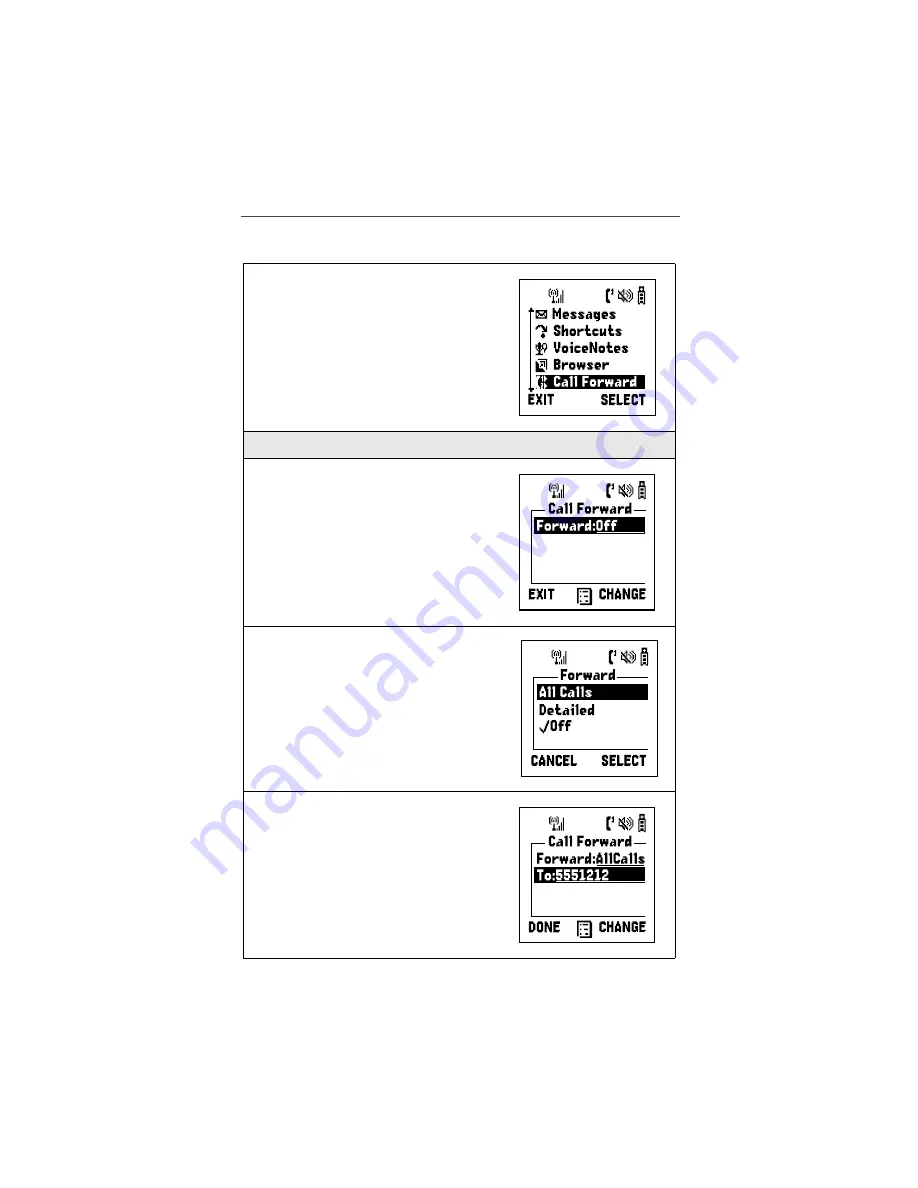
Turning On Call Forwarding

1

Press 

m

, then press 

R

 to scroll to 

Call Forward.

2

Press 

B

 under SELECT.

3

In the Call Forward screen, press 

B


under CHANGE.

4

If you want to forward all calls, press 

R


to scroll to All Calls and press 

A

 under 

SELECT.

If you want to forward calls when only 
BusyNo Answer, or Unreachable
press 

R

 to scroll to Detailed and press 

A

 under SELECT.

5

In the Call Forward screen, press 

R

 to 

scroll to the appropriate field and enter 
the call-forward number. When finished, 
press 

A

 under DONE.


Summary of Contents for i3000plus

Page 1: ...Motorola iDEN Digital Multi Service Data Capable Phone i3000plus Phone User s Guide NTN9468A NTN9468 A ...

Page 2: ... the back cover complete the information and keep it handy 2 Read Safety and General Information 3 Familiarize yourself with the Table of Contents 4 Use the i3000plus Phone CD included in the box Antenna Earpiece Display Menu Key Option Key Photosensor Send Key Microphone Speaker Accessory Connector Next Word Key International Plus Dialing Back Key Pause Dialing Headset Jack Alphanumeric Keypad Pu...

Page 3: ...al Identification Number PIN 17 Entering the PIN 17 Changing the PIN 18 Unblocking the PIN 19 Disabling Enabling the PIN Requirement 20 Removing Inserting the SIM Card 21 Keypad Lock 22 Activating Keypad Lock 23 Receiving Incoming Calls 23 Receiving New Message Mail 23 Receiving Voice Mail 24 Receiving Private Calls 24 Deactivating Keypad Lock 24 Status of Your i3000plus Phone 24 My Information 25...

Page 4: ...5 Viewing Recent Calls 35 Getting Detailed Information About Recent Calls 36 Storing a Number From the Recent Call List 36 Calling From the Recent Call List 36 Deleting Recent Calls 36 Call Timers 37 Hands Free Speakerphone 37 Call Waiting 37 Accepting Calls 38 Switching Between Calls 38 Declining Calls 38 Ending the Active Call 38 Turning Off Call Waiting 38 Call Hold 39 Three Way Calling 39 Call...

Page 5: ... the Phonebook 51 Ready to Alert Screen 51 Receiving Call Alerts 52 Call Alert Queue 52 Accessing the Call Alert Queue 52 Sending a Call Alert From the Queue 52 Deleting a Call Alert From the Queue 52 Group Calls 53 Naming a Talkgroup 53 Making Talkgroup Calls from the Keypad 53 Making a Talkgroup Call from the Phonebook 53 Making a Talkgroup Call from the Recent Call List 54 Receiving Talkgroup C...

Page 6: ...atebook 72 Viewing a Week 72 Viewing a Day 72 Viewing Event Details 73 Viewing Today 73 About Datebook Events 73 Adding New Event 74 Editing Events 77 Deleting Events 77 Memo 78 Adding a New Memo 78 Viewing Memos 78 Editing Memos 78 Deleting Memos 79 VoiceNotes 79 Recording a New VoiceNote 80 Playing a VoiceNote 80 Deleting a VoiceNote 80 Locking Unlocking a VoiceNote 80 Synchronizing 80 K Java 83...

Page 7: ...nds Free Car Kit 107 Data Accessories 108 Y Cable 109 Palm Converter Plugs 110 Other Important Information 111 Understanding Status Messages 111 Safety and General Information 113 RF Operational Characteristics 113 Exposure To Radio Frequency Energy 113 Portable Radio Product Operation and EME Exposure 114 Antenna Care 114 Phone Operation 114 Two way radio operation 114 Body worn operation 114 Dat...

Page 8: ...ive Atmospheres 118 Blasting Caps and Areas 118 Operational Cautions 119 Antennas 119 Batteries 119 Cleaning and Drying Considerations 119 Accessory Safety Information 121 Limited Warranty Motorola Communication Products 123 Limited Warranty Motorola Communication Products international 127 Patent and Trademark Information 131 ...

Page 9: ... Mode includes features such as Call Hold Call Forwarding Call Waiting and Three Way Calling Find out more about placing calls in this section Private Mode Group Mode An innovative feature for communicating instantly with one or more co workers at a fraction of the cost of cellular Text and Numeric Messages Lets you receive numeric pages and important short messages right over the phone Learn more...

Page 10: ...hen dialing manually without the Turbo Dial one touch dialing feature dial only when your vehicle is stopped or have a passenger dial for you 5 Position your phone where it is easy to see and reach 6 Keep your eyes on the road Never take notes while driving 7 Consider using a hands free speakerphone which allows you to keep both hands on the wheel when speaking 8 Be a Good Samaritan Dial 9 1 1 in ...

Page 11: ...ne Page 17 Status of Your i3000plus Phone NOTE Your phone must be activated before you can place or receive a call Page 24 Status of Your i3000plus Phone Page 24 My Information Page 25 Antenna Earpiece Display Menu Key Option Key Photosensor Send Key Microphone Speaker Accessory Connector Next Word Key International Plus Dialing Back Key Pause Dialing Headset Jack Alphanumeric Keypad Punctuation K...

Page 12: ...ls Volume Controls Up Down Press to raise or lower the ear piece volume Push To Talk PTT Button Press to send private or group calls Option Keys Left and Right Activates the left and right menu options in the Display End Home Key End Press to end the call in progress Home Return to the Ready screen or return to the home page Headset Jack Accepts 2 5 mm Motorola headset accessory Microphone Speak i...

Page 13: ...ext messages Next Word International Plus Dialing Next Word Use to display additional words when using T 9 text input International Plus Dialing Use to set up international calls 4 Way Navigation Key S Pressing the upper or lower edge scrolls a menu or list of item T Pressing the left or right edge moves the cursor while entering text or scrolls the display menu options Send Key Press to initiate ...

Page 14: ...e you use it for the first time After the initial charging the battery can be charged more quickly When the battery is not attached to the phone store it in this case Attaching the Battery 1 Remove the battery cover located on the back of the phone by pressing the battery cover release button and sliding the battery cover away from the antenna 2 Insert the top of the battery into the battery area ...

Page 15: ...Ensure that the phone is powered off before attempting to detach the battery 2 Press the battery cover release button and slide the battery cover away from the antenna 3 Remove the battery by pushing the battery toward the antenna and lift ing out of the phone 1 Make sure your i3000plus phone s keypad is facing up 2 Plug the accessory connector into the bot tom of the i3000plus phone 3 Flip open t...

Page 16: ...s Phone On Off Powering On the Phone Icon Display 3 4 5 6 Charge Strength Low Battery 40 70 Fully Charged 1 Extend the antenna 2 Press and hold at the top of the phone until the status light glows red and a tone briefly sounds 3 When the Enter SIM PIN screen displays enter your SIM PIN For more information see SIM Card Personal Identification Number PIN on page 17 NOTE The default SIM card PIN is ...

Page 17: ...the SIM card NOTE If there is no SIM card present notify your sales representative SIM Card Personal Identification Number PIN To prevent unauthorized use of your phone your SIM card is protected by a PIN Each time the i3000plus phone is powered on you must enter your PIN You can change or disable your PIN if desired NOTE Disabling your PIN enables anyone to use your phone If you disable your PIN ...

Page 18: ...ntering your PIN three times causes the SIM to be blocked To unblock your SIM you must contact Customer Care For more information see Unblocking the PIN on page 19 1 From the Enter SIM PIN screen enter your PIN An asterisk appears for each character entered NOTE Other than emergency dialing you will be unable to use any of the phone functions including receiving phone calls until you enter the PIN...

Page 19: ...ach must occur within 2 seconds of the prior key press 3 Press R to scroll to Security 4 Press B under SELECT The Security screen appears Press R to scroll to New Password 5 Press B under SELECT The SIM PIN Editor screen displays 6 Press R to scroll to SIM PIN code 7 Enter the current SIM PIN 8 At the Enter New SIM PIN screen enter the new SIM PIN 9 At the Re Enter New SIM PIN screen re enter the ...

Page 20: ... PIN codes properly the SIM Unlocked screen displays 1 Press m and then press R to scroll to Settings 2 Press B under SELECT The Settings screen appears 3 Press R to scroll to Security 4 Press B under SELECT The Security screen appears 5 Press R to scroll to SIM PIN 6 Press A under SELECT At the SIM PIN on off screen press R to scroll to On to enable Or Scroll to Off to disable If you select this ...

Page 21: ...isplays Removing Inserting the SIM Card 9 Press A under OK If you disable the PIN requirement you remove protection of personal data on your SIM card Anyone can then use your phone and access your personal data 1 Remove the battery cover and battery See Detaching the Battery on page 15 2 With the antenna facing away from you and the back of the i3000plus phone exposed and fac ing up locate the SIM...

Page 22: ...respond to incoming calls messages and alerts 4 To remove the SIM card very carefully slide it out of its holder Do not touch the gold colored areas NOTE Protect the SIM card as you would any delicate object When the SIM card is not in the phone you should store it in something protective like a mail ing envelope 5 To insert the SIM card very carefully place it in its holder with the contact side ...

Page 23: ...swer the call or press A under Ignore to send the call to Voice Mail and reactivate Keypad Lock Receiving New Message Mail When you receive new Message Mail see Text and Numeric Messaging on page xx the Keypad Lock is temporarily disabled You may perform the following NOTE If you have disabled the Message Mail notification only U displays You will not receive the read EXIT or READ options From the...

Page 24: ...ting Keypad Lock Status of Your i3000plus Phone Your i3000plus phone has a Status Light that displays around the power button The Status Light shows you at a glance the status of your connection When New Voice Mail Waiting displays press A under EXIT to return to the Ready screen and reactivate Keypad Lock Or Press A under CALL to access Voice Mail Once you have finished press to exit Voice Mail r...

Page 25: ...edit the phone number displayed in My Information but this does not change your i3000plus phone s numbers IP Addresses these fields display the IP address you use to access the internet with your i3000plus phone Circuit Data Number user editable Viewing Editing My Information Solid Green In use 1 From the Ready screen press m 2 Press R to scroll to MY INFO Press A under SELECT The My Information s...

Page 26: ...26 www motorola com ...

Page 27: ...you are performing Text Display Area In the Ready screen the text displayed in this area is determined by your wireless communications provider When you access other screens this area displays menu options messages names phone numbers and other information This number of lines of text displayed in the text display area at one time depends on which view is selected Standard view Compress view and Z...

Page 28: ...rich features that are built into your i3000plus phone Use the menus to store calls locate and launch the built in Personal Information Manager PIM applications such as Datebook change your i3000plus phone settings browse the Internet and more Some features of the phone includes list of names numbers or other information These list items can be accessed the same way menu options are To access the ...

Page 29: ...nth such as appointments and meetings U Messages Receive store access and manage Voice Mail Message Mail and Net Mail message k Settings Access and manage Ring Vibrate Phone Setup Voice Volume Talkgroup Settings In Call Setup Security Personalize and Initial Setup R Memo Input and store digits or text for later use o Voice Notes Record personal messages or incoming voice calls phone private talkgr...

Page 30: ...30 www motorola com D Call Timers Display the length of time spent on the last phone call phone timer dispatch timer life timer circuit data timer and Kilobytes sent and received ...

Page 31: ...Your i3000plus phone provides the following features for making phone calls Direct dial Phonebook Recent Calls Speed dial Turbo dial Making Phone Calls Page 31 Emergency Calling Page 35 Receiving a Phone Call Page 35 Ending a Phone Call Page 35 Recent Calls Page 35 Call Timers Page 37 Hands Free Speakerphone Page 37 Call Waiting Page 37 Call Hold Page 39 Three Way Calling Page 39 Call Forwarding P...

Page 32: ...it To Clear All Digits To Cancel Press A under DELETE one time Press and hold A under DELETE Press e 1 From Ready screen press m then press R to scroll to Phonebook Press A under SELECT 2 Press R to scroll through all the names in your Phonebook or use the alphanumeric keypad to enter a letter and press R to scroll through all the names beginning with that letter Stop when the name of the person y...

Page 33: ...our Phonebook see xxx on page xx by pressing and holding the corresponding numeric key 4 Press s to place the call 5 Press e to end the call 1 From Ready screen press m If Recent Calls is not the first item on the list press S to scroll to it Press A under SELECT 2 Press S to scroll the list of recent calls 3 Click B under VIEW 4 Press s to place the call 5 Press e to end the call 1 From the Ready...

Page 34: ...Care at 1 800 639 6111 to obtain international dialing access Plus Dialing This feature enables you to place an international call from most countries without entering the local international access code 1 From Ready screen press and hold 2 Speaking into the microphone say the voice tag assigned to the phone number you want to call 3 Your phone will play the name back to you If no key is pressed w...

Page 35: ... provider Special Dialing Codes Receiving a Phone Call Ending a Phone Call Recent Calls The Recent Calls feature stores the phone numbers of the 20 most recent calls you have made and received including private calls You can access the recent call list to view your recent calls store numbers on the Recent Calls list to the Phonebook delete some or all recent calls call numbers on the Recent Calls ...

Page 36: ... a recent call The screen that appears displays information such as the name oscillated with the phone number of the recent call and the date time and duration of the call Storing a Number From the Recent Call List To store a number from the Recent Call list to the Phonebook Calling From the Recent Call List See Making Calls from the Recent Calls List on page 33 Deleting Recent Calls 2 Press S to ...

Page 37: ... you may have difficulty hearing a caller s voice or messages HINT To listen only press A under Mute The display shows Phone MUTE indicating that the microphone is muted While the microphone is muted you can hear incoming audio but a caller cannot hear any speech coming from your i3000plus phone To speak press A under MUTE again Phone Mute no longer displays indicating that the microphone is on Ca...

Page 38: ...urning Off Call Waiting If you do not want to be interrupted during a call you can turn Call Waiting off prior to making receiving a call Press B under YES Press B under HOLD Your phone will refer to the first call as Call 1 and the second call as Call 2 If call 1 is on hold your display will read Call 1 Hold 7035551234 Press B under NO If you subscribe to Voice Mail the call will be forwarded to ...

Page 39: ...ppears in the bottom left hand corner of the display screen To make a three way call 4 Press R to scroll to Off and press B under SELECT Call Waiting is now disabled for the next call It will automatically reset to On when you hang up 1 To place the active call on hold press B under HOLD 2 Place the second call 3 Press B under HOLD to toggle between calls 1 Place or receive a phone call 2 Press A ...

Page 40: ...es you to forward calls you missed to different numbers depending on why you missed each call Busy Sends calls made to your phone when your phone is engaged in other activities to a number you specify No Answer Sends calls you do not answer to a number you specify The phone will ring 4 times before forwarding the call Unreachable Sends calls made to your phone when your phone is not on the network...

Page 41: ... CHANGE 4 If you want to forward all calls press R to scroll to All Calls and press A under SELECT If you want to forward calls when only Busy No Answer or Unreachable press R to scroll to Detailed and press A under SELECT 5 In the Call Forward screen press R to scroll to the appropriate field and enter the call forward number When finished press A under DONE ...

Page 42: ...orward icon U or X with the forwarded line number on your screen You can forward Line 1 and Line 2 independently Turning Off Call Forwarding 1 Press m then press N to scroll to Call Forward 2 Press B under SELECT 3 In the Call Forward screen press B under CHANGE 4 Press R to scroll to Off and press B under SELECT ...

Page 43: ...is displayed if you have entered the person s number into your Phonebook see Phonebook on page xx Otherwise the caller s phone number will be displayed Alternate Line Service If you are an Alternate Line customer you will be given a unique phone number for each line With alternate lines you can separate business and personal calls or designate one as a priority line Line 2 shares the same Voice Ma...

Page 44: ...ve line the Active Line Indicator flashes If the call is on the line that is not currently active the Active Line Indicator remains lit and the other line number icon flashes 1 Press m then press R to scroll to Settings Press B under SELECT 2 Press R to scroll to Phone Setup Press A under SELECT 3 With the current line highlighted press A under CHANGE 4 Press R to scroll to the desired line and pr...

Page 45: ...de Call Completion Operators will connect you to the listing you requested There are no additional charges beyond normal airtime costs for this service airtime will count against your bucket of minutes overage charges will apply if the bucket of minutes has been exhausted If you prefer the operator will stay on the line while connecting to the number In the event you need another listing you can r...

Page 46: ...46 www motorola com ...

Page 47: ...ncludes everything you will need to know to take advantage of Private Calls two way radio service Private Calls There are two ways to reach an individual using Private Calls You can enter the person s Private ID number then press the Push To Talk PTT button Or you can store the person s name and private ID number then recall the number from your Phonebook Whether you dial the person s Private ID d...

Page 48: ...d 4 Press and hold the PTT button on the side of the phone Begin talking after the phone emits a chirping sound 5 Release the PTT button to listen 1 From the Ready screen press m 2 Press R to scroll to the Recent Calls Press A under SELECT 3 From the Recent Calls screen press Q or R to scroll through the names and numbers until the desired name is highlighted 4 Press and hold the PTT button on the...

Page 49: ...irm the alert and prompt you to push the PTT button If you press A under CANCEL the phone returns to the Dial screen with the previously entered number displayed If you press the PTT button the call alert is sent and the phone display goes to Recent Calls screen 1 Enter the private ID of the person you want to call 2 Press B under ALERT 3 Press and hold the PTT button until Alert Sent Successful d...

Page 50: ... press A under CLEAR Call Alert Queue Call alert queuing enables you to save call alerts in a queue or list Accessing the Call Alert Queue Sending a Call Alert From the Queue Deleting a Call Alert From the Queue 1 From the Ready screen press m 2 Press R to scroll to Call Alert Queue 3 Press A under SELECT 1 From the Call Alert Queue screen press R to scroll down to the desired entry 2 Press A unde...

Page 51: ...roup Calls from the Keypad Making a Talkgroup Call from the Phonebook 1 From the Ready screen press m 2 Press R to scroll to Phonebook 3 Press A under SELECT 4 Press R to scroll to New Entry The Entry Details screen displays 5 Press A under SELECT 6 Enter the information as you would any other Phonebook entry See Phonebook on page xx When you get to Type make sure that you select Talkgroup 7 Enter...

Page 52: ...the PTT button to listen 1 From the Recent Call screen press R to scroll to the name of the Talkgroup to call 2 Press and hold the PTT button on the side of the phone and speak The phones of the people in the Talkgroup will emit a chirping sound to alert them that someone is calling 3 Release the PTT button to listen 1 Wait for the caller to finish speaking 2 Press and hold the PTT button to talk ...

Page 53: ...Group Calls 55 7 Press A under BACK ...

Page 54: ...56 www motorola com ...

Page 55: ...Paging and Net Mail The main topics covered in this section are listed below Message Center The message center consists of all the Messaging Services and is broken down by folders such as Voice mail Net Mail and Message Mail Text and Numeric Paging Message Center page xx Voice Mail page xx Net Mail page xx Message Mail page xx ...

Page 56: ...58 www motorola com ...

Page 57: ...ok Lists The information in your Phonebook is stored in two lists the Expanded List and the Simple List Each list stores information differently Your Phonebook Page 59 Phonebook Lists Page 59 Phonebook Icons Page 61 Voice Tags Page 62 Accessing Your Phonebook Page 62 About Phonebook Entries Page 62 Viewing Phonebook Entries Page 63 Sorting Phonebook Entries Page 63 Adding Phonebook Entries Page 64...

Page 58: ... you can enter someone s name into you Phonebook once and then assign that person s home office and fax numbers to the name The information on your Phonebook s Expanded List can be accessed from your SIM card using other i3000plus phones Your Phonebook s Expanded List stores up to 250 entries using with Speed Dial location 1 through 250 Each phone number uses one Speed Dial location even if it is ...

Page 59: ...ears to the right of the first phone number assigned to a name unless you choose another icon For more information on entering phone numbers into you Phonebook see xxxx on page xx This icon called a picker appearing to the right or on both sides of one the phone number type icons above indicates multiple phone numbers stored under one name See xxxx on page xx for more information on storing more t...

Page 60: ...en you can view sort add edit and delete Phonebook entries About Phonebook Entries Each Phonebook entry may contain the following information The name associated with the entry Typically this is the name of the person whose phone number you are storing in the Phonebook The type of number to be stored Main Private Home Work Mobile Fax Pager Talkgroup Chat and Other If you don t choose a type the nu...

Page 61: ...ng each of the numbers assigned to that name To view any of the phone numbers assign to a name Sorting Phonebook Entries You can sort your Phonebook entries by Name the name you entered for the entry Speed No the Speed Dial location of the entry Voice Name 1 From the Phonebook screen press S to scroll through the Phone book entries 2 To view the highlighted number press A under VIEW 1 From the Pho...

Page 62: ...u can leave any item any item blank or unchanged by pressing S to scroll past it on the Entry Details screen Only a phone number is required for a valid Phonebook entry After you have entered a phone number and any other information you wish to include you can press B under DONE to complete the Phonebook entry 1 From the Phonebook screen Press m to view the Phone book Menu screen 2 Press R to scro...

Page 63: ... R to scroll to NEW and press B under SELECT 2 If you want to assign a name to your Phonebook entry With the Name field highlighted press B under CHANGE From the Name screen enter the name using the alphanumeric keypad As you type you can delete a letter by pressing A under DELETE To create a space press R once When you are finished press B under OK The Entry Details screen returns with the Type f...

Page 64: ...number you want to assign to the Phonebook entry Press A under SELECT The Entry Details screen returns with the No field highlighted 4 Assign a phone number to your Phonebook entry With the No field highlighted press A under CHANGE Type the number using the alphanumeric keypad To delete a number press A under DELETE When you are finished press B under OK The Entry Details screen returns with the S...

Page 65: ...250 and 350 to assign the phone number to a Speed Dial location on the Simple List When you are finished press B under OK 6 If you want to assign a voice tag to the phone book entry With the Voice Name field highlighted press B under RECORD As directed by the screen prompts the say and repeat name you want to assign to the Phonebook entry Speak clearly into the phone microphone An o icon appears i...

Page 66: ...68 www motorola com 8 When you have enter all the information you wanted in this Phonebook entry press A under DONE ...

Page 67: ...N to access your messages 1 From the Phonebook screen press R to scroll to the entry you want to edit 2 Press m to view the Phonebook Menu for that entry 3 Press R to scroll to Edit 4 Press A under SELECT The Entry Details screen displays 5 Follow the instructions in Adding Phonebook Entries on page 64 omitting step 1 to edit the various fields 1 From the Phonebook screen press R to scroll to the ...

Page 68: ... dialed NOTE If you use a system that will not let you enter an option until the automated message has played in its entirety you can pro gram your phone to pause for more than 3 seconds For exam ple performing the above step twice will program two pauses and cause your phone to wait 6 seconds before entering the next set of numbers Plus Dialing This feature enables you to place an international c...

Page 69: ...ize events such as appointments and meetings Schedules can be created and viewed for specific days and reminder alarms can be set so that you never miss important events You can view upcoming events by week or by day The Datebook stores and manages 250 events over a 13 month period 12 months ahead and 1 month back Datebook Icons There are several icons commonly used in the Datebook application Dat...

Page 70: ...of your phones screen Below the dates are letters indicating the days of the week When you access your Datebook the current day is highlighted You can scroll to other days and other weeks by pressing T Below each letter is a 12 hour time window for each day A small bar between the letter and the time window indicates an event on that day that does not have a time of day associated with it such as ...

Page 71: ...e previously viewing a week the screen displays the current week with today highlighted About Datebook Events Each Datebook event may contain the following information The title you assign to the event You can enter a title using the phone s alphanumeric keypad or choose from a list of commonly used titles A title is required for every event Addition text of any kind following the event s title Th...

Page 72: ...wing the Datebook press m to view the Datebook Menu screen Press R to scroll to New Press A under SELECT The Event Details screen displays with the Title field highlighted 2 With the Title field highlighted press B under CHANGE to access the Title screen 3 Assign a title to the event Press A under BROWSE to choose from a list commonly used event titles Or Type the title using the alphanumeric keyp...

Page 73: ...e Duration field highlighted press A under CHANGE From the Duration screen press R to scroll to the desired duration If you select None the event will have a duration of zero minutes Press B under SELECT The Event Details screen returns with the Date field highlighted 6 The default date assign to an event is the day selected when you accessed the Event Details screen to add the event to the Datebo...

Page 74: ...u have finished press A under DONE The Event Details screen returns with the Alarm field highlighted 8 If you want to set an alarm to remind you that the event is approaching With the Alarm field is highlighted press A under CHANGE From the Alarm screen press S to scroll to the desired alarm option Press A under SELECT From the Alarm screen press S to scroll to the desired alarm option Press A und...

Page 75: ...scroll to Edit and press A under SELECT 4 Follow the instructions in Adding New Events on page 74 omitting step 1 to edit the various fields 1 Select the even you want to delete View the day containing the even and highlight the event Or View the details of the event you want to delete 2 Press m The Datebook Menu displays 3 Press R to scroll to Delete and press A under SELECT 4 A confirmation scre...

Page 76: ...s m 2 Press R to scroll to Memo 3 Press A under SELECT 4 Type in your memo using the phone s keypad 5 Press A under STORE 1 From the Ready screen press m 2 Press R to scroll to Memo 3 Press A under SELECT 4 Press m to view the Memo Menu screen 1 From the Ready screen press m 2 Press R to scroll to Memo 3 Press A under SELECT 4 Type the new number 5 Press A under STORE ...

Page 77: ...s are stored by the time and date that the VoiceNote is created A VoiceNote is a type of Voice Tag Your phone can store up to 20 Voice Tags To access the VoiceNotes feature 1 From the Ready screen press m 2 Press R to scroll to Memo 3 Press A under SELECT 4 Press A under DELETE 1 From the Ready screen press m 2 Press R to scroll to VoiceNotes 3 Press A under SELECT ...

Page 78: ...crophone 3 When you are finished recording your Voice Note press A under STOP 1 From the VoiceNotes screen press R to scroll to VoiceNote you want to play 2 Press A under PLAY 1 From the VoiceNotes screen press R to scroll to VoiceNote you want to delete 2 Press m to view the VoiceNotes Menu 3 Press R to scroll to Delete and press A under SELECT 4 A confirmation screen appears Press A under YES to...

Page 79: ...ronizing 81 phones ability to exchange data with a personal computer PC application The ability to synchronize ensures that all your various calendar programs always have the most up to date scheduled events ...

Page 80: ...82 www motorola com ...

Page 81: ...pplication supports standard add subtract multiply divide functions and also Clear Delete Plus Minus and Invert K Java Page 83 1 From the Ready screen press m then press R to scroll to K Java Press A under SELECT 2 Press R to scroll to Calculator Press A under SELECT 3 Press N to highlight numbers and the built in functions Press A to SELECT ...

Page 82: ...84 www motorola com ...

Page 83: ... English To change the display language Changing the Display Language Page 85 Setting the Time and Date Page 86 Backlight Timer Page 87 Setting the Ringer Volume Page 88 Selecting a Ring Style Page 88 Setting the VibraCall Feature Page 90 Shortcuts Page 90 Styles Page 94 1 From the Ready screen press m 2 Press R to scroll to Settings 3 Press A under SELECT 4 Press R to scroll to Initial Setup 5 Pr...

Page 84: ...r a MM DD month day or a DD MM day month date format as shown in the table below To set the time and date format once this feature is activated follow the steps below 8 Press R to scroll to highlight the desired language 9 Press A under SELECT 10 A confirmation screen displays 12 Hour Display 12 00 am 6 25 am 12 00 pm 10 25pm 24 Hour Display 00 00 06 25 12 00 22 25 Date Month Day Format MM DD Day ...

Page 85: ... is the first line item of the Initial Setup menu 6 Press A under SELECT 7 Press R to scroll to either Time Format Enables you to change the Time format Date Format Enables you to change the Date format Display On Enables you to disable enable the Time Date display 8 Press A under CHANGE 9 Press R to scroll to the desired Time Date Display option 10 Press A under SELECT 11 A confirmation screen di...

Page 86: ...e Service can 7 Press A under CHANGE 8 Press R to scroll to the desired amount of time that your backlight will remain illuminated after any given activity 9 Press A under SELECT 10 A confirmation screen displays 1 From the Ready screen press m 2 Press R to scroll to Settings 3 Press A under SELECT Ring Vibrate is the first line item of the Settings menu 4 Press A under SELECT Ring Volume is the f...

Page 87: ...e is ringing 1 From the Ready screen press m 2 Press R to scroll to Settings 3 Press A under SELECT Ring Vibrate is the first line item of the Settings menu 4 Press R to scroll to the Style option 5 Press A under CHANGE 6 Press R to scroll to the desired ring style 7 Press A under SELECT 8 A confirmation screen displays ...

Page 88: ...ten marking the Ring Vibe setting as a Shortcut allows you to quickly navigate to that menu Creating a Shortcut VibraCall Settings What this setting does Vibrate Alert Vibrates for all incoming calls and messages Vibrate All appears on the display Speaker Off appears on the display to remind you that the audio will be heard through the earpiece instead of the speaker Phone Vibrate Vibrates only fo...

Page 89: ...wing the assigned shortcut number If you want to change the shortcut number press the desired number on your keypad 4 Press A under OK 5 A confirmation screen displays 1 From the Ready screen press m 2 Press the assigned Shortcut number within 2 seconds ...

Page 90: ... Editor to edit a Shortcut name and key number Delete To delete any highlighted Shortcut Delete All To delete all stored Shortcuts 1 From the Ready screen press m 2 Press R to scroll to Shortcuts 3 Press A under SELECT 4 Press m The Shortcut Menu displays 1 From the Ready screen press m 2 Press R to scroll to Shortcuts 3 Press A under SELECT 4 Press R to scroll to desired shortcut 5 Press m The Sh...

Page 91: ...press m 2 Press R to scroll to Shortcuts 3 Press A under SELECT 4 Press R to scroll to desired shortcut 5 Press m The Shortcut Menu displays 6 Press R to scroll to DELETE if just deleting the selected shortcut Scroll to DELETE ALL if deleting ALL shortcuts 7 Press A under YES to confirm 8 A confirmation screen displays ...

Page 92: ...ns illuminated 5 10 20 or 30 seconds continuous or off Font Size Display font standard zoom or compressed Auto Answer Automatic answer of incoming phone calls 1 From the Ready screen press m 2 Press R to scroll to Styles 3 Press A under SELECT 4 Press m The Styles Menu displays all stored Styles 1 From the Ready screen press m 2 Press R to scroll to Styles 3 Press A under SELECT 4 Press m The Styl...

Page 93: ...he next step Use your keypad to name the style and press A under OK when finished 7 Press R to scroll to the various Style options 8 Press A under CHANGE to edit the highlighted Style option 9 After all Style options are selected press A under DONE to store the style 10 A confirmation menu displays ...

Page 94: ...96 www motorola com ...

Page 95: ...for easy attachment to a belt or purse This case accommodates i3000plus phone travel chargers audio accessories car accessories and all battery types Wearable Carrying Solutions page 97 Batteries page 99 Travel Chargers page 100 Vehicle Power Adapter Car Charger page 102 Dual Pocket Desktop Charger page 103 Headsets page 104 Car Kits page 104 Data Accessories page 108 ...

Page 96: ...ists of the Phone Clip and the Belt Clip Using the Carry Clip 1 Attach the Phone Clip to the i3000plus phone 2 Attach the Belt Clip to the Phone Clip as illustrated in the picture above 3 Attach the Carry Clip Phone Clip and Belt Clip to your belt 4 To release phone from belt clip push the button on the top of the belt clip Phone Clip Belt Clip ...

Page 97: ...a self discharge rate and without use will lose about 1 of its charge per day The battery capacity will be degraded if stored for long periods while fully charged If long term storage is required store at half capacity The Motorola iDEN Approved Lithium Ion chargers will provide optimum performance Other chargers may not fully charge your iDEN Lithium Ion battery or may yield reduced number of lif...

Page 98: ...he other AC outlet end of the device there is a compact housing that contains the plug in power supply NOTE Additional adaptor plugs to accommodate various International power outlets can be purchased separately SYN7456 SYN7455 SYN8127 SYN7461 SYN7460 TRAVEL CHARGERS Kit Number Description SPN4940 Mid Rate Multi Voltage Travel Charger SPN4716 Rapid Multi Voltage Travel Charger SPN4808 Mid Rate Eco...

Page 99: ... holding the i3000plus phone with its keypad facing up insert the accessory connector with the Motorola logo facing you into the bottom of the i3000plus phone until you hear a click 2 If you have either the Mid Rate Multi Voltage Travel Charger or the Rapid Multi Voltage Travel Charger flip open the prongs and plug the Travel Charger transformer into an AC wall outlet Or If you have the Mid Rate E...

Page 100: ...e with its keypad facing up insert the accessory connector with the Motorola logo facing you into the bot tom of the i3000plus phone until you hear a click 2 Plug the vehicle power adapter into the cigarette lighter power recepta cle The power light green LED will come on 3 The i3000plus phone may be turned off turned on or in use 1 Unplug the vehicle power adapter from the vehicle s cigarette lig...

Page 101: ... only NOTE Please see the label on the bottom of your Dual Pocket Desktop Charger for more information regarding battery charging status 1 Plug the flat end of the power supply cord with the logo facing up into the back of the charger 2 Plug the transformer end of the power supply cord into any standard AC wall outlet 3 Insert an i3000plus phone with an attached battery into the charger s front po...

Page 102: ...he Dash Mount Holder can be installed either horizontally or vertically Item Number Description NTN8367 Privacy Earpiece and microphone NTN8497 Lightweight over the ear headset with boom mic NTN8496 Lightweight headset with microphone NTN8513 Adjustable headset SYN8608 Hearing aid neckloop kit 1 Insert the plug of the headset cord into the jack on the side of the phone 2 Pull on the plug not the c...

Page 103: ...the air bag or in the air bag deployment area 1 Mount the Dash Mount Holder to the dash of your vehicle by securing the four self tapping screws to the base of the holder Or for a semi per manent installation use an adhesive strip 2 Snap your phone securely into the holder ...

Page 104: ...mmunications by providing a built in speaker a power supply for the phone s internal battery charger hands free visor microphone and an external Push To Talk PTT switch Using the Hands Free Car Kit 1 Hold the i3000plus phone with its keypad facing up Insert the acces sory connector with the Motorola logo facing you into the bottom of the phone until it clicks into place 2 Plug the Hands Free Car K...

Page 105: ...the driver The visor microphone Should NOT be located within 12 inches of the speaker box Should never be mounted near the vehicle s window or in a spot where road and ambient noise are substantially high Should be mounted so that it does not come into contact with the air bag or interfere with air bag deployment 4 Turn on your i3000plus phone 5 Adjust the speaker volume using the volume control b...

Page 106: ...108 www motorola com Data Accessories The RS232 Data Cable NKN6544 Using the Data Cable 1 2 3 4 ...

Page 107: ...Data Accessories 109 Y Cable The NKN6540 cable allows for audio or charging accessories to be used while simultaneously performing data operations Using the Y Cable 1 2 DATA CAR KIT ...

Page 108: ... www motorola com PDA Converter Plugs The Palm III VII Adapter NKN6546 the Palm V Adapter NKN6547 or the generic PDA Adapter NTN8993 can be used with your i3000plus phone Using the Palm Converter Plug 1 2 ...

Page 109: ... not valid User Not Available The phone that you called is either busy out of range or turned off Please try again later User Not Authorized The party that you called has not purchased this service Please Try Later This service is temporarily not available Please try again later User Busy in Private The phone that you called is busy in a Private call User Busy in Data The phone that you called is ...

Page 110: ...n your phone off and contact Customer Care PIN Blocked Call Your Provider The incorrect PIN was entered three consecutive times You will be unable to send or receive call on your i3000plus phone Call your service provider to have them obtain the PIN Unblocked Key PUK code Insert SIM Your SIM Card is not being detected Please check to ensure that you have inserted the SIM Card Check SIM Card Please...

Page 111: ...ectronics Engineers IEEE C95 1 1992 Institute of Electrical and Electronics Engineers IEEE C95 1 1999 Edition National Council on Radiation Protection and Measurements NCRP of the United States Report 86 1986 International Commission on Non Ionizing Radiation Protection ICNIRP 1998 National Radiological Protection Board of the United Kingdom 1995 Ministry of Health Canada Safety Code 6 Limits of H...

Page 112: ...en using your radio product as a traditional two way radio while making group or private calls with the Group Private Speaker ON no speaker icon visible in the display hold the radio product in a vertical position with the microphone one to two inches 2 5 to 5 cm away from the lips Body worn operation To maintain compliance with FCC RF exposure guidelines if you wear a radio product on your body w...

Page 113: ...he phone is designed to operate at multiple power levels so as to use only the power required to reach the network In general the closer you are to a wireless base station antenna the lower the power output Before a phone model is available for sale to the public it must be tested and certified to the FCC that is does not exceed the limit established by the government adopted requirement for safe ...

Page 114: ...nsistent with the independent research by and recommendations of Wireless Technology Research Persons with pacemakers should ALWAYS keep the radio product more than 6 inches 15 cm from their pacemaker when the radio product is turned ON Not carry the radio product in a breast pocket Use the ear opposite the pacemaker to minimize the potential for interference Turn the radio product OFF immediately...

Page 115: ...dio products in the area where you drive Always obey them When using the radio product while driving please Give full attention to driving and to the road Use hands free operation if available Pull off the road and park before making or answering a call if driving conditions so require ...

Page 116: ...o not remove install or charge batteries in such areas Sparks in a potentially explosive atmosphere can cause an explosion or fire resulting in bodily injury or even death NOTE The areas with potentially explosive atmospheres referred to above include fueling areas such as below decks on boats fuel or chemical transfer or storage facilities areas where the air con tains chemicals or particles such...

Page 117: ... air flow 5 Let the radio product and battery dry for 72 hours before reconnecting the battery and or powering on the radio product Operational Cautions Antennas Do not use any portable radio product that has a damaged antenna If a damaged antenna comes into contact with your skin a minor burn can result Batteries All batteries can cause property damage and or bodily injury such as burns if a cond...

Page 118: ...rmation Clean the external surfaces of the radio product with a damp cloth using a mild solution of dishwashing detergent and water Some household cleaners may contain chemicals that could seriously damage the radio product Avoid the use of any petroleum based solvent cleaners Also avoid applying liquids directly on the radio product ...

Page 119: ...recommended attachment to a battery charger may result in a risk of fire electric shock or injury to persons Make sure the battery charger power cord is located so that it will not be stepped on tripped over or subjected to damage or stress An extension cord should not be used with any battery charger unless absolutely necessary Use of an improper extension cord could result in a risk of fire and ...

Page 120: ...y charger should not exceed 40 C 104 F The output power from the power supply or transformer must not exceed the rating given on the Desktop Dual Pocket Charger The disconnection from the line voltage is made by unplugging the power supply from the AC receptacle To reduce risk of electric shock unplug any battery charger from the outlet before attempting any maintenance or cleaning For optimum cha...

Page 121: ...nted for the balance of the original applicable warranty period All replaced parts of Product shall become the property of MOTOROLA This express limited warranty is extended by MOTOROLA to the original end user purchaser only and is not assignable or transferable to any other party This is the complete warranty for the Product manufactured by MOTOROLA MOTOROLA assumes no obligations or liability f...

Page 122: ...L SPECIAL OR CONSEQUENTIAL DAMAGES ARISING OUT OF THE USE OR INABILITY TO USE SUCH PRODUCT TO THE FULL EXTENT SUCH MAY BE DISCLAIMED BY LAW III STATE LAW RIGHTS SOME STATES DO NOT ALLOW THE EXCLUSION OR LIMITATION OF INCIDENTAL OR CONSEQUENTIAL DAMAGES OR LIMITATION ON HOW LONG AN IMPLIED WARRANTY LASTS SO THE ABOVE LIMITATIONS OR EXCLUSIONS MAY NOT APPLY This warranty gives specific legal rights ...

Page 123: ...Product which has had the serial number removed or made illegible g Rechargeable batteries if 1 Any of the seals on the battery enclosure of cells are broken or show evidence of tampering 2 The damage or defect is caused by charging or using the battery in equipment or service other than the Product for which it is specified c Freight costs to the repair depot d A Product which due to illegal or u...

Page 124: ...of the Product or parts as established by MOTOROLA MOTOROLA will have no liability with respect to any claim of patent infringement which is based upon the combination of the Product or parts furnished hereunder with software apparatus or devices not furnished by MOTOROLA nor will MOTOROLA have any liability for the use of ancillary equipment or software not furnished by MOTOROLA which is attached...

Page 125: ...ty Replaced parts or boards are warranted for the balance of the original applicable warranty period All replaced parts of Product shall become the property of MOTOROLA This express limited warranty is extended by MOTOROLA to the original end user purchaser only and is not assignable or transferable to any other party This is the complete warranty for the Product manufactured by MOTOROLA MOTOROLA ...

Page 126: ...NVENIENCE COMMERCIAL LOSS LOST PROFITS OR SAVINGS OR OTHER INCIDENTAL SPECIAL OR CONSEQUENTIAL DAMAGES ARISING OUT OF THE USE OR INABILITY TO USE SUCH PRODUCT TO THE FULL EXTENT SUCH MAY BE DISCLAIMED BY LAW III HOW TO GET WARRANTY SERVICE You must provide proof of purchase bearing the date of purchase and Product item serial number in order to receive warranty service and also deliver or send the...

Page 127: ...eptance labeling in effect for the Product at the time the Product was initially distributed from MOTOROLA e Scratches or other cosmetic damage to Product surfaces that does not effect the operation of the Product f Normal and customary wear and tear g Exclusion for defects or damage arising from use of the products in connection with non MOTOROLA equipment V PATENT AND SOFTWARE PROVISIONS MOTOROL...

Page 128: ...f ancillary equipment or software not furnished by MOTOROLA which is attached to or sued in connection with the Product or any parts thereof In no event shall MOTOROLA be liable for any incidental special or consequential damages arising from any claim of patent infringement or alleged infringement Laws in the United States and other countries preserve for MOTOROLA certain exclusive rights for cop...

Page 129: ...patents listed in the User s Guide Microsoft Microsoft Internet Explorer MSN MSN Mobile MSN Hotmail MSNBC Expedia com Sidewalk com and MoneyCentral are registered trademarks of Microsoft Corporation Netscape Navigator is a registered trademark of Netscape Communications Corporation T9 is a trademark owned by Tegic Communications T9 Text Input Patent and Trademark Information This product is covere...

Page 130: ...132 www motorola com ...

Reviews: