background image


Using the  FR6076


42


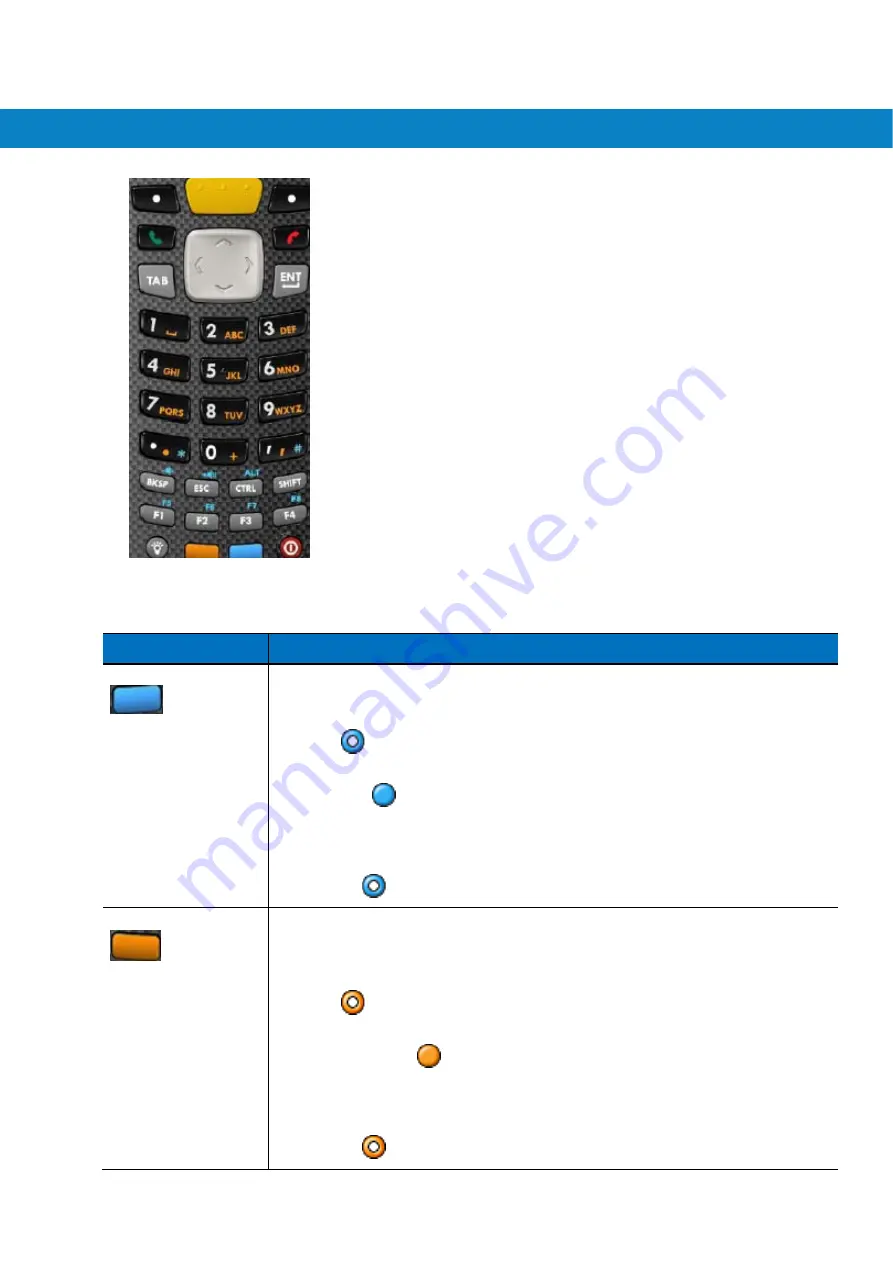
Figure 2-13 

FR6070Numeric Keypad


Table 2-9   

Alpha-numeric Keypad Descriptions 

Key


Action


Blue Key 


Launches applications (shown on the keypad in  blue). 

Press the Blue key once to activate this mode temporarily, followed by another key. This 
displays the following icon at the bottom of the screen, until a second key is 


pressed:   


Press the Blue key twice to lock this mode. This displays the following icon at the bottom


of the screen:   


Press the Blue key a third time to unlock. 

Press and hold the Blue key while selecting a sequence of keys to activate this mode 
temporarily. This displays the following icon at the bottom of the screen as long as the key


is pressed:     


Orange Key 


Accesses the secondary layer of characters and actions (shown on the keypad in 
orange). 

Press the Orange key once to activate this mode temporarily, followed by another key. 
This displays the following icon at the bottom of the screen, until a second key is 


pressed:   


Press the Orange key twice to lock this mode. This displays the following icon at the 


bottom of the screen: 


Press the Orange key a third time to unlock. 

Press and hold the Orange key while selecting a sequence of keys to activate this mode 
temporarily. This displays the following icon at the bottom of the screen as long as the key


is pressed:     


Summary of Contents for FR6070Enterprise

Page 1: ...FR6070Enterprise Digital Assistant User Guide ...

Page 2: ...2 FR6070EnterpriseDigitalAssistant User Guide Rev A Jan 2009 ...

Page 3: ...torola The user agrees to maintain Motorola s copyright notice on the licensed programs delivered hereunder and to include the same on any authorized copies it makes in whole or in part The user agrees not to decompile disassemble decode or reverse engineer any licensed program delivered to the user or any portion thereof Motorola reserves the right to make changes to any software or product to im...

Page 4: ...FR6076 User Guide 4 RevisionHistory Changes to the original manual are listed below Change Date Descriptio n 01 Rev A Initial release ...

Page 5: ...erence to radio or television reception which can be determined by turning the equipment off and on the user is encouraged to try to correct the interference by one or more of the following measures Reorient or relocate the receiving antenna Increase the separation between the equipment and receiver Connect the equipment into an outlet on a circuit different from that to which the receiver is conn...

Page 6: ...evels of various devices and at various positions they all meet the government requirement The FCC has granted an Equipment Authorization for this device with all reported SAR levels evaluated as in compliance with the FCC RF exposure guidelines SAR information on this device is on file with the FCC and can be found under the Display Grant section of http www fcc gov oet fccid after searching on F...

Page 7: ...Table of Contents ix 7 Tableof Contents About This Guide Chapter1 Getting Started Chapter2 Using the FR6070 Chapter3 Using Bluetooth Chapter4 Accessories Chapter5 Maintenance Troubleshooting ...

Page 8: ...and accessories NOTE Screens and windows pictured in this guide are samples and can differ from actual screens Documentation Set The documentation set for the FR6070 provides formation for specific user needs and includes FR6070 Quick Start Guide describes how to get the FR6070 up and running FR6070 User Guide describes how to use the FR6070 ...

Page 9: ...ersions This guide covers various software configurations and references are made to operating system or software versions for Adaptation Kit Update AKU version AKU Version To determine the Adaptation Kit Update AKU version Tap Start Settings System tab About icon Version tab The second line lists the operating system version and the build number The last part of the build number represents the AK...

Page 10: ...uctions on cleaning and storing the FR6070 and provides troubleshooting solutions for potential problems during FR6070operation Notational Conventions The following conventions are used in this document Handy refers to the Motorola FR6070series of hand held computers Italics are used to highlight the following Chapters and sections in this and related documents Icons on a screen Bold text is used ...

Page 11: ...quipment contact Motorola Enterprise Mobility support for your region Contact information is available at http www symbol com contactsupport When contacting Enterprise Mobility support please have the following information available Serial number of the unit Model number or product name Software type and version number If your problem cannot be solved by Motorola Enterprise Mobility Support you ma...

Page 12: ...r the first time Figure 1 1 FR6070Front View Figure 1 2 FR6070Rear View 1 IrDA Window 2 Headset Jack 13 Battery Door 14 Door Latch 3 Scan Button 4 Microphone Not available in FR6070 15 Speaker 16 Scan Widnow 5 I O Connector 6 Power button 17 CF Card Slot 18 SD Card Slot 7 Keypad 8 Touch Screen 19 Scan Button 20 Handstrap 9 Scan Decode LED 10 Charging LED 21 Stylus 11 Radio Status LED 12 Receiver ...

Page 13: ...u received the following FR6070 3600 mAh Lithium ion battery Battery cover strap assembly Tethered stylus Protective overlay installed on display window Regulatory Guide Quick Start Guide Inspect the equipment for damage If any equipment is missing or damaged contact the Motorola Enterprise Mobility Support center immediately See page xvi for contact information ...

Page 14: ...t 100 240V 50 60Hz 0 4A 2 Output 5 4V 3A USB Charging Cable 25 118708 01R FR6000 series USB Charging Cable Requires power adapter P N 50 14000 249R Model EADP 16BBA Manufacture Delta Electronics Ltd Miscellaneous KT 76490 01R Battery adapter shim for 4 slot charge only packet of 5 MN2800AAAPCD FR6070Cradle Adaptor Clip Adapts FR6070mobile computer to the cradle Pack of 3 Orders are placed directly...

Page 15: ...ted Country Korea 50 16000 257R AC Line Cord 1 8M grounded IEC 60320 C13 plug Associated Country China 50 16000 669R AC Lind Cord 1 8 M grounded BS 546 Plug Associated Country India 50 16000 671R AC Line Cord 1 8M grounded CIE 23 16 plug Associated Country Italy 50 16000 672R AC Line Cord 1 8M grounded S132 Plug Associated Country Israel 50 16000 678R AC Line Cord 36 L grounded Associated Countrie...

Page 16: ...arted FR6800 User Guide 15 Getting Started To start using the FR6070for the first time Install the SIM card FR6070and FR6070only Install the main battery Charge the FR6070 Power on the FR6070 Configure the FR6070 ...

Page 17: ...Charging the MainBattery andMemory BackupBattery Before using the FR6070for the first time charge the main battery until the amber Charging Battery Status LED remains lit see Table 1 2 on page 1 7 for charge status indications To charge the FR6070 use a cable or a cradle with the appropriate power supply For information about the accessories available for the FR6070 see Chapter 6 Accessories The F...

Page 18: ...battery is not fully inserted Fast Blinking Red 2 blinks second Charging error e g Temperature is too low or too high Charging has gone on too long without completion typically eight hours Table 1 2 LED Charge Indicators Continued Charging Battery Status LED Indication Single Blink Amber when device is turned on Battery depleted Blink Amber Battery charger temperature is too high Battery over temp...

Page 19: ...p the screen to continue Checking Battery Status To check the charge status of the main battery or backup battery in the FR6070 tap Start Settings System tab Power icon to display the Power window To save battery power tap the Advanced tab and set the FR6070to turn off after a specified number of minutes CF Card Installation First unscrew the plastic cover and remove it insert CF card with the fro...

Page 20: ...2 Remove the memory card cover 3 Carefully press and release the card to eject it 4 Remove the card from the card slot 11 28 5 Replace the memory card cover Adjusting the Handstrap The FR6070handstrap is attached to the bottom of the battery cover Adjust the handstrap to increase comfort when holding the FR6070for extended periods of time To adjust the handstrap 1 Feed the handstrap through the ha...

Page 21: ...attery 1 Press the red Power button to suspend the FR6070 2 Loosen the handstrap 3 Open the battery cover latches on either side of the battery cover 4 Lift the top of the battery cover and remove 5 Press the battery release latch on the bottom of the battery to unlock and lift the battery out of the well 6 Insert the replacement battery top first into the battery compartment in the back of the FR...

Page 22: ...rge at a faster rate Changing the Power Settings To set the FR6070to turn off after a short period of non use 1 Tap Start Settings System tab Power icon Advanced tab 2 Select the On battery power Turn off device if not used for check box and select a value from the drop down list 3 Select ok Changing the Backlight Settings To change the backlight settings in order to conserve more battery power 1 ...

Page 23: ... the Connectivity icon or tap Wireless Manager on the Today screen Connectivity icon Figure 1 8 Opening Wireless Manager Select Wireless Manager Figure 1 9 Wireless Manager Window Figure 1 10 Wireless Manager Menu NOTE Wireless connection options vary depending upon configurations To enable or disable a wireless connection tap the specific button To enable or disable all wireless connections tap t...

Page 24: ...ult radio states are Bluetooth OFF Wireless LAN ON Today Screen The Today screen displays important information such as upcoming appointments and status indicators Tap a section on the screen to open the associated program Alternatively tap Start Today to display the Today screen Open the Start Menu Adjust volume Battery Status Change the date and time Change the date and time set up the alarm and...

Page 25: ... 1 Status Icons Icon Function Description Notification Backup Battery Low Notification that one or more instant messages were received Notificationthat one or more e mail textmessageswere received There are more notification icons than can be displayed Tap to display remaining icons Indicates a reminder of an upcoming calendar event Connectivity Connection is active Connection is not active Synchr...

Page 26: ...s Continued Icon Function Description Speaker Vibrate is on Main battery is charging Battery power completely depleted Battery Main battery is low Main battery level Displays current time in analog or digital format Time and Next Appointment ...

Page 27: ...e complete suite of Microsoft Office applications for your mobile device Excel Mobile Create new workbooks or view and edit Microsoft Excel workbooks OneNote Mobile Create new notes or view existing notes PowerPoint Mobile View Microsoft PowerPoint slides and presentations Word Mobile Create view and edit Microsoft Word documents Calendar Keep track of appointments and create meeting requests Cont...

Page 28: ...e AP DataWedge Notify and Scanner Calculator Perform basic arithmetic and calculations such as addition subtraction multiplication and division File Explorer Organize and manage files on your device Getting Started Display help on how to use some functions Internet Sharing Connect a notebook computer to the Internet using the FR6070 s data connection Messenger Use this mobile version of Windows Li...

Page 29: ...s Pictures Videos View and manage pictures animated GIFs and video files Search Search contacts data and other information on your FR6070 Task Manager Show and stop all the tasks on run Tasks Keep track of your tasks Windows Live Use this mobile version of Windows Live to find information on the web WindowsMediaPlayer Mobile Play back audio and video files ...

Page 30: ...s Enable sounds for events notifications and more and set the type of notification for different events Today Customize the appearance and the information to be displayed on the Today screen SystemTab About View basic information such as the Windows Mobile version and type of processor used on the FR6070 802 11d Tools Enable or disable 802 11d Backlight Set the display backlight time out and adjus...

Page 31: ...crosoft s technical support if you choose to send it Managed Programs View installation history Memory Check the device memory allocation status and memory card information and stop currently running programs Power Check battery power and set the time out for turning off the display to conserve battery power Regional Settings Set the regional configuration to use including the format for displayin...

Page 32: ...incoming IrDA beams and bluetooth beam Bluetooth Search for other Bluetooth devices Domain Enroll Enroll in domain USB to PC Enables or disables the enhanced network connectivity Wi Fi Setup wireless network connection and customize settings Wireless Manager Enables or disables the FR6070 s wireless radios and customizes Wi Fi Bluetooth ...

Page 33: ...dow or use the Up Down button on the side of the FR6070 Battery Status Indications Battery icons appear on the navigation bar indicating the battery power level When the main battery or backup battery power falls below a predetermined level the icon indicates the status and a battery dialog box appears indicating the status of the main or backup battery Figure 2 3 Battery Status Dialog Box The Bat...

Page 34: ...tle Bar Also view the battery status using the Power window Power Setting 1 Tap Start Settings Power icon Main tab A power remaining capacity bar appears Figure 2 5 Main Tab 2 Tick the following options to save the power and tap ok Figure 2 6 AdvancedTab ...

Page 35: ...uld move to an environment within proper operating temperature Level 2 Temperature Warning this level is similar to main battery very low warning It indicates the battery temperature has reached the second threshold level The user should stop using the FR6070 Level 3 Temperature Error this level indicates the battery has reached an unusable temperature threshold and immediately suspends the FR6070...

Page 36: ...de LED Solid Green Successful decode capture Solid red Laser enabled scanning in process Off Not enabled Charging Battery Status LED Slow blinking amber Main battery in FR6070is charging Solid green Main battery in FR6070is fully charged Fast blinking amber Charging error Off Not charging Single blink amber when power button is pressed Battery depleted Blinking amber when power button is pressed B...

Page 37: ...itions define what actions wake up the mobile computer after it has gone into suspend mode The mobile computer can go into suspend mode by either pressing the Power button or automatically by Control Panel time out settings These settings are configurable and the factory default settings are shown in Table 2 7 are subject to change update Table 2 7 Wake up Default Settings Condition for Wake up Po...

Page 38: ... input To lock the device tap the Device unlocked icon The icon changes to locked Figure 2 11 Device Locked Unlocked Icons To unlock the device and free it for use tap Unlock Figure 2 12 Unlock Device Window Tap Unlock on the Unlock window NOTE You can make emergency calls even when the FR6070is locked See Making an Emergency Call on page 5 7 for more information ...

Page 39: ... Alpha numeric Keypad Input Modes Continued Key Numeric Mode Orange Key Alpha Lowercase Mode Orange Shift Keys Alpha Uppercase Mode Blue Key SHIFT Key 1st Press 2nd Press 3rd Press 4th Press 1st Press 2nd Press 3rd Press 4th Press Up Up Up Hilight Up Left Left Down Down Down Hilight Down Right Right Enter Action Action Action Action Action Note An application can change the key functions The keypa...

Page 40: ...sequenceof keys to activatethis mode temporarily This displaysthe followingicon at the bottomof the screenas long as the key is pressed OrangeKey Accessesthe secondarylayer of charactersand actions shownon the keypadin orange Press the Orangekey once to activatethis mode temporarily followedby anotherkey This displaysthe followingicon at the bottomof the screen until a secondkey is pressed Press t...

Page 41: ...isplays the following icon at the bottom of the screen until a second key is pressed z Press and hold the Shift key while selecting a sequence of keys to activate this mode temporarily This displays the following icon at the bottom of the screen as long as the key is pressed Press the Shift key twice to lock this mode This displays the following icon at the bottom of the screen Press the Shift key...

Page 42: ...in functions Figure 2 14 Function Buttons 1 Scan button 2 Power button Power Press the red Power button to turn the FR6070screen on and off The FR6070is in suspend mode when the screen is off For more information see Powering On the FR6070on page 1 8 Also use the Power button to reset the FR6070by performing a warm or cold boot See Resetting the FR6070on page 2 14 Scan Press to scan bar codes See ...

Page 43: ...een and drag across the screen to select text Drag in a list to select multiple items NOTE Motorola recommends using the spring loaded tip of the stylus to write on the screen and the back end of the stylus to tap the screen Use your finger to press the Power button and keypad buttons CAUTION To prevent damage to the screen do not use any device other than the Motorola provided stylus Entering Dat...

Page 44: ...de density and scanning device optics Scanning within range brings quick and constant decodes scanning too close or too far away prevents decodes Move the scanner closer and further away to find the right working range for the bar codes being scanned Angle Scanning angle is important for promoting quick decodes When laser beams reflect directly back into the scanner from the bar code this special ...

Page 45: ...the red scan beam covers the entire bar code The Scan Decode LED lights red to indicate that scanning is in process then lights green and a beep sounds by default to indicate the bar code was decoded successfully Figure 2 17 Linear Scanner Aiming Pattern 4 Release the scan button ...

Page 46: ...tings Connections tab Beam icon 2 Tap Receive all incoming beams check box Figure 2 18 Beam Window 3 Tap ok Infrared Connection Using infrared you can enable short range file exchange between your FR6070and another IrDA device Exchanging Files using IR Connection Ensure that the IrDA function on both the FR6070and the other device are enabled To send files via IrDA connection 1 Switch to the progr...

Page 47: ...e that you want to send the file to Figure 2 20 Beam Contact Figure 2 21 Receive File To receive files via IrDA connection 1 Align the IrDA port of the FR6070with that of the other IrDA device so that they are unobstructed and within a close range 2 On the other device send the file to the FR6070 3 When the Receiving Data dialog displays tap Yes ...

Page 48: ... with Bluetooth voice All devices in the piconet Bluetooth network must be AFH capable in order for AFH to work There is no AFH when connecting and discovering devices Avoid making Bluetooth connections and discoveries during critical 802 11b communications AFH for Bluetooth consists of four main sections Channel Classification A method of detecting an interference on a channel by channel basis or...

Page 49: ...aired generates the initialization key The PIN number is never sent over the air By default the Bluetooth stack responds with no key when a key is requested it is up to user to respond to the key request event Authentication of Bluetooth devices is based upon a challenge response transaction Bluetooth allows for a PIN number or passkey that is used to create other 128 bit keys used for security an...

Page 50: ...ed Figure 4 2 Enable Bluetooth Bond New Device s The FR6070can exchange information with bonded devices To find Bluetooth devices in the area 1 Ensure that Bluetooth is enabled on both devices 2 Ensure that the Bluetooth device to discover is in discoverable and connectable modes 3 Ensure that the two devices are within 30 feet 10 meters of one another 4 Tap the Bluetooth icon to enter Wireless Ma...

Page 51: ... it and enter a passcode to establish a secure connection with it Meanwhile enter the passcode on the target device Figure 4 5 Discover Devices Dialog Box File Transfer Services To transfer files between the FR6070and another Bluetooth enabled device please ensure the FR6070is discoverable and connectable NOTE Some devices might not require a PIN This depends upon the device s authentication ...

Page 52: ... Transfer file Window Bluetooth Settings Use the Bluetooth Settings window to configure the operation of the application Tap Menu Settings The Bluetooth Settings window appears Device Info Tab Use the Device Info tab to add and bond new devices Please refer to Bond new device s Mode Tab Use the Mode tab to configure the FR6070 s Bluetooth connection modes ...

Page 53: ...ces to find your FR6070 please tick Make this device visible to other devices COM Ports Tab Use the COM Ports tab set specific outgoing ports for bonded devices 1 Tap New Outgoing Port Figure 4 9 Add COM Ports 2 Select the device you want to add Then tap Next Figure 4 10 Select device 3 Select a port from drop down list Then tap Finish ...

Page 54: ...60 Figure 4 11 Select a Port for device ...

Page 55: ... communication with a host computer Headset Used in noisy environments Single Slot USB Serial Cradle This section describes how to use a Single Slot USB Serial cradle with the FR6070 For USB communication setup procedures refer to the FR6070Integrator Guide The Single Slot USB Serial Cradle Provides 5 4 VDC power for operating the FR6070 Synchronizes information between the FR6070and a host comput...

Page 56: ...st Blinking Red Charging Error It is recommended that this product be charged for 24 hours before the first use to ensure that the internal battery is fully charged Figure 6 1 FR6070Battery Charging Charging the Spare Battery Spare Battery Figure 6 2 Spare Battery Charging ...

Page 57: ... Charging Temperature Charge batteries in temperatures from 0 C to 45 C 32 F to 113 F Charging is intelligently controlled by the FR6070 To accomplish this for small periods of time the FR6070or accessory alternately enables and disables battery charging to keep the battery at acceptable temperatures The FR6070or accessory indicates when charging is disabled due to abnormal temperatures via its LE...

Page 58: ...0R Figure 6 5 Headset Connection Cables This section describes how to set up and use the cables The cables are available with a variety of connection capabilities The following communication charge cables are available USB Client Charge cable standard A connector and a barrel receptacle for power Auto charge cable Charge only cable The following printer cables are available directly from Motorola ...

Page 59: ... the communication charge cable and gently press in until it latches into the FR6070 The FR6070amber Charge LED indicates the FR6070battery charging status The 3600 mAh standard battery charges in less than five hours See Table 1 2 on page 1 7 for charging status indications 3 When charging is complete remove the cable by gently pulling the FR6070and the cable apart LED Charge Indications The ambe...

Page 60: ...on the surface of the FR6070screen Motorola recommends using a screen protector p n KT 67525 01R The touch sensitive screen of the FR6070is glass Do not to drop the FR6070or subject it to strong impact Protect the FR6070from temperature extremes Do not leave it on the dashboard of a car on a hot day and keep it away from heat sources Do not store or use the FR6070in any location that is dusty damp...

Page 61: ...products that bear the USB IF logo or have completed the USB IF compliance program To enable authentication of an approved battery as required by IEEE1725 clause 10 2 1 all batteries will carry a Motorola hologram Do not fit any battery without checking it has the Motorola authentication hologram Do not disassemble or open crush bend or deform puncture or shred Severe impact from dropping any batt...

Page 62: ...he alcohol wipes but care should be taken not to allow any pooling of liquid around the edges of the display Immediately dried the display with a soft non abrasive cloth to prevent streaking Scanner Exit Window Wipe the scanner exit window periodically with a lens tissue or other material suitable for cleaning optical material such as eyeglasses Connector 1 Remove the main battery from mobile comp...

Page 63: ...d air in the connector area by pointing the tube nozzle about inch away from the surface CAUTION do not point nozzle at yourself and others ensure the nozzle or tube is pointed away from your face 6 Ensure that there is no lint left by the cotton tipped applicator remove lint if found 7 If grease and other dirt can be found on other areas of the cradle use lint free cloth and alcohol to remove 8 A...

Page 64: ...e 2 14 FR6070removed from cradle while battery was charging Insert FR6070in cradle The 3600 mAh batteryfully chargesin less than six hours Extremebattery temperature Batterydoesnot chargeif ambienttemperatureis below0 C 32 F or above 45 C 113 F Cannotseecharacters on display FR6070not powered on Press the Powerbutton During data communication no data transmitted or transmitteddata was incomplete F...

Page 65: ...appingthe window buttonsor icons does not activatethe correspondingfeature Screenis not calibratedcorrectly Re calibratethe screen See Calibrating the Screen on page 1 8 The systemis not responding Warm boot the system See Resetting the FR6070on page 2 14 A messageappears stating that the FR6070memoryis full Too many files storedon the FR6070 Delete unusedmemosand records If necessary save these r...

Page 66: ...cation to generatea beep on good decode Batteryis low If the scannerstops emittinga laser beam upon a trigger press check the batterylevel When the batteryis low the scannershuts off before the FR6070low batteryconditionnotification Note If the scanneris still not readingsymbols contactthe distributoror Motorola Bluetooth Connection Table 7 2 Troubleshooting Bluetooth Connection Problem Cause Solu...

Page 67: ...or spare batteryis inserted Cradle is not receivingpower Ensurethe power cable is connectedsecurelyto both the cradle and to AC power FR6070is not seated firmly in the cradle Removeand re insertthe FR6070into the cradle ensuringit is firmly seated Spare battery is not seated firmly in the cradle Removeand re insertthe spare batteryinto the chargingslot ensuringit is firmly seated ...

Page 68: ... F and 35 C 95 F Extremebattery temperature Batterydoesnot chargeif ambienttemperatureis below0 C 32 F or above 45 C 113 F Spare batteryis not charging Batterynot fully seatedin charging slot Removeand re insertthe spare batteryin the cradle ensuringit is firmly seated Batteryinserted incorrectly Re insertthe batteryso the chargingcontactson the batteryalign with the contactson the cradle Batteryi...

Reviews: