background image

44

ActiveSync (

USB) Connectivity

ActiveSync is a synchronization program developed by 
Microsoft. When dock in a personal desktop cradle, Active-
Sync allows the HC700-G to be synchronized with a PC over 
USB. The program synchronizes Personal Information Man-
ager (PIM) data such as Microsoft Outlook, along with Inter-
net surfing. ActiveSync enables the manual transfer of files 
between the HC700-G and a PC and the ability to install and 
uninstall mobile device applications.

First time connection

In order to enable USB communication with your host PC, 
Microsoft ActiveSync program must be installed on your PC.

The HC700-G is provided with the ActiveSync program 
installed. However, the program can be obtained from 
Microsoft web site. To learn more about the most up-to-date 
version of the ActiveSync and its operation, refer to Active-
Sync help.

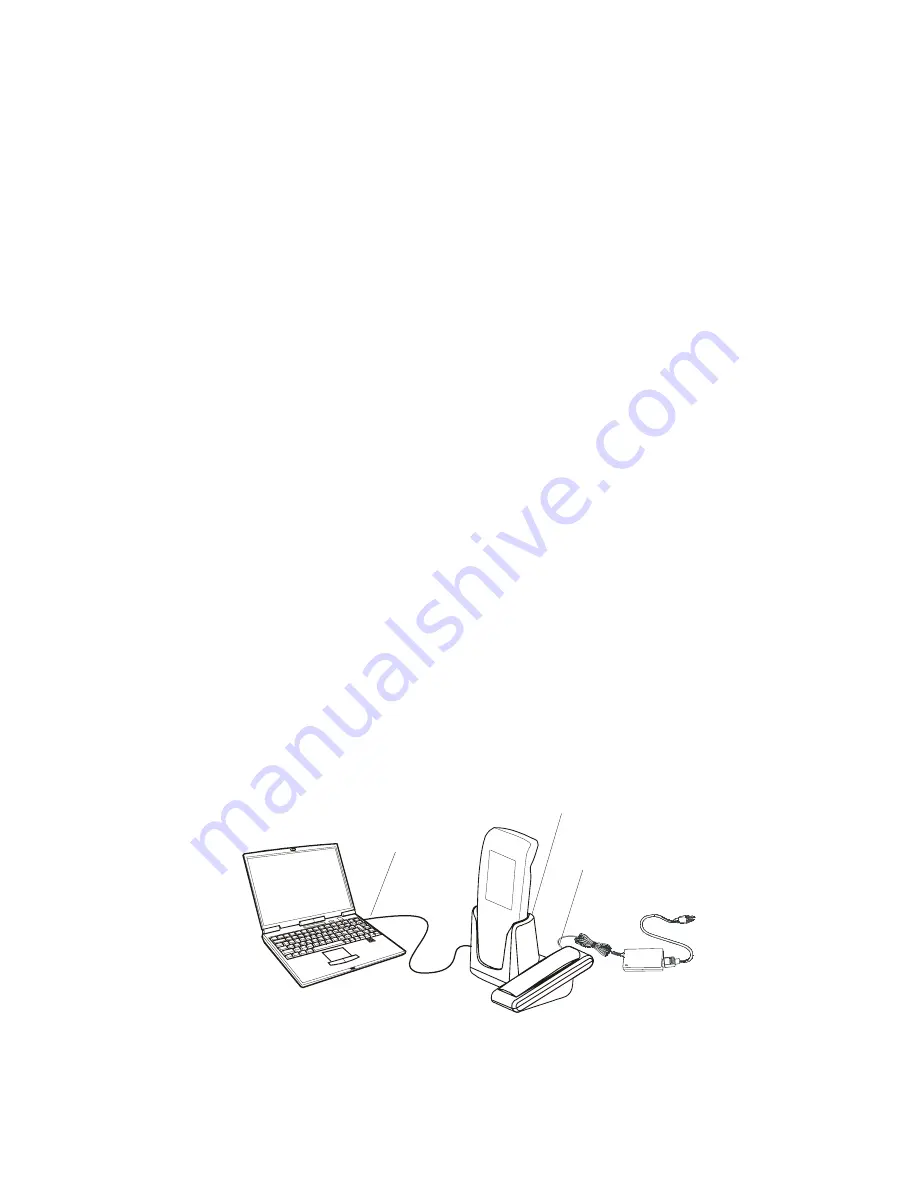
Place the HC700-G inside the Personal Desktop Cradle and 
connect the USB cable between the USB ports of the cradle 
and the PC. Your PC will identify the new connection and will 
request you to point to the HC700-G USB driver provided with 
this product. The HC700 USB driver can also be downloaded 
from MOTODEV web site (

https://developer.motorola.com/

?path=1.870)

.

Figure 20. ActiveSync - USB Connectivity

PC USB Port

Host PC

HC700-G USB Port

Personal Desktop Cradle

Summary of Contents for F4705A

Page 1: ...HC700 G HCe700 G Handheld Computers Models F4705A F4707A F4708A Quick Start Guide a ...

Page 2: ......

Page 3: ...lumbia and Canada Document Copyrights No duplication or distribution of this document or any portion thereof shall take place without the express written permission of Motorola No part of this manual may be reproduced distributed or transmitted in any form or by any means electronic or mechanical for any pur pose without the express written permission of Motorola Disclaimer The information in this...

Page 4: ... Product with any ancillary equipment and all such equipment is expressly excluded from this warranty Because each system which may use the Product is unique MOTOROLA disclaims liability for range cov erage or operation of the system as a whole under this warranty II General Provisions This warranty sets forth the full extent of MOTOROLA s responsibili ties regarding the Product Repair replacement...

Page 5: ...hip E A Product subjected to unauthorized Product modifica tions disassemblies or repairs including without limi tation the addition to the Product of non Motorola supplied equipment which adversely affect perfor mance of the Product or interfere with Motorola s nor mal warranty inspection and testing of the Product to verify any warranty claim F Product which has had the serial number removed or ...

Page 6: ...parts as established by MOTOROLA MOTOROLA will have no liability with respect to any claim of patent infringement which is based upon the combination of the Product or parts furnished hereunder with software apparatus or devices not furnished by MOTOROLA nor will MOTOROLA have any liability for the use of ancillary equipment or software not furnished by MOTOR OLA which is attached to or used in co...

Page 7: ...t in permanent damage to the equipment and void your warranty and our authority to operate this device under Part 15 of the FCC Rules Indicates a potentially hazardous situation which if not avoided may result in minor or moderate injury CAU TION may also be used to alert against unsafe practices and property damage only accident hazards Model FCC ID Industry Canada ID F4708A AZ489FT7027 109U 89FT...

Page 8: ...oduct safety and RF exposure refer to Safety and General Information leaflet Motorola publication Number 6802979C37 Radio Network Frequency Band Rated Power GPRS WAN GSM 850 TX 824 2 848 8 MHz RX 869 894 MHz PCS 1900 TX 1850 2 1909 8 MHz RX 1930 1990 MHz 1 585 W 0 794 W EGPRS WAN GSM 850 TX 824 2 848 8 MHz RX 869 894 MHz PCS 1900 TX 1850 2 1909 8 MHz RX 1930 1990 MHz 0 4 W 0 32 W Wi Fi 802 11b g W...

Page 9: ...ence in a residen tial installation This equipment generates uses and can radiate radio frequency energy and if not installed and used in accordance with the instructions may cause harmful inter ference to radio communications However there is no guar antee that interference will not occur in a particular installation If this equipment does cause harmful interference to radio or television recepti...

Page 10: ...uct Approval Number from your prod uct s label in the Search bar on the Web site This product conforms with the restriction of the use of certain haz ardous substances in electrical and electronic equipment RoHS Please contact your supplier to view your product s RoHS informa tion Radio Frequency and Power The CE Mark on the product indicates that this product has been tested to and conforms with ...

Page 11: ... Logo are registered in the U S Patent and Trademark Office All other product or service names are the property of their registered owners Motorola Inc 2007 Wi Fi and the Wi Fi CERTIFIED logo are registered trademarks of the Wi Fi Alliance Note Bluetooth features and Bluetooth Class 1 power levels are not allowed for outdoor operation in France To avoid unlawful interference with radio signals do ...

Page 12: ... following symbol either on the item or in manuals to indicate the level of safety when compared against the Standard The Standard also recommends that the following be included in user documentation Note This warning states that altering the inner parts of the scanner in a way not specified in the user guide may cause light levels to exceed Class 1 limits It is not an issue when using a hand held...

Page 13: ...rate that the engine is safe for its intended application under normal usage condi tions The 5100 engine is certified as Class 1 the safest level This level includes relatively dim indicator LEDs and other sources that are brighter than the 5100 engine This means the engine is safe under reasonably foreseeable conditions of operation2 The use and condi tions of operation are the device is aimed at...

Page 14: ...xii ...

Page 15: ...Transmission Modes ix Waste Disposal of your Electronic and Electric Equipment ix Trademarks ix Eye Safety Standard for Imager Engines x Welcome 1 What is the HC700 G Handheld Computer 1 Unpacking 3 HC700 G Features 5 Front Panel and Top Side Features 5 Rear and Bottom Side Features 6 Initializing the HC700 G 7 Using the touch screen 7 Align screen procedure 7 Attaching the hand strap 9 Using the ...

Page 16: ...6 Battery Replacement 27 Battery Maintenance 28 Battery Disposal 29 Using the Phone 30 SIM Card Installation 30 Wireless Manager 31 Switching on the phone 32 Starting the Phone Application 32 Make a Call 33 Answer a Call 33 Make a call using speed dial 33 Call Waiting 33 Create a Contact from a Call 33 Make a conference call 34 Display hide your caller ID 34 Block incoming outgoing calls 34 Forwar...

Page 17: ...uetooth link partnership 40 Wireless LAN Connection 42 Turning on off 42 Connection to the Internet 42 First time Connection to the Internet 42 Connect to work 43 Switching to a different wireless LAN 43 Advance wireless operations 43 ActiveSync USB Connectivity 44 First time connection 44 Routine connection 45 Troubleshooting 46 Service 49 Maintaining the HC700 G 49 Cleaning 49 ...

Page 18: ...xvi ...

Page 19: ... The HC700 G is designed for field applications where Automatic Identifica tion and Data Capture AIDC is required The HC700 G has three models the North American HC700 G models F4708 F4705 and the European Asian HCe700 G model F4707 This manual refers to all models as HC700 G The HC700 G serves as a Personal Digital Assistant PDA using one of the following operating systems Microsoft Windows Mobil...

Page 20: ...n visibility under varied light conditions A touch screen enables easy on screen menu navigation in addition to using keypad navigation The keypad uses an adjustable backlight illumination designed for low light working conditions The HC700 G is powered by an 1800 mAh 7 2V Lithium Ion battery pack The battery is fully recharged within four hours when the HC700 G is docked in a cradle A drained bat...

Page 21: ...adle with RS232 and Ethernet ports Vehicle Cradle with USB and RS232 pass through Vehicle Power Adapter 12V Serial Cables DB25 or DB9 Travel Charger 220 110VAC Belt Shoulder holster without shoulder strap Spare Stylus Pack of 5 Spare Tethered Stylus Pack of 5 Spare Hand strap user replaceable 7 2V Lithium Ion spare battery pack Carefully unpack each item from the shipping carton Check all items fo...

Page 22: ...4 buff the screen A clean screen ensures smooth gliding of the stylus over the surface ...

Page 23: ...ith Status LED see page 10 see page 12 4 Earpiece Speaker Volume Keys see page 18 5 Scan Picture Key see page 22 6 miniSD Card Door see page 21 7 IrDA Window IrDA communication is not supported 8 Speaker see page 18 9 Keypad see page 14 10 Microphone see page 18 11 Application LED see page 13 12 Earpiece see page 18 1 2 3 5 6 7 8 10 11 4 9 12 ...

Page 24: ...HC700 G with another device using Bluetooth 2 Stylus Compartment 3 Voice Recording Button see page 18 4 Scan Picture Key 5 Hand strap 6 Battery Pack see page 27 7 Access Door to the miniSD Memory Card see page 21 8 IrDA Window IrDA communication is not supported 9 Cradle Interface Connector 10 Tethered Stylus 1 2 3 5 6 7 8 9 4 10 ...

Page 25: ...tap on the screen and to follow the Align Screen procedure touch screen calibra tion Using the touch screen Use only the included stylus or your finger depends on which method is the appropriate For example use your stylus to enter information navigate through menus or when greater accuracy is required Your finger can be used to tap on large areas such on screen buttons Align screen procedure You ...

Page 26: ...ng down the SHIFT and SP and C keys Once screen alignment has ended the Today screen is dis played The Today screen shows a summery of important information regarding your daily activities and serves as a start point for setting and operating the HC700 G When working with the HC700 G you can always display the Today screen by tapping Today Tap for Start Menu Figure 5 Today Screen ...

Page 27: ...e material with Velcro attachment patches To attach the hand strap to the back of the HC700 G 1 Turn the HC700 G to view the back side 2 Insert the U shaped clip of the strap into the holes on the imager housing 3 Attach the end of the strap through the cavity located next to cradle interface connector Figure 6 Attaching the hand strap U shaped clip Hole Buckle Hand strap ...

Page 28: ...st used program screen and will turn off No information will be lost from the memory Once turned on again the HC700 G will return to the last program screen that previously in use Turning off when the unit is in Suspend mode If the unit is in Suspend mode the screen is off and the Sta tus LED flashes green perform the following 1 Resume operation by momentarily pressing the Power button 2 Wait for...

Page 29: ...5 minutes To manually shift to Suspend mode while the HC700 G is turned on momentarily press the Power Button see Figure 1 During Suspend mode the display turns off and the status LED inside the Power Button slowly flashes green To resume operation momentarily press the Power Button again In Suspend mode the battery power is conserved by auto matically turning off the display and the computer sect...

Page 30: ...the cradle LED indications when HC700 G is used out side of the cradle Table 1 Status LED indications when HC700 G is used out of the Cradle Status Description Slowly flashing green HC700 G is in Suspend mode Fast flashing green with off interval HC700 G display is off Steady red for 6 seconds HC700 G is resuming from critical off or power off Important to avoid system failure do not remove the ba...

Page 31: ... indications when HC700 G is docked in the Cradle Status Description Steady red Battery is charging Steady green Battery is fully charged Flashing amber 1 Battery temperature is out of range battery charging has stopped Charging will resume when battery temperature is within range 2 Battery Voltage is out of range drained battery The cradle will attempt to initiate charging for 20 min utes and tha...

Page 32: ...Two sets of keys exist on the HC700 G 1 Keys active when in Alphabetic mode which are those seen on the overlay of the HC700 G keypad 2 Keys active when in Shift or Function mode which are those seen next to each key on the HC700 G keypad panel Press the SHIFT key to toggle between the Alphabetic and Numeric keypad modes Figure 9 shows the HC700 G keypad and Table 3 describes the HC700 G keys assi...

Page 33: ...nd down The Right bump and Left bump are used for horizontal navigation between action buttons and entry fields The ENT key is used to continue to the next field screen i e continue processing The SP key enables entering blank space s within a text field The SP key is active only on those text entry screens which contain fields that allow spaces to be entered The BKSP key moves the cursor to the p...

Page 34: ... alphabetic mode or numeric mode icon on the lower Taskbar For example pressing the SHIFT key and then the P key displays the digit 8 Pressing the SHIFT again and then the P key displays the letter P Hold down the SHIFT key and press on any alphabet key for uppercase letter default mode is lowercase letters The SHIFT is also used for screen and keypad illumination see page 16 The Application P1 P2...

Page 35: ...e keypad backlight Screen Backlight Turning backlight on off Hold down the SHIFT for two seconds the screen back light will turn on To turn off hold down for another two sec onds When not in use the backlight turns off automatically To configure the screen illumination duration go to Settings System Backlight Backlight adjustment The screen backlight can be adjusted by holding down the SHIFT key a...

Page 36: ...e volume during a call or when playing sound 2 Using your stylus Tap Under move the volume slider to the desired vol ume level Select On or Off to quickly enable disable volume 3 Using the keypad Hold down the SHIFT and SP keys Press the up and down arrows on the 4 Way Naviga tion key The volume may also be adjusted in Function mode as fol lows Hold down the Fn key Use the F6 key to increase or F7...

Page 37: ...C and A and F keys see Figure 10 for at least 5 seconds the Motorola logo will show on the screen for about 30 seconds and then Windows Mobile desktop or application screen will appear the HC700 G functions again Warm Reset can also be performed in the following way go to TaskManager and tap on Soft Reset If the HC700 G still does not respond perform Step 2 Cold Reset Step 2 Cold Reset Cold Reset ...

Page 38: ...n the Power Button and S and X keys for at least 5 seconds see Figure 11 the HC700 G will restart its operating system Cold Reset can also be performed in the following way go to TaskManager and tap on Cold Reset ...

Page 39: ...ver and secure the screw 4 Tap Programs File Explorer and verify that the SDCard folder is shown on the root directory of the HC700 G miniSD Card Handling Precautions SanDisk are recommended miniSD cards Do not bend or apply force to the miniSD card Do not store the miniSD card in locations subjected to high humidity or temperatures Allocating Memory You can allocate the HC700 G memory by setting ...

Page 40: ...e capture image perform the following 1 Run the Bcr barcode reader application Programs Sample Applications Bcr 2 Aim and hold the HC700 G at about 7 inches from the target 3 Press one of the Scan Picture keys and adjust your posi tion to place the emitted green bar at the target The red light emitted form the imager serves as an ambient illu mination Note When adjusting your position you may rota...

Page 41: ...reader application Programs Sample Applications Bcr 2 Aim and hold the HC700 G at about 7 inches from the target Press one of the Scan Picture keys and adjust your position to place the emitted red pattern at the target Red Ambient Light Aim the green light bar at the barcode Scan Picture Keys About 7 inches from barcode 40 degrees Scan Picture Key Figure 13 Capturing Barcodes with LED Aimer Image...

Page 42: ...cessful scan is followed by a beeping sound The HC700 G supports 360 omni directional capture for easy use in daily work The aiming pattern can be positioned at any angle across the barcode symbol see Figure 16 Aim the Laser pattern at the barcode Scan Picture Keys Scan Picture Key Figure 15 Capturing Barcodes with the HC700 G Imager Figure 16 Laser Aimer Imager Barcode Capture Positions ...

Page 43: ...atteries and or battery charg ers The following sections describe the installation and charging of the battery of the HC700 G First Time Battery Charge New batteries are shipped partially charged Charge the bat tery before using the HC700 G for the first time When not in use always place the HC700 G in a powered cradle Leaving the HC700 G out of the cradle may drain the battery causing memory lost...

Page 44: ...g the Remaining Battery Power To the status of the remaining battery power is shown as an icon on the upper status bar However to view the accurate power level go to Settings System Power The status of the remaining power will show as a bar Routine Battery Charge The battery is fully charged after four hours During the charge the Status LED inside the Power Button shows steady red and turns green ...

Page 45: ...alled within 30 minutes To replace a battery perform the following steps 1 Make sure that the HC700 G is powered off See Turn ing Off on page 10 2 Remove the HC700 G hand strap see Figure 18 3 Press the battery snap on the battery see Figure 18 and pull away the battery from the HC700 G 4 Insert a fresh battery bottom end first into the battery compartment 5 Carefully press the battery top downwar...

Page 46: ... bat tery is treated Therefore to comply with Motorola Warranty for batteries and to assure high performance and a long life for the rechargeable battery please read and follow the bat tery maintenance instructions described in the following sec tions Battery Storage Batteries which have already been charged and then stored for more than two months should be recharged before use Use the following ...

Page 47: ... and notice a decrease in usage time or an increase in charging time then it is probably time to switch to a new battery To ensure maximum service life of the HC700 G always replace the battery with a genuine Motorola replacement Battery Disposal Batteries must be recycled or disposed of properly in accor dance with local requirements Recycling facilities may not exist in all areas Please contact ...

Page 48: ...C700 G see page 10 disconnect the hand strap see page 9 and remove the battery see page 27 To install a SIM card perform the following steps see Figure 19 1 Open the SIM card door 2 Slide the SIM card holder forward to unlock the SIM card and pivot up 3 Slide the new SIM card inside the holder with the cut corner on the upper right side and the gold plate facing down 4 Lower the SIM card holder an...

Page 49: ...by performing the following 1 Tap on the antenna icon on the status bar 2 Tap Wireless Manager 3 Tap on the required wireless connection to turn on off the corresponding radio Tap All to turn on off all wire less radios Important The Wireless LAN Wi Fi and Phone radios can not be operated simultaneously Therefor when tapping All the default configuration turns on the Phone and Bluetooth radios Ant...

Page 50: ...to your GPRS network Starting the Phone Application The Phone application can be started by one of the following methods 1 Pressing the TAB key Important the TAB key starts the Phone application only in Alphabetic keypad mode use the SHIFT to tog gle Alphabetic Numeric keypad Once the Phone appli cation appears on the screen press the SHIFT key to enable the hardware keypad of the phone 2 Tapping ...

Page 51: ...Ignore The phone will stop ring ing and the caller will be directed to your voice mail depending on your service provider Make a call using speed dial 1 From the tap Phone 2 On the Phone keypad tap the Speed Dial button 3 Tap the speed dial number next to the contact you want to call from the list Call Waiting If you receive a call while in a call tap Wait to place the new call in on hold Create a...

Page 52: ... ID To display hide your identity when you are calling someone 1 From the button bar of the Phone keypad tap Tools Options Services tab 2 Tap Caller ID Get Settings 3 Tap Everyone to display your ID To prevent your identity from being revealed to others tap No one Block incoming outgoing calls Use Call Barring to block a type of incoming and or outgoing calls 1 From the Phone keypad tap Tools Opti...

Page 53: ...ference issues To place an emergency call 1 If HC700 is in Suspend screen is blank press briefly on the Power button 2 Tap Start and select Phone form the menu see upper left hand side of the screen 3 Dial the emergency number by tapping the on screen keys 4 Press the on screen Talk key to call the emergency num ber Important Notes Before the call can be made your HC700 must have the phone turned ...

Page 54: ...coming call If you have more than one call on the line you can switch between one call and the other 1 To place a call on hold tap Hold 2 To move from one call to another tap Swap Speed Dial Create a speed dial entry You can create speed dials for frequently called phone num bers so you can dial a number with a single tap Speed dials can only be created for numbers stored in Contacts 1 Tap Phone S...

Page 55: ...t Messages and tap Get Settings 5 Enter the voice mail or text message phone number in the appropriate box Change the ringer volume As you move between loud and quiet surroundings through out your day you may want to change the ringer volume to suit your situation 1 Tap the volume icon on the upper Taskbar 2 Move the Phone slider to the desired volume level Change the ring type You can change the ...

Page 56: ...ing and or outgoing calls forward incoming calls to a different phone number based on your situation be notified of incom ing calls when you re already in a call or let others know your identity when making calls Tip To change Services settings from the Phone keypad tap Menu Options Services tab tap a service and then tap Get Settings Internet connection using GPRS EGPRS network Internet access an...

Page 57: ...ne number provided by your ISP and tap Next 6 Enter User Name Password and Domain provided by your ISP and tap Finish 7 Switch to Internet Explorer Mobile and surf the Internet Your HC700 will connect automatically To view Help information for any screen in the wizard or while changing settings tap the question mark icon ...

Page 58: ...etooth radio is turned on 3 Press the OK button to turn on the Bluetooth radio Create a Bluetooth link partnership You can create a link between your HC700 G and another remote device The link enables to transmit information between the two devices Ensure that the two devices are turned on discoverable and within 10 meters 1 Tap Settings System tab 2 Tap the Bluetooth Monitor icon 3 Tap Device Fin...

Page 59: ...se a passkey by entering a alphanumeric passkey between 1 and 16 characters and tap Next Otherwise leave the passkey blank and tap OK 6 If you use passkey enter the same passkey on the other device You may change the name of the remote device name Tap OK ...

Page 60: ...sm will keep looking for wireless networks When entering a wireless LAN coverage area the HC700 G will popup a message that will require you to confirm connec tion to a network LAN connection can be made to either Internet through your ISP or to your work server First time Connection to the Internet Before you connect to the Internet for the first time perform the following 1 Tap Settings Connecti...

Page 61: ...nnect Switching to a different wireless LAN There may be times when you want to manually select or switch to a different wireless network For example you may want to select a specific network out of many available in order to control costs 1 From the Phone keypad tap Settings Connec tions tab 2 Tap Network Cards 3 From the list of networks tap and hold your stylus on the available network you want...

Page 62: ...Microsoft ActiveSync program must be installed on your PC The HC700 G is provided with the ActiveSync program installed However the program can be obtained from Microsoft web site To learn more about the most up to date version of the ActiveSync and its operation refer to Active Sync help Place the HC700 G inside the Personal Desktop Cradle and connect the USB cable between the USB ports of the cr...

Page 63: ...follow the instructions shown on the screen to set partnership The USB connection icon will appear at the button of the HC700 G screen When the cradle remains connected to the PC removing the HC700 G from the cradle and docking it again triggers the ActiveSync program To explore the HC700 G from your PC perform the following 1 Run the Desktop Explorer program on your PC Tap the Mobile Device icon ...

Page 64: ...page 49 Battery does not charge in HC700 G Cra dle HC700 G is not locked in the HC700 G Cra dle Re install the HC700 G in the HC700 G Cradle Place the HC700 G properly in HC700 G Cradle Verify that the HC700 G Cradle LED is On and charge for 4 hours HC700 G bat tery contacts are not clean Clean the battery contacts see Cleaning on page 49 Battery temper ature is out of range Status LED flashes amb...

Page 65: ...ault refer to the Specifica tions section HC700 G does not respond Problem in the HC700 G oper ating system or communica tions network Ensure proper battery installation in HC700 G Charge or replace the bat tery Execute Warm Reset Resetting the HC700 G on page 19 The HC700 G should function again If HC700 G still does not respond perform Cold Reset see Resetting the HC700 G on page 19 The operatin...

Page 66: ...prop erly in the cra dle Make sure that the HC700 G is properly docked in the cradle Communica tion software was incorrectly installed or configured Refer to your system administrator for program installation or configura tion Table 4 Troubleshooting the HC700 G Problem Cause Solution ...

Page 67: ...C700 G in any location that is extremely dusty damp or wet Cleaning If the battery contacts screen or surface of the HC700 G become dirty use a soft lint cloth moistened with solution to remove dirt Cleaning Materials To clean the HC700 G use Chemical Pure grade C P Isopro pyl Alcohol IPA also named Propanol The IPA can be diluted with water up to 20 You may use IPA manufactured by Merck Riedel de...

Page 68: ...50 Blank Page ...

Page 69: ...d Reset 19 conference call 34 critical off 12 D deep sleep 10 Disposal 29 does not charge 46 does not respond 47 does not turn on 46 E Earpiece 5 End 15 ENT 15 Esc 15 Ethernet 2 F Fast flashing green 12 Flashing orange inside cradle 13 Flashing red green 13 flight mode 36 Fn 16 G GPRS 1 2 green aiming pattern 22 23 GSM 1 H Hand strap 3 I Imager Window 5 IrDA Window 5 K Keypad 14 keypad backlight 1...

Page 70: ...een backlight 17 SHIFT 16 Slowly flashing green out of cradle 12 SP 15 Speaker 5 Speed Dial 36 speed dial 33 status LED 12 Steady green inside cradle 13 Steady red 12 Steady red inside cradle 13 Storage 28 Stylus 5 Suspend 11 system failure 12 T TAB Send 15 TFT 2 turn on the phone 32 Turning On 10 12 V vehicle cradle 2 Volume Keys 5 W Warm Reset 19 WATER 28 Wi Fi 2 ...

Page 71: ......

Page 72: ...tomer Support call 1 888 877 7023 US domestic 1 847 725 4150 International MOTOROLA and the Stylized M Logo are registered in the U S Patent and Trademark Office All other product or service names are the property of their respective owners Motorola Inc 2007 6802981C55 F 6802981C55 ...

Reviews: