moon MiND App User Manual Download Page 6

               App User Guide 


____________________________________________________________________________________ 


MiND App Screen Layout   (cont’d)


Figure 5 


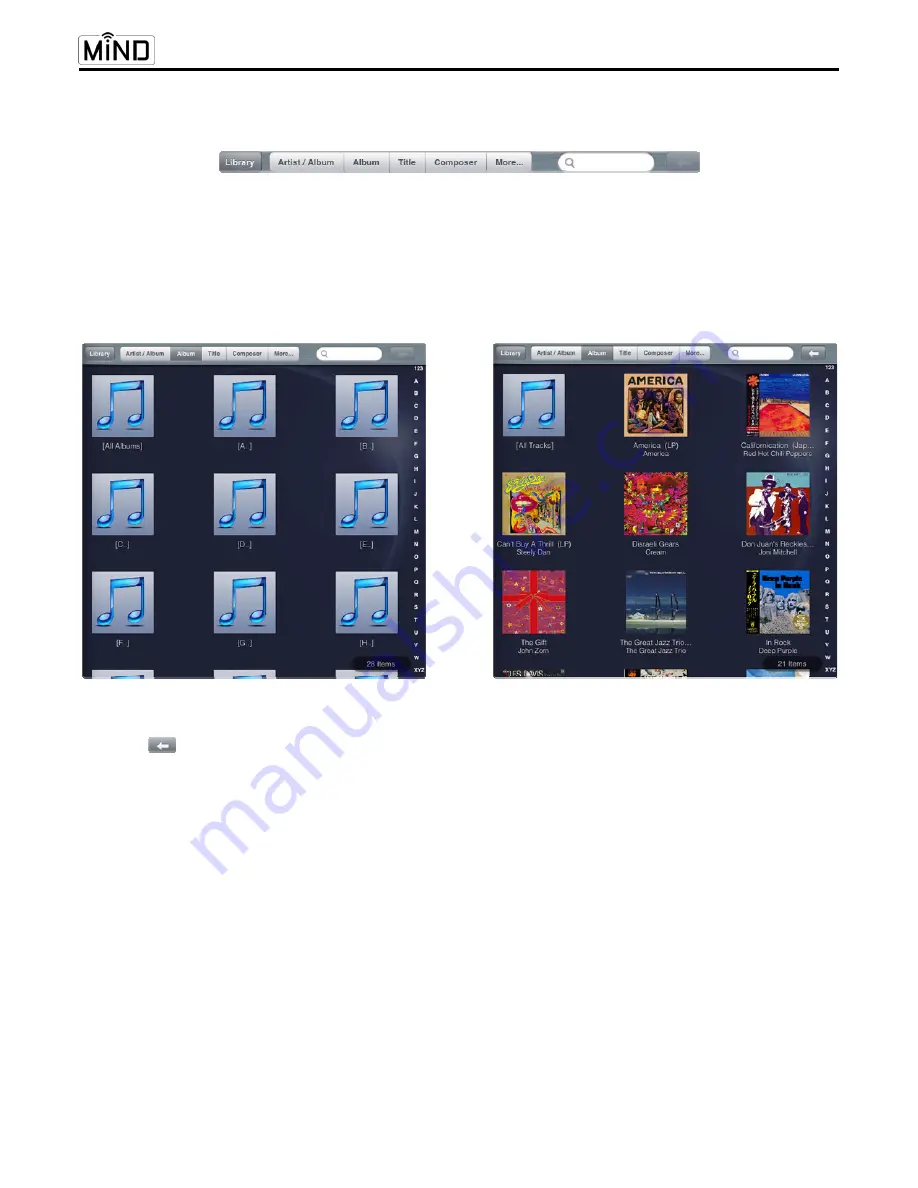
Tapping on the “Album” tab, the BROWSER section will show an Album index (Figure 6) that allows you to search 

albums in alphabetical order; select a letter by tapping on either the tile or the vertical alphabetical index on the 

far right side. Alternatively, you can tap on the [All Albums] tile option which displays an alphabetically ordered 
tile view every album available in the current library “Asset UpnP: SIM0774” (Figure 7).


Notice how the “Album” 

tab is highlighted in a darker gray when selected, compared to the other tabs. 


   Figure 6   


Figure 7 


The back       button, located at the top right corner of the BROWSER. makes navigating the BROWSER an easy 

process. When you want to return to the previous BROWSER screen, simply tap on the “Back” button. 

 
To scroll though the entire list of available albums, simply swipe your finger (up or down) over the BROWSER 

section. To select an album, tap on the album name and the BROWSER screen will change, showing you a list of 

all the tracks from the selected album (figure 8); “Californication” by the “Red Hot Chili Peppers” which has a 

total of 16 tracks as indicated by an icon located in the bottom right corner of the BROWSER. Since only 12 of 

these tracks are visible in the BROWSER, you can use one of your fingers to swipe on the screen to scroll down 

and see the 4 remaining tracks of this album. 
 

You can now select the tracks that you want to listen to. This is done by adding them to the QUEUE: Simply tap 

on each track that you want to add to the QUEUE (figure 9) and they will be highlighted. Tap on a track a second 

time and it will no longer be highlighted. In this example, we have selected tracks 1, 4 and 7. 


Summary of Contents for MiND App

Page 1: ...User Guide MOON intelligent Network Device MiND App User Guide v1 0 2...

Page 2: ...ay 11 Volume and Muting 11 SimLink 12 Information Displayed in the QUEUE 12 Editing The Queue 13 Clearing The Queue 14 Saving The Queue as a Playlist 15 Accessing music stored on your App controller 1...

Page 3: ...RJ45 Ethernet interface IEEE 802 11 b g n Wi Fi interface inputs WEP WPA WPA2 Wi Fi encryption support Application Control Features iPhone iPad iPod touch now and Android coming soon compatible contr...

Page 4: ...are properly connected and your MiND device s is successfully configured into your network This App User Gude and the MiND Setup Guide are both available at www simaudio com MiND htm Tap the MOON HD...

Page 5: ...to 24 bit 192kHz available on your network It is based on the UPnP protocol so you must have compatble server software on your NAS or computer Initially the contents of the BROWSER will be from the li...

Page 6: ...s When you want to return to the previous BROWSER screen simply tap on the Back button To scroll though the entire list of available albums simply swipe your finger up or down over the BROWSER section...

Page 7: ...lete its entire contents and build a new one The QUEUE can hold a maximum of 250 tracks You can also save the contents of the QUEUE as a Playlist for future use refer to page 15 To create a QUEUE tap...

Page 8: ...rld from the album Californication by the Red Hot Chili Peppers Note The current track is always displayed in the top half of the QUEUE along with its corresponding album information It can easily be...

Page 9: ...on the Next button inserts Do It Again right after Around The World figure 16 The current track Around The World remains unchanged and continues playing Tapping on the End button inserts Do It Again...

Page 10: ...epending on the status of the MiND app When a track is Playing the button will appear as When a track is Paused or Stopped the button will appear as X Figure 19a Figure 19b The previous track and next...

Page 11: ...icon located in the top right corner of the QUEUE column figure 21b Once activated the icon will change color from white to red and a 1 will appear in the bottom right corner of the icon This indicat...

Page 12: ...iously described Shuffle and Repeat icons can be found on either side of the zone name Current Track Information Album cover artwork related to the current track is displayed followed by the aforement...

Page 13: ...to save the QUEUE as a Playlist refer to page 15 To edit the contents of the QUEUE tap on the white edit button The QUEUE is now in edit mode figure 27 Left of each track name is a red circle with a...

Page 14: ...2 Clearing the QUEUE You also have the option to clear the QUEUE This deletes all of the tracks in the QUEUE in one single action Tap on the Edit Queue button to place the QUEUE into edit mode figure...

Page 15: ...or the Playlist is randomly assigned from the contents of that Playlist Finally you may create as many Playlists as you want To access your Seventies Rock Playlist at any time simply tap on the librar...

Page 16: ...nes music collection can be loaded into the BROWSER and used to create a QUEUE just like any other library in your MiND setup Tap on the icon and select the related option for your device in this exam...

Page 17: ...top right corner of the BROWSER and a keyboard will appear figure 44 As we type the word Blue to find all songs with the word Blue in their title the search result will yield fewer tracks as each let...

Page 18: ...uide a show guide is also included allowing you to find your favorite show and browse entire program schedules for thousands of stations __________________________________________ For vTuner to operat...

Page 19: ...ation section of the QUEUE along with the elapsed time of your connection to the station The name of the track and the artist will appear below the station logo On the next line from left to right the...

Page 20: ...Now your unit is ready to use Now your unit is ready to use At this point you may re enter your network settings from step 1 MOON components equipped with the MiND option such as the 380D Digital to A...

Page 21: ...e of the back panel and when you insert the paperclip properly and push on the switch you ll feel it click Hold the switch press down do not remove the paperclip until step 4 4 While the switch is pre...

Reviews: