Moog Videolarm EOF2N Installation And Operation Instructions Manual Download Page 5

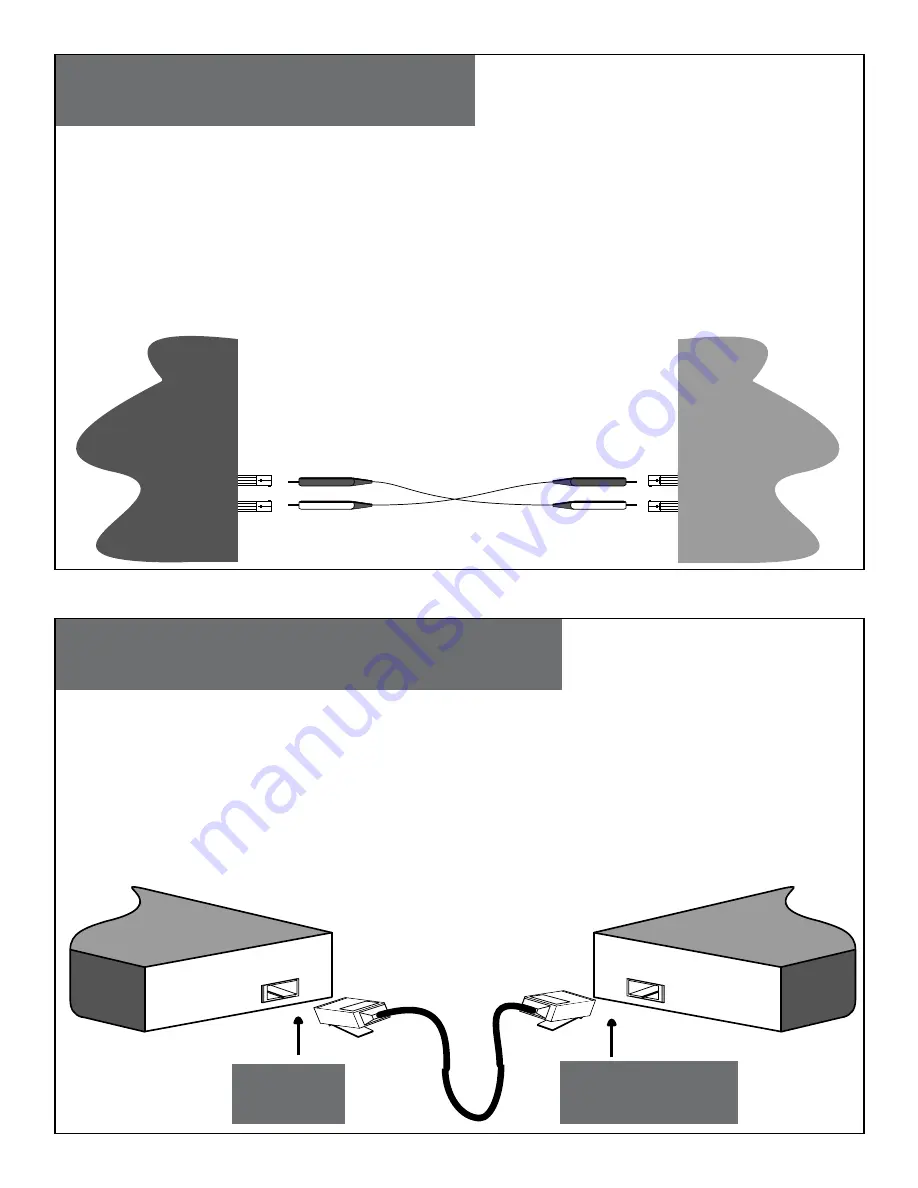
Connect the twisted-pair copper cable

Connect the fiber cable

RX

TX

RX

TX

Full dupex (

always ON

) is on the fiber side only; therefore, the 512-Bit Rule does not apply.  The cable lengths are 

constrained by the cable requirement.
 

1.  Locate or bould IEEE 803.2™ compliant 100Base-FX fiber cable with male, two-stranded TX to RX connectors    


     installed at both ends. 


2.  Connect the fiber cable to the EOF2N media converters as follows:  


•  Connect the male TX cable connector to the female TX port.


•  Connect the male RX cable connector to the female RX port.


3.  Connect the fiber cable to the other device (

another media converter, hub, etc.

) as follows:


•  Connect the male TX cable connector to the female RX port.


•  Connect the male RX cable connector to the female TX port.


Connect the fiber cable 
to the media converters 
as shown. 


Connect the fiber cable 
to other device (media 
converter, hub, etc.) as 
shown   


The EOF2N allows either MDI (

straight-through

) or MDI-X (

crossover

) cable connections to be configured automatically, 

according to network conditions.   


•  If half-duplex mode is used, refer to the 512-Bit Rule.


•  If full-duplex mode is used, the 512-Bit Rule does not apply.  The cable lenghts are constrained by the    


   cable requirements. 


1.  Locate or build IEEE 803.2™ compliant 10Base-T or 100Base-TX cables, with RJ-45 connectors installed  


     at both ends.  


2.  Connect the RJ-45 connector at one end of the cable to the RJ-45 port on the EOF2N media converter.


3.  Connect the RJ-45 connector at the other end of the cable to the RJ-45 port on the other device  


     (

switch, workstation, etc.

).


RJ-45 port               

on the media

converter

RJ-45 port               

on the other device

      (

switch, work station, etc.

)


4

3

Summary of Contents for EOF2N

Page 1: ...1 29 2009 www videolarm com EOF2N Stand Alone Media Converter for IP Ready SView CCTV Pole and PolEvator Installation and Operation Instructions for the following models EOF2N Mini media converter Ethernet over multi media fiber SC connector power supply included Copper to Fiber 10 100Base TX to 100Base FX ...

Page 2: ...n be damaged if improperly handled or dropped If an item appears to have been damaged in shipment replace it properly in its carton and notify the shipper Be sure to save 1 The shipping carton and packaging material They are the safest material in which to make future shipments of the equipment 2 These Installation and Operating Instructions If technical support or service is needed contact us at ...

Page 3: ...t requiring service during the warranty period which is subjected to any of the following abuse improper use negligence accident lightning damage or other acts of God i e hurricanes earthquakes failure of the end user to follow the directions outlined in the product instructions failure of the end user to follow the maintenance procedures recommended by the International Security Industry Organiza...

Page 4: ...rter from its protective packaging until you are ready to install it Wear an ESD wrist grounding strap before handling any module or component If you do not have a wrist strap maintain grounded contct with the system unit throughout any procedure requiring ESD protection CAUTION Intergrated circuits and fiber optic components are extremely susceptible to electrostatic discharge damage Failure to o...

Page 5: ...onnector to the female TX port Connect the fiber cable to the media converters as shown Connect the fiber cable to other device media converter hub etc as shown The EOF2N allows either MDI straight through or MDI X crossover cable connections to be configured automatically according to network conditions If half duplex mode is used refer to the 512 Bit Rule If full duplex mode is used the 512 Bit ...

Page 6: ...power port located on the back panel of the media converter 2 Connect the power adapter plug to AC power 3 Verify that the media converter is powered up by observing the illuminated LED power indicator light on the front panel 6 Status LEDs Use the LEDs to monitor the status of the media converter 7 Front Panel Power ON LED FX Link Act LED TX Link Act LED LED discriptions are as follows FX Link Ac...

Page 7: ... MDI X The EOF2N utilizes either straight through MDI or crossover MDI X copper cables when connecting to 10Base T or 100Base TX devices the EOF2N determines the characteristics of the connection and automatically configures the device to link up regardless of the copper cable configuration MDI or MDI X Link Pass Through The Link Pass Through feature illustrated below allows the media converter to...

Page 8: ...r than the receiving device can accept it Distance extension The EOF2N media converters cam segment one 1 10Base T copper Ethernet and or 100Base TX copper Fast Ethernet and one 1 100Base FX fiber Fast Ethernet collision domain In a half duplex Ethernet or Fast Ethernet environment the EOF2N media converters extend network distances by segmenting collision domains so that the 512 Bit Rule applies ...

Page 9: ...0 and 21CFR1040 11 Copper cable Category 3 Minimum requirement for 10 Mb s operation Gauge 24 to 22 AWG Attenuation 11 5 dB 100m 5 10 MHz Maximum Cable Distance 100 meters Category 5 Minimum requirement for 100 Mb s operation Gauge 24 to 22 AWG Attenuation 22 0 dB 100m 100 MHz Maximum Cable Distance 100 meters Straight through or crossover twisted pair cable may be used Shielded STP or unshielded ...

Page 10: ...than those specified herein could result in hazardous radiation exposure 11 Troubleshooting If the media converter fails isolate and correct the failure by determining the answers to the following questions and then taking the indicated action 1 Is the power LED illuminated and did the TX and FX LEDs turn ON then turn OFF NO Is the device powered by an adapter USB plug or Power over Ethernet Is th...

Page 11: ... Form at www videolarm com productregistration jsp or complete and mail in the bottom portion of this flyer Register your recent Videolarm purchases and benefit from the following Simple and Trouble Free RMA process Added into customer database to receive product updates news Eliminate the need to archive original purchase documents Receipts Purchase Orders etc Main Contact Info First Name Last Na...

Reviews: