background image

NOTE:


The power distribution board is designed with a 24Vac / 12Vdc 
selector switch.  If the Switch is set at 24Vac, then voltage input 
should be 24Vac.  24Vac will then be output to the camera.  If the 
Switch is set at 12Vdc, then voltage input should be 12Vdc, 12Vdc 
will then be output to the camera.  The selector switch is to allow 
the housing to operate at either voltage.

•  El tablero de distribución de energía está diseñado con un selector de 24 Vac / 12 Vdc. Si el 

interruptor se ha fijado en 24 Vac,entonces la tensión de entrada debe ser 24 Vac.  24 Vac será 
entonces la salida de la cámara. Si el interruptor se ha fijado en 12 Vcc, entonces la tensión de 
entrada debe ser de 12 Vdc, 12 Vdc a continuación será la salida a la camera.  Selector es 
permitir a la vivienda para operar a cualquier voltaje.

•  Le tableau de distribution électrique est conçu avec un interrupteur 24Vac / 12Vdc sélecteur. 

Si le commutateur est fixé à 24Vac, puis la tension d'entrée doit être 24Vac.  24Vac sera alors 
sortie de la caméra. Si le commutateur est fixé à 12 Vdc, puis la tension d'entrée doit être 
12Vdc, 12Vdc sera alors la sortie de l'interrupteur de sélection camera.  Est de permettre 
le logement de fonctionner à la tension soit.

•  Die Stromverteilungsplatine wird mit einer 24 Vac / 12Vdc Wahlschalter konzipiert. Wenn 

der Schalter auf 24Vac gesetzt ist, dann sollte Spannungseingang 24Vac.  Wird 24Vac dann 
an der Kamera sein. Wenn der Schalter auf 12Vdc eingestellt ist, dann sollte Spannungseingang 
12Vdc, 12Vdc wird dann an den camera.  Wahlschalter ist es, dass das Gehäuse entweder 
an Spannung zu betreiben sein.

•  O quadro de distribuição de energia é projetado com um interruptor 24Vac / 12 Vdc selector. 

Se o interruptor está fixado em 24Vac, depois da tensão de entrada deve ser 24Vac.  24Vac, 
então, ser a saída para a câmera. Se o interruptor estiver na 12Vdc, em seguida, entrada de 
tensão deve ser 12Vdc, 12Vdc será então a saída para o comutador selector camera.  é permitir 
que o invólucro para operar em qualquer tensão.

•  La scheda di distribuzione dell'alimentazione è progettato con una 24Vac / 12Vdc selettore. Se 

l'interruttore viene fissato a 24 Vac, quindi tensione di ingresso deve essere 24Vac.  24Vac sarà 
quindi uscita alla fotocamera. Se l'interruttore viene fissato a 12Vdc, quindi tensione di ingresso 
deve essere 12Vdc, 12Vdc sarà poi uscita allo switch camera.  Di selezione è quello di permettere 
l'alloggiamento di funzionare sia a tensione.

12

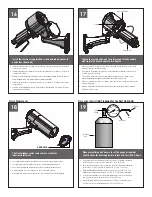
WARNING!

  Make sure that the Voltage Selector Switch is set for the 

correct  input and camera supply voltage before power is 
supplied.  Failure to do this may result in damage to the 
housing and void all warranties.

•  Asegúrese de que el selector de tensión está ajustado para la entrada correcta y tensión 

de alimentación de la cámara antes de la alimentación se suministra. No hacer esto puede 
resultar en daños a la vivienda y anulará todas las garantías.

•  Assurez-vous que le sélecteur de tension est réglé pour l'entrée et la tension d'alimentation 

appareil photo avant de l'alimentation est fournie. Le défaut de ce faire peut entraîner des 
dommages au logement et annulera toutes les garanties.

•  Stellen Sie sicher, dass der Spannungswahlschalter für die richtige Eingabe und Kamera 

Versorgungsspannung eingestellt ist, bevor Strom versorgt wird. Wenn Sie dies nicht tun, 
kann es zu Schäden am Gehäuse führen und erlischt jegliche Gewährleistung.

•  Certifique-se de que o seletor de tensão é definido para a entrada correta e tensão de 

alimentação da câmera antes de alimentação é fornecida. Não fazer isso pode resultar 
em danos à carcaça e anular todas as garantias.

•  Assicurarsi che il selettore di tensione sia impostato per l'ingresso corretto e tensione di 

alimentazione della fotocamera prima che l'alimentazione viene fornita. In caso contrario 
si possono causare danni al corpo e invalidare tutte le garanzie.

13

  The power distribution board is located inside the housing at 

the rear.

•  El cuadro de distribución de alimentación se encuentra dentro de la carcasa en la parte trasera.

•  Le tableau de distribution électrique est situé à l'intérieur du boîtier à l'arrière.

•  Die Stromverteilungsplatine innerhalb des Gehäuses auf der Rückseite.

•  A placa de distribuição de energia está localizado no interior do invólucro na parte traseira.

•  La scheda di distribuzione di potenza è situato all'interno dell'alloggiamento sul retro.

24Vac /12Vdc

selector switch

Selectable

24Vac or 12Vdc

Analog

Video

Network

Data

Alarm / analog

communication

power out 

to camera

  The power distribution board is designed with a 24Vac/12Vdc 

selector switch.  Select the desired input voltage.  No other 
customer input is needed for this board.

•  El tablero de distribución de energía está diseñado con un interruptor selector de 24Vac/12Vdc. 

Seleccione el voltaje de entrada deseada. No hay entrada de otro cliente que se necesita para 
este foro.

•  Le tableau de distribution de puissance est conçu avec un commutateur sélecteur de 

24Vac/12Vdc. Sélectionnez la tension d'entrée souhaitée. Aucun autre client d'entrée est 
nécessaire pour ce conseil.

•  Die Stromverteilungsplatine ist mit einem Wahlschalter 24Vac/12Vdc- konzipiert. Wählen Sie die 

gewünschte Eingangsspannung. Kein anderer Kunde Eingang ist für dieses Board benötigt.

•  O quadro de distribuição de energia é projetado com um interruptor 24Vac/12Vdc selector. 

Seleccionar a tensão de entrada desejado. Nenhuma entrada de outro cliente é necessário para 
este fórum.

•  La scheda di distribuzione di potenza è progettato con un interruttore 24Vac/12Vdc selettore. 

Selezionare la tensione di ingresso desiderato. Nessun ingresso altro cliente è necessario per 
questa scheda.

24Vac /12Vdc

selector switch

Heater        (-) Input (+)         (-) Output (+)          (-) Fan (+)      

 }


Factory Wiring

24Vac

12Vdc

14

15

Reference Block [15]

Reference Block [15]

Summary of Contents for DFH10C2W

Page 1: ...span included heater blower with feed thru wall pole mount supports af PoE cameras adjustable sunshield DFH10C2W Dust Proof tubular housing 24Vac or 12Vdc input heater blower with feed thru wall pole mount DFH10C2WY Dust Proof tubular housing 24Vac or 12Vdc input heater blower with feed thru wall pole mount adjustable sunshield DFH10C8WY Dust Proof tubular housing PoE input with Dynamic Power Allo...

Page 2: ...n be damaged if improperly handled or dropped If an item appears to have been damaged in shipment replace it properly in its carton and notify the shipper Be sure to save 1 The shipping carton and packaging material They are the safest material in which to make future shipments of the equipment 2 These Installation and Operating Instructions If technical support or service is needed contact us at ...

Page 3: ...spect to any Product requiring service during the warranty period which is subjected to any of the following abuse improper use negligence accident lightning damage or other acts of God i e hurricanes earthquakes modification failure of the end user to follow the directions outlined in the product instructions failure of the end user to follow the maintenance procedures recommended by the Internat...

Page 4: ...ough hides and protects cables Pop Out Tabs allows for pole mounting Rear Access Panel acts as internal J Box Installers Connection Board allows for easy hook ups Lanyard Cable safely retains housing during installation Durable and Attractive grite color powder coated finish increased corrosion protection finish available Optional Accessory ...

Page 5: ...oto 12Vdc 11W Aucun appareil photo 24Vac 29W Keine Kamera 12Vdc 11W Keine Kamera 24Vac 29W Nenhuma câmera 12Vdc 11W Nenhuma câmera 24Vac 29W Nessuna macchina fotografica 12Vdc 11W Nessuna macchina fotografica Electrical Specifications Power 12VDC Class 2 Only Français Deutsch Italiano Portuguese Español English ADDITIONAL DETAIL TO BE UPDATED IN FUTURE REVISIONS ...

Page 6: ...enenplatte zusammenbauen stellen Sie sicher dass alle VerdrahtungsZugangslöcher Einfassung in Richtung zur Rückseite des niedrigen Einfassungszugangsportals sind CUIDADO Ao montar o suporte certifique se que todos os furos de acesso da fiação são revestimento para a parte traseira do portal baixo do acesso das montagens ATTENZIONE Nel montare il montaggio la staffa si assicura che tutti i fori di ...

Page 7: ...estellt Una a montagem à parede com a ferragem apropriada não fornecida Attacchi il supporto alla parete con fissaggi adatti non forniti WALL MOUNTING If attaching to pole first break away tabs with pliers and remove 4 strap plugs Si atan al poste el primeros rompen lejos lengüetas con los alicates y quitan 4 los enchufes de la correa Si attachant au poteau les premiers cassent loin des étiquettes...

Page 8: ...Alimenti il cavo tramite la staffa perfori gli ugelli della guarnizione come stato necessario Disponga la guarnizione come indicata Cable Gasket Nipples 5 6 Feed cable through back of bracket or bottom access point Then follow instructions from previous block Alimente el cable a través detrás del soporte o del punto de acceso inferior Entonces siga las instrucciones del bloque anterior Alimentez l...

Page 9: ... tutti collegamenti nessecary dei collegamenti A Slightly loosen B Completely loosen RJ45 568B Power BNC Communication 9 Use provided Key to remove the front part of the housing El uso proporcionó llave para quitar la parte delantera de la cubierta L utilisation a fourni la clef pour enlever la partie avant du logement Gebrauch lieferte Schlüssel um das Vorderteil des Gehäuses zu entfernen O uso f...

Page 10: ...a alimentación se suministra No hacer esto puede resultar en daños a la vivienda y anulará todas las garantías Assurez vous que le sélecteur de tension est réglé pour l entrée et la tension d alimentation appareil photo avant de l alimentation est fournie Le défaut de ce faire peut entraîner des dommages au logement et annulera toutes les garanties Stellen Sie sicher dass der Spannungswahlschalter...

Page 11: ...ektiv an wenn erforderlich Instale a câmera usando os parafusos fornecidos e o espaçador de borracha à lente center se necessário Stalli la macchina fotografica usando le viti fornite ed il distanziatore di gomma all obiettivo concentrare se necessario Loosen the screws shown on the picture and turn the camera sled ring to the desired angle and re tighten Afloje los tornillos demostrados en el cua...

Page 12: ...3 volte rimuovere tutta l umidità Depress to Purge Pressure Fill Schraeder Valve Pressure Fill Schraeder Valve Air Chuck Place the air chuck on the fill valve and begin filling until pressure relief valve opens Coloque la tirada del aire en la válvula del tanque y comience a llenar hasta que la válvula de descarga de presión se abra Placez le mandrin d air sur la valve de réservoir et commencez à ...

Page 13: ...5 30 Fill Valve Over Pressure Relief Valve Connectors Pressure Gauge NOT INCLUDED Air Chuck After purging and refilling check the housings pressure It should be around 5 7psi 0 35 0 5bar Después de purgar y de rellenar compruebe la presión de las cubiertas Debe estar alrededor de 5 7psi 0 35 0 5bar Après la purge et le remplissage vérifiez la pression de logements Elle devrait être autour de 5 7ps...

Page 14: ...ousings Poles Power Supplies and Accessories and 5 Years on camera systems SView QView Warriors and InfraRed Illuminators Register Your ProductsOnline Take a few moments and validate your purchase via the Online Product Registration Form at www videolarm com productregistration jsp Register your recent Moog Videolarm purchases and benefit from the following Simple and Trouble Free RMA process Adde...

Reviews: