background image

24

LIVE FOREVER LIMITED WARRANTY FOR CONSUMERS

Monster, LLC, 7251 West Lake Mead Blvd., Las Vegas, NV 89128, (“Monster”) extends You 
this Limited Warranty. Statutory or common law may provide You with additional rights 
or remedies, which shall not be aff ected by this Limited Warranty.

DEFINITIONS
“Adequate Use”

 means use of the Product (i) within a home or dwelling, (ii) for private 

(as opposed to commercial) purposes, (iii) in conformance with all applicable local, 
state or federal law, code or regulations (including without limitation building and/or 
electrical codes), (iv) in accordance with manufacturer recommendations and/or 
instructions in the materials and documentation that accompany the Product, and (v) 
with proper electrical grounding.

“Authorized Dealer”

 means any distributor, reseller or retailer that (i) was duly 

authorized to do business in the jurisdiction where it sold the Product to You, (ii) was 
permitted to sell You the Product under the laws of the jurisdiction where You bought 
the Product, and (iii) sold You the Product new and in its original packaging.

“Formal Warranty Claim”

 means a claim made in accordance with the section “Formal 

Warranty Claims” herein.

“Product”

 means a Product (i) that contained a reference to the “live forever” 

Limited Warranty, (ii) that You bought from an Authorized Dealer new and in its 
original packaging, and (iii) whose serial number, if any, has not been removed, altered, 
or defaced.

“Product Defect”

 means an inadequacy of the Product that existed at the time when 

You received the Product from an Authorized Dealer and that causes a failure of the 
Product to perform in accordance with Monster’s documentation accompanying the 
Product, unless such failure has been caused completely or partly by (a) any use other 
than Adequate Use, (b) transportation, neglect, misuse or abuse by anyone other 
than Monster’s employees; (c) alteration, tampering or modifi cation of the product by 
anyone other than a Monster employee; (d) accident (other than a malfunction that 
would otherwise qualify as a Product Defect); (e) maintenance or service of the Product 
by anyone other than a Monster employee; (f) exposure of the Product to heat, bright 
light, sun, liquids, sand or other contaminants; or (g) acts outside the control of Monster, 
including without limitation acts of God, fi re, storms, earthquake or fl ood.

“You”

 means the fi rst individual person that purchased the Product in its original 

packaging from an Authorized Dealer. This Limited Warranty does not apply to persons 
or entities that bought the Product (i) in used or unpackaged form, (ii) for resale, lease 
or other commercial use, or (iii) from someone other than an Authorized Dealer.

SCOPE OF THIS LIMITED WARRANTY

If a Product contained a Product Defect when You bought it from an Authorized Dealer 
and Monster receives a Formal Warranty Claim from You within two (2) months after 

Summary of Contents for PerfectView 400L

Page 1: ...ectView 400L FlatScreen Mount Support d cran plat PerfectView 400L Base PerfectView 400L FlatScreen para televisores planos USER GUIDE WARRANTY GUIDE ET GARANTIE D UTILISATEUR GU A DEL USUARIO Y GARAN...

Page 2: ......

Page 3: ...ative and practical AV solutions on the market so enthusiasts like yourself always experience the absolute best from their high performance AV components Monster FlatScreen Mounts deliver the clean so...

Page 4: ...owerProtect and PowerCenters Safeguard your atscreen investment from harmful electrical surges and dirty AC power with exclusive Monster Power technologies including Monster technologies including Mon...

Page 5: ...y review the instructions to ensure that no parts are missing or defective Improper installation can cause damage or serious injury Do not use this product for any purpose not explicitly speci ed by M...

Page 6: ...2 Speci cations and Notes Monster is constantly striving to improve its products Speci cations are subject to change without notice...

Page 7: ...stud sensor Level included Electric hand drill 3 16 drill bit Phillips screwdriver Combination wrenches or socket set Masonry Mounting brick solid concrete concrete blocks Above tools plus hammer Repl...

Page 8: ...4 Package Contents 1 Mounting System...

Page 9: ...M4x35 4 ea M4x45 4 ea M5x15 4 ea M5x35 4 ea M5x45 4 ea M6x15 4 ea M6x35 4 ea M6x45 6 ea M8x15 4 ea M8x35 4 ea M8x45 4 Washers M10 8 Washers M5 2 Washers M8 4 Lag Bolts 4 Masonry Anchors If any parts...

Page 10: ...Package Contents 6 4 Spacers 2 4 Spacers 1 2 Quick Snap Screw Covers 2 Square Washers 8 Square Nuts...

Page 11: ...If any parts are missing please call 800 877 8989 Parts in supplied hardware kit are numbered as above 7 4 Stoppers S 4 Security Cap S Bubble Level 12 End Caps...

Page 12: ...t 3 ft from all water sources DO NOT install near an air conditioner DO NOT install in a location where there is excessive dust smoke or moisture These sources can create a re DO NOT apply unnecessary...

Page 13: ...ation have at least two wall studs Is your view of the mounting location free of glare or other obstructions Is the location of your wall stud or masonry surface suitable for repositioning your displa...

Page 14: ...that the mounting system is level Mark the stud centers in two slots in the top and bottom wall plate arms with a pencil With your electrical drill and 3 16 bit pre drill a 3 deep hole at each mark A...

Page 15: ...11...

Page 16: ...and bottom wall plate arms with a pencil Be careful not to mark a mortar joint With your electrical drill and 1 2 masonry bit pre drill a 3 deep hole at each mark Install the supplied plastic anchors...

Page 17: ...13...

Page 18: ...on the sliding self centering mounting brackets Align two holes on each of the mounting brackets with four threaded inserts on your TV s back panel This may require you to adjust one of the brackets...

Page 19: ...arm bracket thread the remaining two M8x15 screws and washers found in the hardware bag through the bottom holes on the arm bracket and TV mounting plate Tighten down all four screws with your Allen w...

Page 20: ...TV left or right 180 Each arm hinge has an adjustable tension screw adjustable before or after the TV and mounting plate are attached to the swing arms Remove the plastic cap on the bottom of any arm...

Page 21: ...17...

Page 22: ...e steps below to quickly and easily tilt your screen Fully extend the mount s swing arms Note the lower tension nuts on each side of the bracket connecting the swing arms to the TV mounting plate With...

Page 23: ...19...

Page 24: ...mounting plate as shown Turn the left and right tension screws counterclockwise to initiate screen leveling If rotation is still limited after loosening the left and right screws loosen the center te...

Page 25: ...21...

Page 26: ...all three swing arms Connect your TV s power cord to the TV if TV uses a detachable type power cord Slide the cable management covers o the swing arms as shown to the right Route your TV s power cord...

Page 27: ...nstalled your PerfectView 400L FlatScreen Mount Visit MonsterCable com FlatScreen for more innovative Monster FlatScreen products including our ultra low pro le FlatScreen Cable and our safe FlatScree...

Page 28: ...original packaging and iii whose serial number if any has not been removed altered or defaced Product Defect means an inadequacy of the Product that existed at the time when You received the Product f...

Page 29: ...case of any inconsistency between the English and other versions of this Limited Warranty the English version shall prevail Registration Please register Your Product at www MonsterCable com Warranty...

Page 30: ......

Page 31: ...Support d cran plat PerfectView 400L GUIDE ET GARANTIE D UTILISATEUR...

Page 32: ......

Page 33: ...nn s tels que vous de b n cier au maximum de tous les avantages o erts par les composants audiovisuels hautes performances Les supports d cran plat Monster FlatScreen Mounts ont le style sobre et l ga...

Page 34: ...ran plat contre des surtensions et les d fauts de votre alimentation lectrique en choisissant les technologies Monster Power Power Power qui incluent Monster qui incluent Monster SurgeGuard et Monster...

Page 35: ...u aucune pi ce n est manquante ou d fectueuse Une installation incorrecte peut provoquer des dommages ou de graves blessures Ne r servez pas ce produit utilisation autre que celle indiqu e expliciteme...

Page 36: ...permanence d am liorer ses produits Les caract ristiques techniques sont susceptibles d tre modi es sans pr avis 25 67 652mm 5 06 128 5mm 2 25 6mm 9 29 236mm 14 13 359mm 23 8 605mm 23 8 605mm 14 13 3...

Page 37: ...ctronique Niveau bulle inclus Per euse main lectrique Foret de 5 mm Tournevis cruciforme Kit de cl s de serrage Fixation sur paroi de ma onnerie murs en brique mur en b ton plein bloc de b ton Les out...

Page 38: ...34 Contenu de l emballage 1 Syst me de montag...

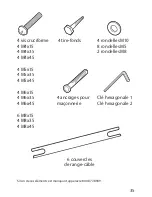
Page 39: ...M4x35 4 M4x45 4 M5x15 4 M5x35 4 M5x45 4 M6x15 4 M6x35 4 M6x45 6 M8x15 4 M8x35 4 M8x45 4 rondelles M10 8 rondelles M5 2 rondelles M8 4 tire fonds 4 ancrages pour ma onnerie Si l un de ces l ments est...

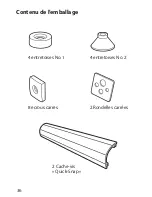
Page 40: ...Contenu de l emballage 36 4 entretoises No 2 4 entretoises No 1 2 Cache vis Quick Snap 2 Rondelles carr es 8 crous carr s...

Page 41: ...Si l un de ces l ments est manquant appelez le 800 877 8989 Les composants du kit d installation sont r f renc s comme indiqu ci dessus 37 4 but es 4 capuchons de s curit Niveau bulle 12 Capuchons...

Page 42: ...N INSTALLEZ pas le produit proximit d un climatiseur N INSTALLEZ PAS le produit dans une pi ce o il pourrait tre excessivement expos des poussi res de la fum e ou des moisissures Ces conditions peuve...

Page 43: ...ins deux montants Le site d installation permet il d assurer une bonne visibilit de l cran sans obstacles visuels ni blouissement La position de votre montant ou surface de ma onnerie est elle adapt e...

Page 44: ...ez le niveau du syst me de montage Marquez au crayon le centre des montants dans la fente en haut et en bas des bras de la platine murale A l aide d une perceuse lectrique munie d un foret b ton de 5...

Page 45: ...41 VERIFICATION DU NIVEAU VERIFICATION DU NIVEAU 3 16 Trou 7 5 cm de profondeur Montant en bois 3 16 Trou 7 5 cm de profondeur Montant en bois Tire fonds et rondelles...

Page 46: ...s des bras de la platine murale Veuillez ne pas tracer de marque sur un joint de mortier A l aide d une perceuse lectrique munie d un foret b ton de 12 mm percez un trou de 76 mm de profondeur sur cha...

Page 47: ...Trou 7 5 cm de profondeur 1 2 Trou 7 5 cm de profondeur Mur en ma onnerie Ancrage pour ma onnerie Mur en ma onnerie Tire fonds et rondelles Cache vis Quick Snap VERIFICATION DU NIVEAU VERIFICATION DU...

Page 48: ...ts avec quatre inserts let s du panneau arri re de votre t l viseur Ceci peut exiger le r glage de l un des supports ce qui r glera automatiquement l autre support la m me distance Ins rez chacune des...

Page 49: ...au support visser les deux vis M8x15 et rondelles qui restent dans le sac d accessoires dans les trous inf rieurs du support et de la platine du t l viseur Serrez les quatre vis au moyen de votre cl h...

Page 50: ...otation de 180 Chaque charni re est dot e d une vis de r glage utilisable avant ou apr s l installation du t l viseur avec sa plaque de soutien sur les bras articul s Retirez le capuchon en plastique...

Page 51: ...47...

Page 52: ...n assise Suivez les instructions ci dessous pour ajuster rapidement et ais ment l inclinaison de votre t l viseur D ployez les bras articul s extensibles au maximum Sur le c t de chaque bras articul r...

Page 53: ...49...

Page 54: ...mme indiqu par les illustrations Tournez les vis de r glage droite et gauche dans le sens anti horaire pour commencer r gler l horizon talit de l cran Si apr s avoir desserr les vis lat rales la rotat...

Page 55: ...51...

Page 56: ...cul s Branchez le c ble d alimentation au t l viseur s il est d tachable Faites glisser les couvercles des passe c bles sur les trois bras articul s comme indiqu droite Faites passer le c ble d alimen...

Page 57: ...rmations sur les produits innovants de Monster destin s aux crans plats rendez vous sur le site MonsterCable com FlatScreen Vous y d couvrirez notamment le c ble ultra plat FlatScreen et notre solutio...

Page 58: ...het chez un Revendeur agr neuf et dans son emballage d origine et iii dont le num ro de s rie s il existe n a pas t supprim modi ou endommag D faut du produit d signe une insu sance du Produit qui exi...

Page 59: ...ons restantes En cas d incoh rence entre la version anglaise et d autres versions de la pr sente Garantie limit e la version anglaise pr vaudra Enregistrement Veuillez enregistrer votre Produit sur le...

Page 60: ......

Page 61: ...Base PerfectView 400L FlatScreen para televisores planos GU A DEL USUARIO Y GARANT A...

Page 62: ......

Page 63: ...pr cticas del mercado para que los entusiastas de los equipos de audio y video como usted los disfruten al m ximo en todo momento Las bases FlatScreen Mounts de Monster para televisores planos propor...

Page 64: ...de las nocivas sobretensiones el ctricas y de la electricidad sucia mediante las tecnolog as exclusivas de Monster Power de Monster Power de Monster Power que incluyen las que incluyen las tecnolog a...

Page 65: ...a y de que todas est n en buen estado Una instalaci n incorrecta puede causar da os materiales y heridas graves No utilice este producto para prop sitos distintos a los especi cados expl citamente por...

Page 66: ...a constantemente para mejorar sus productos Las especi caciones est n sujetas a cambio sin previo aviso 25 67 652mm 5 06 128 5mm 2 25 6mm 9 29 236mm 14 13 359mm 23 8 605mm 23 8 605mm 14 13 359mm 9 29...

Page 67: ...Taladro el ctrico de mano Broca de 3 16 5 mm para taladro Destornillador de cruz Llaves de tuercas de combinaci n o juego de cubos Instalaci n en paredes de mamposter a ladrillo concreto s lido ladri...

Page 68: ...64 Contenido del paquete 1 Sistema de bas...

Page 69: ...4 unidades M5x35 4 unidades M5x45 4 unidades M6x15 4 unidades M6x35 4 unidades M6x45 6 unidades M8x15 4 unidades M8x35 4 unidades M8x45 4 arandelas M10 8 arandelas M5 2 arandelas M8 4 pernos autorosca...

Page 70: ...Contenido del paquete 66 4 espaciadores 2 4 espaciadores 1 2 tapas Quick Snap para tornillos 2 arandelas cuadradas 8 tuercas cuadradas...

Page 71: ...0 877 8989 si falta alguna pieza Las piezas de los accesorios de instalaci n suministrados est n numeradas como se indica anteriormente 67 4 topes 4 tapas de seguridad Nivel de burbuja 12 tapas para l...

Page 72: ...INSTALAR la base cerca de acondicionadores de aire EVITE INSTALAR la base en lugares donde haya una presencia excesiva de polvo humo calor o de humedad Dichas fuentes pueden producir incendios Una ve...

Page 73: ...que va a instalar la base Puede ver el lugar donde va a instalar la base sin re ejos o resplandor Es adecuado el lugar donde est n los montantes de pared o la super cie de mamposter a para la instala...

Page 74: ...dad para con rmar que el sistema de base est nivelado Marque dos ranuras con un l piz en las placas de pared superior y tambi n en la inferior en la l nea media de los montantes Utilice un taladro el...

Page 75: ...71 Montante de madera Agujero de 3 16 3 de profundidad Agujero de 3 16 3 de profundidad Montante de madera Pernos autoroscantes y arandelas VERIFICACI N DE NIVEL VERIFICACI N DE NIVEL...

Page 76: ...as de las placas de pared tanto de la superior como de la inferior Est atento a evitar marcar agujeros en las juntas de argamasa Utilice un taladro el ctrico y una broca para mamposter a de 1 2 pulgad...

Page 77: ...de profundidad Agujero de 1 2 3 de profundidad Anclaje para concreto Pared de maposter a Pared de maposter a Pernos autoroscantes y arandelas 2 tapas Quick Snap para tornillos VERIFICACI N DE NIVEL VE...

Page 78: ...trantes de instalaci n Alinee dos agujeros de ambas m nsulas de instalaci n con los cuatro insertos roscados en el panel trasero de su televisor Lo anterior podr a requerir que ajuste una de las m nsu...

Page 79: ...s M8x15 y sus arandelas a trav s de los agujeros inferiores de la m nsula del brazo y de la placa del televisor Los tornillo y las arandelas se encuentran en la bolsa de accesorios de instalaci n Apri...

Page 80: ...hacia la derecha un ngulo m ximo de 180 Todas las bisagras disponen de un tornillo para ajustar su tensi n Dicho ajuste se puede hacer antes o despu s de jar el televisor y su placa de instalaci n a l...

Page 81: ...77...

Page 82: ...r la inclinaci n ptima de su televisor r pida y f cilmente Extienda completamente los brazos pivotantes de la base Observe las tuercas de tensi n inferiores a cada lado de la m nsula que une los brazo...

Page 83: ...79...

Page 84: ...rdo y derecho en sentido antihorario para proceder a graduar la posici n horizontal del televisor Si despu s de a ojar los tornillos izquierdo y derecho la rotaci n todav a est restringida a oje el to...

Page 85: ...81...

Page 86: ...l cable de alimentaci n el ctrica al televisor si es un cable que se puede separar Quite las cubiertas de los canales de los cables de los brazos pivotantes como se muestra a la derecha Pase el cable...

Page 87: ...e MonsterCable com FlatScreen para conocer otros innovadores productos Monster FlatScreen incluyendo nuestro cable FlatScreen de per l ultra bajo y nuestra soluci n limpiadora FlatScreen Clean LCD par...

Page 88: ...uidor Autorizado y iii cuyo n mero de serial si exist a en el producto en condici n de nuevo no haya sido eliminado modi cado o hecho ilegible El signi cado de Defecto en el Producto signi ca una de c...

Page 89: ...de esta Garant a Limitada se considerar v lida la versi n en ingl s Registro Haga el registro de su producto en MonsterPower com Los derechos establecidos por la garant a no se ven afectados si no se...

Page 90: ...reen Clean and Monster FlatScreen Mounts are registered or unregistered trademarks of Monster Cable Products Inc or its subsidiaries in the US and other countries Monster Monster Cable Monster FlatScr...

Reviews: