background image

7

Before Use

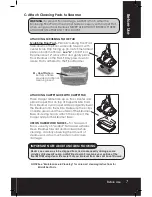
ATTACHING CARPET GLIDE WITH CARPET PAD
Place Carpet Glide face up on floor. Center and 

place Carpet Pad on top of Carpet Glide. Hold 

Floor Steamer over Carpet Glide and gently lower 

the Steamer onto the Glide. Make sure the 4 clips 

on Glide are around the outside of the Steamer 

Base and using hands, attach the 4 clips of the 

Carpet Glide to the Steamer Base.

USE ON HARDWOOD FLOORS – For hardwood 

floors, use only on “sealed” hardwood surfaces. 

Move Steamer forward and backward while 

cleaning, carefully observing the amount of 

steam used, as too much water could cause 

damage.

Be

fo

re Us

e

C. Attach Cleaning Pads to Steamer

WARNING: To prevent floor damage, ALWAYS attach either the 

Scrubbing Floor Pad or the Carpet Glide Accessory with Carpet Pad 

when using your Floor Steamer. NEVER USE WITHOUT EITHER OF THESE 

ATTACHMENTS AFFIXED TO THE MACHINE.

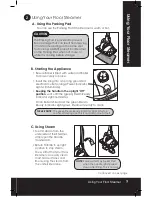
ATTACHING SCRUBBING FLOOR PAD
Scrubbing Floor Pad – 
Place Scrubbing Floor Pad 

face down on the floor, wide side forward, with 

center Scrub Strip facing up (to match metal heat 

plate on bottom of Base - see “A” ). Hold Floor 


Steamer about 2” above Pad and gently place 

Floor Steamer on the Pad. Firmly press down to 


assure Pad is adhered to the Floor Steamer.

A - 

Heat Plate

 on 

bottom of Base 

provides additional 

cleaning boost.

NOTE:  See “Maintenance & Cleaning” for care and cleaning instructions for 

Microfiber Pads.

IMPORTANT NOTE ABOUT LINOLEUM FLOORING

Steam can cause wax to be stripped from, and consequently damage, some  

varieties of linoleum flooring. ALWAYS test a small, inconspicuous portion of the  

floor BEFORE using steam to ensure that your linoleum floor does not have this issue.

Summary of Contents for SC1Z1

Page 1: ...MONSTER FLOOR SC1Z1 INSTRUCTION MANUAL Steam Booster CUSTOMER SERVICE 1800 663 866 AUS 0800 666 783 NZ Model SC1Z1 AUS NZ ...

Page 2: ... not attempt to disassemble or repair appliance Return it to manufacturer or an authorized service center for examination or repair 7 Do not wrap cord too tightly around appliance Never carry by the cord or yank to disconnect from an outlet To unplug always grasp plug to remove from outlet do not pull on cord 8 Do not handle cord or appliance with wet hands or without shoes on 9 Look closely at st...

Page 3: ...t must be repaired by manufacturer in order to avoid safety issues to the operator 23 This appliance is not intended for use by persons including children with reduced physical sensory or mental capabilities or lack of experience and knowledge unless they have been given supervision or instruction concerning use of appliance by a person responsible for their safety 24 Read and follow all important...

Page 4: ...een 9 Power Indicator Light orange 10 Power Cord 11 Steam Nozzles 12 Carpet Pad 13 Scrubbing Floor Pad 2 14 Carpet Glide 15 Parking Pad Product Features 4 Product Features 10 9 Technical Data Adapter Input 220 240V 50 60Hz Cord Length 7 meters 23 feet Power 1200 watts Boiler Stainless Steel Boiler Capacity 0 6 liter 20 ounces Steam Pressure 3 5 bars P A R K I N G P A D 15 14 12 13 6 4 ...

Page 5: ...m Extension position BE SURE EXTENSION TUBE IS FULLY EXTENDED AND LOCKED IN PLACE FOR OPTIMAL STEAM OPERATION Maximum Extension Position 3 Snap the Locking Clamp closed to lock the Extension Tube in position Pull apart Extension Tube A Assemble Handle After removing Handle Assembly from carton 1 Pull Extension Tube apart until you see the lock opening hole on the Tube 2 Line up the peg on Locking ...

Page 6: ...e with Arrow on Base as shown in Fig A Once inserted twist Handle Assembly 90 clockwise as shown in Fig B Be sure Arrow on the Handle is aligned with Line Lock Icon on Base Align the Handle Assembly screw hole with the opening in the steamer housing Secure the handle assembly with self tapping screw which was removed from bottom of Extension Tube as shown in Fig C Fig A Fig B Fig C Front View Side...

Page 7: ...he Carpet Glide Accessory with Carpet Pad when using your Floor Steamer NEVER USE WITHOUT EITHER OF THESE ATTACHMENTS AFFIXED TO THE MACHINE ATTACHING SCRUBBING FLOOR PAD Scrubbing Floor Pad Place Scrubbing Floor Pad face down on the floor wide side forward with center Scrub Strip facing up to match metal heat plate on bottom of Base see A Hold Floor Steamer about 2 above Pad and gently place Floo...

Page 8: ...ake sure Handle Assembly is in the upright off position Remove Boiler Cap by turning it counter clockwise Pour in 600 mls of water using the Measuring Cup and Filler Funnel provi ded fill cup to the 200 ml marking three times Be careful not to overfill the Boiler Please note that excess water will be flushed out during use if the Boiler is overfil led resulting in wet floors Replace Boiler Cap by ...

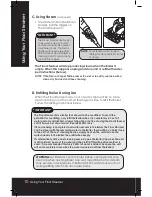
Page 9: ...t CAUTION The Parking Pad is provided to prevent floor damage that can result from leaving a hot steamer resting on the same spot for too long ALWAYS place Floor Steamer on the Parking Pad when not in use or while it is cooling before storage P A R K I N G P A D C Using Steam To emit steam from the underside of the Steamer simply pull the Handle downwards Return Handle to upright position to stop ...

Page 10: ...ow IMPORTANT The Floor Steamer has a Boiler that should not be overfilled To avoid the potential for overfilling only refill the Boiler when it is completely run out of water and only add 600ml Always follow the practice of using the Floor Steamer until it has run out of water and then refill 600ml only If floor cleaning is completed and water remains in the Boiler the Floor Steamer can be stored ...

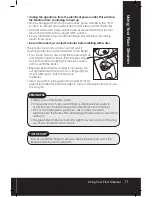
Page 11: ...l provided fill the Measuring Cup to the 200 ml marking 3 times Be careful not to overfill the Boiler Replace Boiler Cap by turning it clockwise Do not tighten Boiler Cap too much finger tighte ning is sufficient to lock the steam in the Boiler Insert plug into 3 prong electrical outlet Wait for green Steam Ready Indicator Light to turn on Steamer is ready to use once again 100 ml 200 ml ANT Max I...

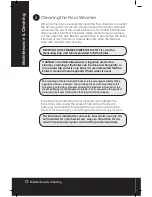
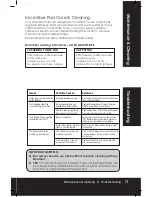
Page 12: ...and the product fails and or the steam pathways are blocked the appliance owner should send the product for servicing by contacting the Customer Support Line The Steamer is intended for domestic household use only It is not intended for commercial use Any use other than for do mestic household purposes will void the product warranty Cleaning the Floor Steamer We recommend you periodically clean th...

Page 13: ...d Surface Floor Pad or Carpet Glide with Carpet Pad Issues Possible Causes Solutions Steam is not coming out of the Improper Handle assembly Call Customer Service to receive instructions Steam Nozzles to correct the problem The Scrubbing Floor Pad Not enough pressure was Position Steamer about 2 above Pad and is not adhering to Steamer applied when attaching Pad FIRMLY press it down onto the Pad F...

Page 14: ...14 Notes Notes ...

Page 15: ...15 Notes Notes ...

Page 16: ...m your Floor Steamer they are full of helpful steam cleaning tips too Monster Customer Support Line AUSTRALIA 1800 663 866 NEW ZEALAND 0800 666 783 Monster Appliances Australia 8 Success Way WANGARA WA 6065 AUSTRALIA TEL 08 9302 2526 Email admin monsterappliances com au Website www monsterappliances com au Euroflex New Zealand Ltd PO BOX 305 650 Triton Plaza North Shore 0757 NEW ZEALAND TEL 0800 6...

Reviews: