- 70 -
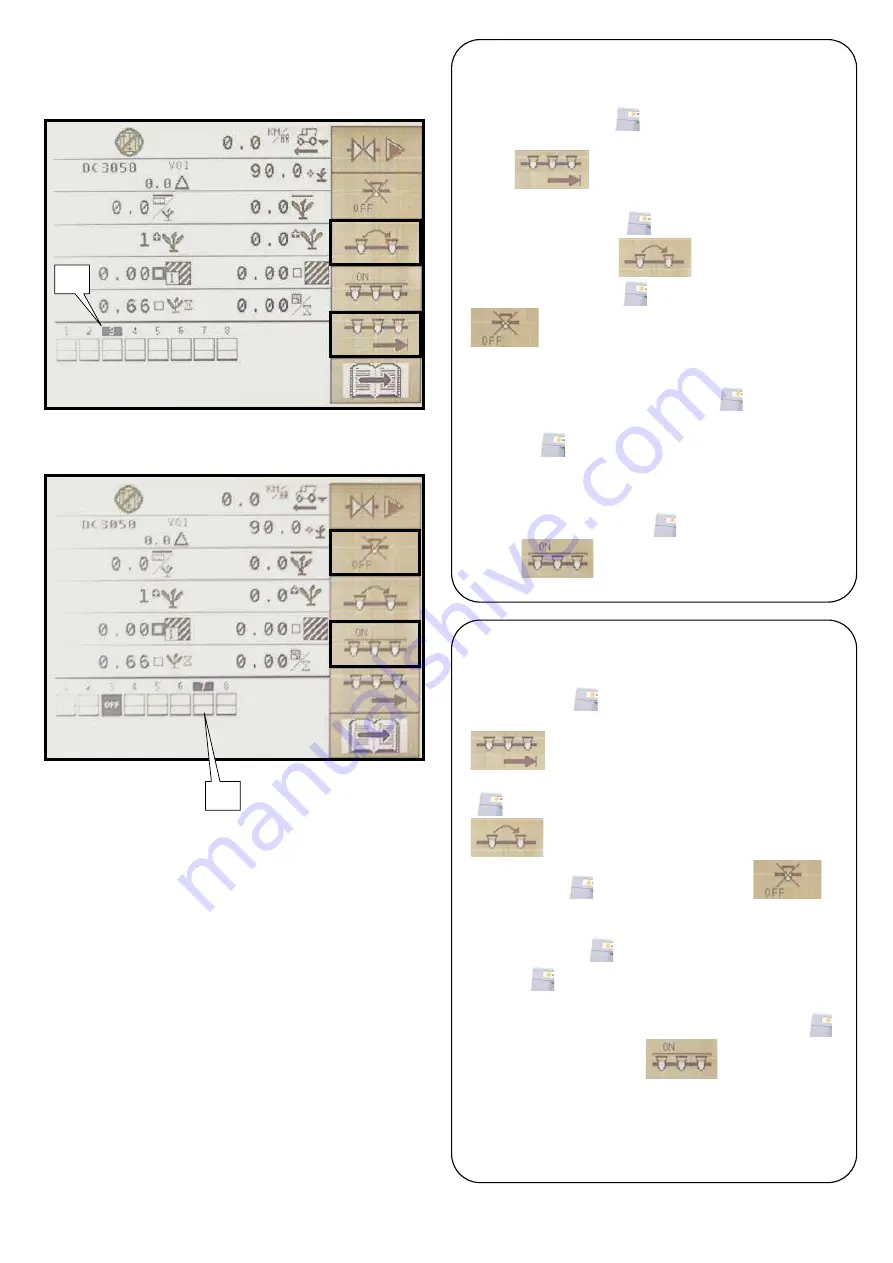
h) Commandes de coupures de rangs (option)
Si vous avez besoin de couper des rangs manuellement sur
votre semoir, voici les différentes commandes :
- A l’aide de la touche
,
sélectionner le côté du semoir
(droit ou gauche) où vous allez commencer à couper des
rangs :
(Fig.1).
- Si vous avez besoin de couper des rangs à l’intérieur du
semoir utiliser la touche
pour positionner le curseur A
sur les différents rangs :
(Fig.1).
- Appuyer sur la touche
qui correspond à l’icône
(Fig.2) pour couper le rang B qui est en
surbrillance.
- Pour remettre en fonctionnement un rang vous devez le
sélectionner, puis appuyer sur la touche
ON
pour le
remettre en fonctionnement (Fig.2).
La touche
a une fonction
ON
lorsque vous
sélectionnez un rang coupé et une fonction
OFF
lorsque
vous sélectionnez un rang qui est en fonctionnement.
- Pour remettre en fonctionnement tous les rangs en même
temps, appuyer sur la touche
correspondant au
symbole
(Fig.2).
h) Row cut-off controls (option)
If you need cut off rows manually on your seeder, operate
the different controls:
- Using the key
,
select the side of the seeder (right or
left) where you are going to start cutting off rows:
(Fig.1).
- If you need cut off rows inside the seeder, use the key
to position the cursor A on the different rows:
(Fig.1).
- Press the key
corresponding to the icon
(Fig.2) to cut off row B which is highlighted.
- If you want a row to operate again, you must select it and
then press the key
ON
to start it again (Fig.2).
The key
has a function
ON
when you select a cut off
row and a function
OFF
when you select an operating row.
- To restart all the rows at the same time, press the key
corresponding to the symbol
(Fig.2).
Mode utilisation/Use mode
Einsatzmodus/Gebruiksmodus
Modo de uso/Modo d’uso
A
B
Fig. 1
Fig. 2
Summary of Contents for CS 7000 ISOBUS
Page 2: ......
Page 6: ...4 Fig 1 Fig 2 Fig 8 Fig 4 Fig 5 Fig 3 Fig 6 Fig 7 Fig 9 Fig 10 Fig 11 Fig 12 Fig 13...
Page 8: ...6 A A A A A B B B B Fig A...
Page 10: ...8 B C C B C C E E F D A C B E F D...
Page 12: ...10 A B C C B C C E E F D C B E F D G...
Page 14: ...12 A B Fig 2 Fig 1...
Page 24: ...22 FB1 PMW1 RPM1 IMP LIFT RADAR WHEEL SPEED D C B E F G H I J A K Z a b...
Page 25: ...23 O N P S T V Y R U Z Z e d c L M Q W XB XA...
Page 102: ...100...
Page 103: ...101 PIECES DE RECHANGE SPARE PARTS ERSATZTEILE ONDERDELEN PIEZAS DE REPUESTO PEZZI DI RICAMBIO...
Page 104: ...102...
Page 109: ......


