background image

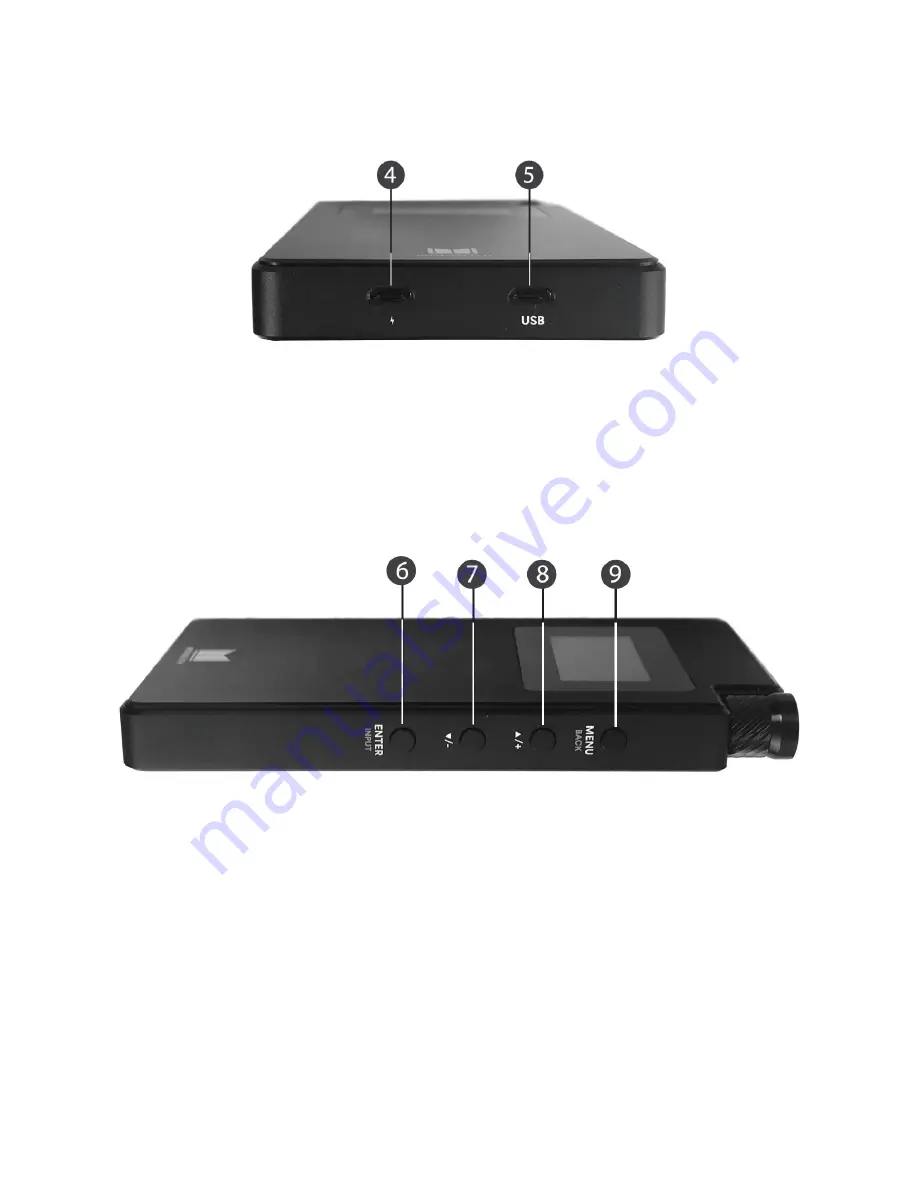
Bottom View 


4.


CHARGE: Micro USB charging port to connect to the included micro USB cable and 
USB wall charger. 

5.


USB: Micro USB digital audio input. 


Side View 


6.


ENTER/INPUT: Momentarily press the button to select options. Press and hold the 
button to enter the Input Selection Menu. 

7.


DECREASE: Momentarily press the button to select the previous menu or to 
decrease the value of an edited option. 

8.


INCREASE: Momentarily press the button to select the next menu or to increase the 
value of an edited option. 

9.


MENU/BACK: Momentarily press the button to enable the Main Menu. Momentarily 
press the button to exit. 


Summary of Contents for Monolith 24460

Page 1: ...Monolith by Monoprice Portable Headphone Amplifier and DAC with THX AAA Technology Dual AKM 4493 DACs Dual AAA 788 Modules P N 24460 User s Manual ...

Page 2: ...UCT OVERVIEW 5 Top View 5 Bottom View 6 Side View 6 CHARGING 7 AUDIO INPUT CONNECTIONS 8 Analog 8 Digital Optical 9 USB 10 INPUT SELECTION 10 Automatic 10 Manual 10 OPERATION 11 MAIN MENU 12 EQ MENU 12 Shelf EQ 12 PEQ 14 DRC 16 DIRAC SENSAROUND 18 SETTINGS 19 SPECIFICATIONS 21 TECHNICAL SUPPORT 22 ...

Page 3: ...hock or fluctuations in temperature or humidity Do not expose this device to excessively high temperatures Do not place it in on or near heat sources such as a fireplace stove radiator etc Do not leave it in direct sunlight Do not place or install this device in an area where it can be exposed to excessive amounts of dust humidity oil smoke or combustible vapors This device contains a Lithium batt...

Page 4: ...ity NDK low noise low jitter oscillators Input options include USB and optical digital audio inputs as well as an unbalanced analog stereo audio input Unbalanced stereo headphone output Built in 4000mAh rechargeable battery provides up to 10 hours of audio playtime Includes USB wall charger for recharging the internal battery CUSTOMER SERVICE The Monoprice Customer Service department is dedicated ...

Page 5: ... 1x User s manual 1x Thank you card PRODUCT OVERVIEW Top View 1 HEADPHONES 3 5mm unbalanced headphone output jack 2 LINE OPT IN Combination 3 5mm unbalanced analog stereo input and 3 5mm digital optical mini TOSLINK input 3 POWER VOLUME With the unit powered off turn the knob clockwise until it clicks to turn the unit on With the unit powered on turn the knob fully counterclockwise until it clicks...

Page 6: ...to select options Press and hold the button to enter the Input Selection Menu 7 DECREASE Momentarily press the button to select the previous menu or to decrease the value of an edited option 8 INCREASE Momentarily press the button to select the next menu or to increase the value of an edited option 9 MENU BACK Momentarily press the button to enable the Main Menu Momentarily press the button to exi...

Page 7: ...ay while charging is in progress When charging is complete the screen will go blank Notes The USB wall charger accepts input voltages from 100 240 VAC 50 60 Hz Charge the battery before first use and at least once every three months to keep the battery fresh and capable of holding a full charge Charging should be performed at temperatures between 50 95 F 10 35 C Attempting to charge at temperature...

Page 8: ...connections Use a 3 5mm to 3 5mm stereo audio cable e g PID 9765 to connect the headphone output of an mp3 player or smartphone to the LINE OPT IN jack on the amplifier Use a 3 5mm to RCA stereo audio cable e g PID 9768 to connect the RCA stereo audio output of an audio source device e g CD player to the LINE OPT IN jack on the amplifier ...

Page 9: ...t the optical output of an audio source device e g DVD player to the LINE OPT IN jack on the amplifier Use a TOSLINK to TOSLINK digital optical cable e g PID 1419 and a TOSLINK to mini TOSLINK adapter e g PID 2671 to connect the optical output of an audio source device e g DVD player to the LINE OPT IN jack on the amplifier Multi channel audio is not supported The amplifier support LPCM 2 channel ...

Page 10: ...u to use audio playback software of your choice Multi channel audio is not supported The amplifier support LPCM 2 channel input only INPUT SELECTION Automatic By default the amplifier will automatically select the most recently connected input This feature can be disabled in the SETTINGS section of the Main Menu Manual 1 Press and hold the MENU INPUT button on the amplifier to display the Input Se...

Page 11: ... headphones with 3 5mm plug into the HEADPHONES jack on the amplifier 5 If your audio source device has a volume control put the volume at the midpoint 6 Start audio playback on your audio source device 7 Turn the POWER VOLUME knob clockwise to a point just past the click to turn the amplifier on 8 Slowly turn the POWER VOLUME knob clockwise to increase the volume to a comfortable listening level ...

Page 12: ...ER INPUT button to select the displayed menu Momentarily press the MENU BACK button to return to the Main Menu The submenus are EQ 1 4 DRC 2 4 DIRAC 3 4 and SETTINGS 4 4 After about 30 seconds of no button input while any menu or submenu is displayed the Display will revert back to the Home Screen EQ MENU The EQ Menu allows you to set the parameters for the Shelf EQ and up to three Parametric EQs ...

Page 13: ...z in 10Hz increments 7 Momentarily press the ENTER INPUT button The Display will change to show the pointer to the left of the HF GAIN label 8 Use the INCREASE or DECREASE buttons to increase or decrease the HF GAIN value from 6 0dB to 6 0dB in 0 5dB increments 9 Momentarily press the ENTER INPUT button The Display will change to show the pointer to the left of the FREQ label 10 Use the INCREASE o...

Page 14: ...to accentuate particular sounds voices or instruments in an audio mix It is also useful if the speakers headphones or even any item within the room has a resonant frequency that rattles With PEQ you can set which frequency is at the apex of the curve the amount of gain or attenuation and the width of the curve Perform the following steps to set first of the three available PEQs The concept is the ...

Page 15: ...arily press the ENTER INPUT button The Display will show PEQ 1 with the pointer to the left of the Q label 11 Use the INCREASE or DECREASE buttons to increase or decrease the Q value from 0 5 octaves to 5 0 octaves in 0 1 octave increments 12 Momentarily press the ENTER INPUT button The Display will show PEQ 1 with the pointer to the left ENABLE label 13 Momentarily press the MENU BACK button thre...

Page 16: ...lit low and high frequencies 24dB octave filters at 140Hz This is followed by two independent stereo compressors and a mixer to combine the compressed low and high frequency bands The DRC operates on the pre volume control signal so the DRC threshold level refers to the level of the incoming signal source The Threshold value determines at which point the DRC takes effect The Ratio value determines...

Page 17: ... the RATIO value from 1 2 1 to 8 0 1 in 0 1 ratio increments 9 Momentarily press the ENTER INPUT button The Display will show DRC with the pointer to the left of the LF OFFSET label 10 Use the INCREASE or DECREASE buttons to adjust the LF OFFSET value from 12dB to 12dB in 1 0dB increments 11 Momentarily press the ENTER INPUT button The Display will show DRC with a pointer to the left of the ENABLE...

Page 18: ...uring and modeling a preferred listening space Dirac Sensaround reproduces key acoustic properties associated with high fidelity stereo home cinema listening within the headphones themselves You will notice that the result sounds vastly different from so called virtual surround techniques that color the sound and take the edge away from the recording Dirac Sensaround is not a sound effect to grow ...

Page 19: ...cy being 1 2 the sample frequency with a very sharp roll off characteristic Unfortunately there is no such thing as a perfect reconstruction filter so that is why the AKM DAC and other DACs have selectable filter characteristics Your headphones and listening requirements vary so experiment with the different slopes to find your sound The possible options are Normal Slow 1 and Slow 2 Reset All This...

Page 20: ...ill show MAIN MENU 3 4 RESET ALL 8 If you want to reset the Portable Headphone Amplifier s settings to their factory default values press the INCREASE button to change the RESET ALL value to YES otherwise leave it set to NO 9 Momentarily press the ENTER INPUT button If you had RESET ALL set to YES the system will reset all settings to their factory default values The Display will show MAIN MENU 4 ...

Page 21: ...sstalk 100dB Maximum Output Voltage 3 7 Vrms Maximum 3 5mm Analog Input Voltage 2 0 Vrms 3 5mm Analog Input Impedance 10 kilohms Optical Sampling Frequency 32 96 kHz Maximum Optical Resolution 24 bits USB Sampling Frequency 32 192 kHz Direct Stream Digital Support DSD64 DSD128 Battery Capacity 4000mAh Charging Power 5 VDC 2A USB Wall Charger Input Power 100 240 VAC 50 60 Hz Dimensions 5 4 x 2 8 x ...

Page 22: ...rs 7 days a week You can also get assistance through email by sending a message to tech monoprice com Monolith and the Monolith logo are trademarks of Monoprice Inc THX and the THX logo are trademarks of THX Ltd registered in the U S and other countries Direct Stream Digital is a trademark of Sony Corporation Dirac and Dirac Sensaround are registered trademarks of Dirac Research AB TOSLINK is a re...

Reviews: