background image

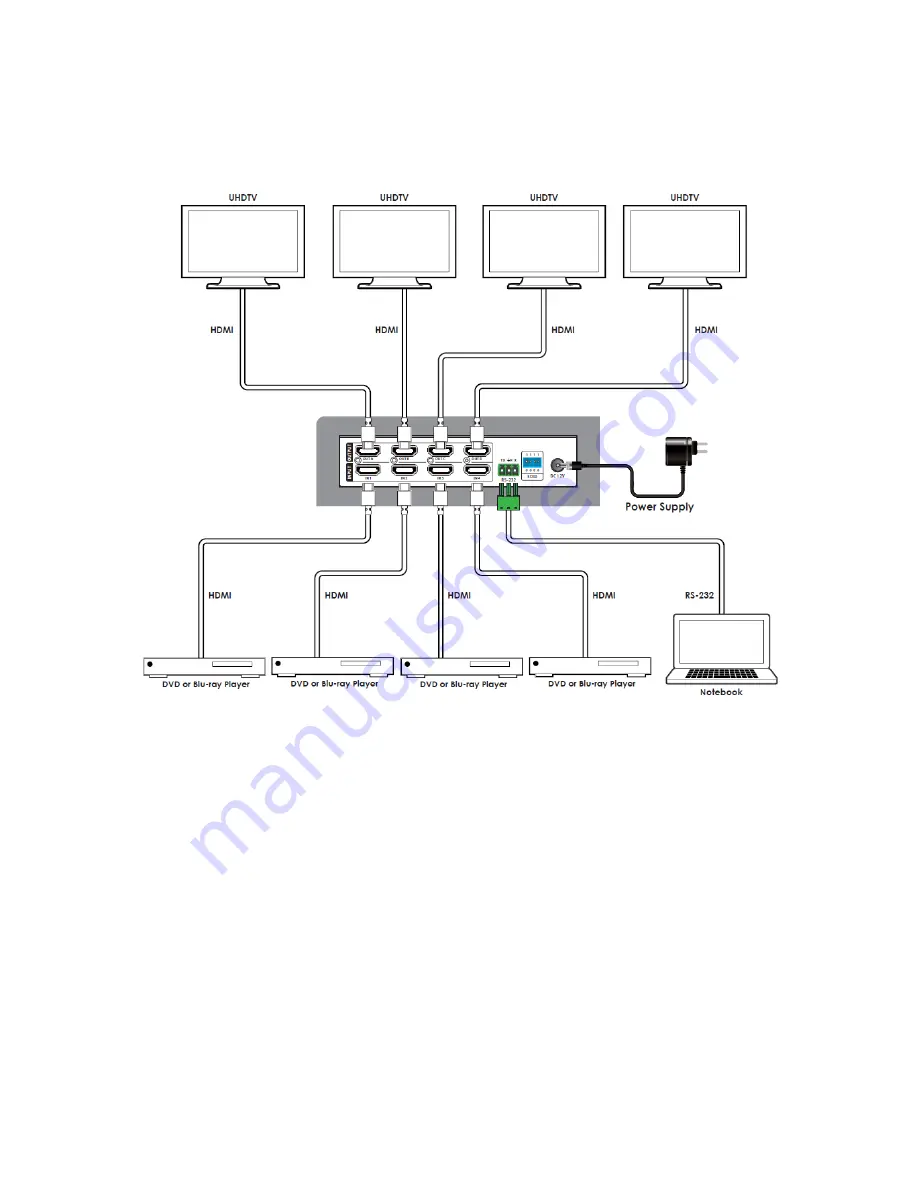
SAMPLE CONNECTION DIAGRAM 


INSTALLATION 

Perform the following steps to install this matrix into your home theater system. 

1.


Ensure that all equipment to be connected is powered off and unplugged from its 
power source. 

2.


Place or mount the matrix in its intended location. 

3.


Using a High Speed HDMI® Cable (not included), plug one end into the HDMI input 
on one of your displays, then plug the other end into one of the OUT ports on the 
matrix. Repeat for up to three additional displays. 

Summary of Contents for Blackbird30916

Page 1: ...Blackbird 4K HDMI 4x4 Mini Matrix P N 30916 User s Manual ...

Page 2: ...e it can be exposed to excessive amounts of dust humidity oil smoke or combustible vapors Prior to operation check the unit and power cord for physical damage Do not use if physical damage has occurred Before plugging the unit into a power outlet ensure that the outlet provides the same type and level of power required by the device Never unplug the unit by pulling on the power cord Always grasp t...

Page 3: ... to 4K 30Hz Compliant with the HDMI 2 0 and HDCP 2 2 specifications Supports 24 bit RGB YCbCr 4 4 4 and YCbCr 4 2 2 color spaces as well as 12 bit YCbCr 4 2 0 Supports high resolution multichannel audio formats such as Dolby TrueHD and DTS HD Master Audio CUSTOMER SERVICE The Monoprice Customer Service department is dedicated to ensuring that your ordering purchasing and delivery experience is sec...

Page 4: ...RVIEW Front Panel 1 Power LED The LED illuminates when the matrix is powered off The LED is off when the unit is powered on 2 Digital Display The four digits display the number 1 4 of the video input for each letter A D of the video output 3 POWER Press the POWER switch to turn the unit on or off 4 OUT X Press the OUT X buttons to cycle through the available inputs for the selected output The digi...

Page 5: ...udio settings for the input source devices 5 DC 12V DC barrel connector for attaching the included AC power adapter Remote Control 1 Power Press the Power button to turn the unit on or off 2 Output X Each Output section of buttons contains 4 number buttons and two arrow buttons Press a number button to directly assign the numbered input 1 4 to the lettered output A D Press the Left Arrow button to...

Page 6: ...l equipment to be connected is powered off and unplugged from its power source 2 Place or mount the matrix in its intended location 3 Using a High Speed HDMI Cable not included plug one end into the HDMI input on one of your displays then plug the other end into one of the OUT ports on the matrix Repeat for up to three additional displays ...

Page 7: ...e DC barrel connector on the included AC power adapter into the DC 12V jack on the matrix then plug the adapter into a nearby AC power outlet The Power LED will illuminate indicating that the matrix is in standby mode 8 Press the POWER button to turn the matrix on The Power LED will extinguish indicating that power is applied 9 Plug in and power on all connected equipment Start video playback on a...

Page 8: ...channel Dolby DTS 0010 1080p 60Hz 7 1 channel HD audio 0011 1080i 60Hz 2 0 channel stereo 0100 1080i 60Hz 5 1 channel Dolby DTS 0101 1080i 60Hz 7 1 channel HD audio 0110 3D 60Hz 2 0 channel stereo 0111 3D 60Hz 5 1 channel Dolby DTS 1000 3D 60Hz 7 1 channel HD audio 1001 4K 30Hz YCbCr 4 4 4 2 0 channel stereo 1010 4K 30Hz YCbCr 4 4 4 5 1 channel Dolby DTS 1011 4K 30Hz YCbCr 4 4 4 7 1 channel HD aud...

Page 9: ... Matrix Controller exe software program from the matrix to your PC then double click the program to run the RS 232 control program The following sections detail each page in the program General Page The General Page allows you to set the basic communications settings to connect with the matrix 1 Port Use the drop down list to select the RS 232 COM port that is connected to the matrix 2 Connect Cli...

Page 10: ...he device is displayed in this section EDID Page Rather than using the general physical EDID settings you can individually set the EDID for each input This can be done in three ways manually selecting the EDID mode copying the EDID data from a particular display or reading all EDID information from a file Note that to use this program the EDID DIP switches must be set to 1111 1 Set EDID Mode Use t...

Page 11: ...en use the drop down list to select the video source device and finally click the Set button to load the EDID capabilities 4 Status Click the Status button to refresh the displayed EDID capabilities for each video source device Matrix Page The Matrix Page allows you to directly assign specific inputs to each of the specific OUTPUTs 1 OUTPUT X Each of the four OUTPUT sections displays the numbered ...

Page 12: ...ck the Open button to open the file browser to select the firmware file Firmware files have a FW file extension 2 Path Displays the path of the selected firmware file 3 Progress The progress bar displays the progress of the firmware update 4 Upgrade Click the Upgrade button to upload the firmware file to the matrix 5 Messages The Messages section displays any messages about the firmware upgrade ...

Page 13: ...e com during regular business hours 7 days a week You can also get assistance through email by sending a message to tech monoprice com Model 30916 Video Inputs 4x HDMI Video Outputs 4x HDMI Video Bandwidth 18Gbps Maximum Video Resolution 4K 60Hz Control Methods Front panel buttons IR remote control RS 232 Input Power 12 VDC 2 5A AC Adapter Input Power 100 240 VAC 50 60 Hz Maximum Power Consumption...

Page 14: ...ing LLC in the United States and other countries Dolby and the double D symbol are registered trademarks of Dolby Laboratories Dolby TrueHD is a trademark of Dolby Laboratories DTS is a registered trademark and the DTS logos Symbol DTS HD and DTS HD Master Audio are trademarks of DTS Inc Blu ray Disc and Blu ray are trademarks of the Blu ray Disc Association ...

Reviews: