background image


3


SAFETY WARNINGS AND GUIDELINES 

Please read this entire manual before using this device, paying extra 
attention to these safety warnings and guidelines. Please keep this manual 
in a safe place for future reference. 


This device is intended for indoor use only. 


Do not expose this device to water or moisture of any kind. Do not 
place drinks or other containers with moisture on or near the device. 
If moisture does get in or on the device, immediately unplug it from 
the power outlet and allow it to fully dry before reapplying power. 


When installing this device, ensure that the mount is sufficiently 
robust to support the weight of the unit and to prevent unwanted 
movement. 


Always secure the device to the mount using a safety wire or chain 
sufficiently robust to bear the weight of the device. 


Do not subject the product to extreme force, shock, or fluctuations in 
temperature or humidity. 


Do not touch the device, the power cord, or any other connected 
cables with wet hands. 


Do not expose this device to excessively high temperatures. Do not 
place it in, on, or near heat sources, such as a fireplace, stove, 
radiator, etc. Do not leave it in direct sunlight. 


This device ventilates excessive heat through the slots and openings 
in the case. Do not block or cover these openings. Ensure that the 
device is in an open area where it can get sufficient airflow to keep 
from overheating. 


Do not expose this device to excessively high temperatures. Do not 
place it in, on, or near heat sources, such as a fireplace, stove, 
radiator, etc. Do not leave it in direct sunlight. 
Summary of Contents for 612764

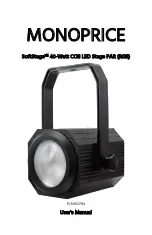
Page 1: ...MONOPRICE SoftStage 40 Watt COB LED Stage PAR RGB P N 612764 User s Manual ...

Page 2: ... WIRING DIAGRAM 6 DMX TERMINATION 7 CONTROL PANEL 7 CONTROLS AND MENU DISPLAY 8 MENU MAP 9 nodE FUNCTION 9 PRESETS 10 MASTER SLAVE MODE 10 DMX CONTROL 11 3CH MODE 11 6CH MODE 11 7 8CH MODE 12 TROUBLESHOOTING 15 TECHNICAL SUPPORT 15 SPECIFICATIONS 16 REGULATORY COMPLIANCE 17 Notice for FCC 17 Notice for Industry Canada 17 ...

Page 3: ...Always secure the device to the mount using a safety wire or chain sufficiently robust to bear the weight of the device Do not subject the product to extreme force shock or fluctuations in temperature or humidity Do not touch the device the power cord or any other connected cables with wet hands Do not expose this device to excessively high temperatures Do not place it in on or near heat sources s...

Page 4: ...ion Ensure that the power source has a proper ground connection Do not modify the plug or use a cheater plug to bypass the ground connection Unplug this device from the power source when not in use Never unplug the unit by pulling on the power cord Always grasp the connector head or adapter body Take care to prevent damage to the power cord Do not allow it to become crimped pinched walked on or be...

Page 5: ...ce is second to none If you have any problem with your order please give us an opportunity to make it right You can contact a Monoprice Customer Service representative through the Live Chat link on our website www monoprice com during normal business hours Mon Fri 5am 7pm PT Sat Sun 9am 6pm PT or via email at support monoprice com PACKAGE CONTENTS Please take an inventory of the package contents t...

Page 6: ...DIMENSIONS DIAGRAM SAMPLE WIRING DIAGRAM Following is a sample wiring diagram for a multiple fixture installation Note that the final fixture must have a DMX Terminator plugged into the DMX Out connector ...

Page 7: ... any chain must have a DMX terminator connected to the DMX Out connector If using just a single light connect a DMX terminator to the DMX Out connector A DMX terminator is a DMX plug with a 120 ohm 1 4 watt resistor soldered between pins 2 and 3 CONTROL PANEL ...

Page 8: ...button to rapidly increase the displayed value The list will cycle back to the beginning after the maximum value is reached Press the DOWN button to decrease the value of the selected function or mode Press and hold the button to rapidly decrease the displayed value The list will cycle back to the end after the minimum value is reached Once the desired value is displayed press the ENTER button to ...

Page 9: ...t slow 00 No FX FAdE FA00 FA99 Color fade fast slow ASC AC00 AC99 Color jump change Pr Pr00 Pr15 Preset selection see Presets section for details SP SP00 SP99 Program speed fast slow SLAU SL AU Slave mode CHnd 3 6 7 8CH DMX channel selection nodE FUNCTION The nodE function serves as a speed limiter for manual dims and fades When set to nod0 any manual dims or fades will occur in real time meaning ...

Page 10: ...other than a DMX address of Slave mode SL AU the fixture is in Master mode For example when set to Sound Activation mode So UA it is in Master mode You can daisy chain additional fixtures to the Master fixture using 3 pin DMX cables All other connected fixtures must be set to Slave mode SL UA and will perform the same functions as the Master fixture Note that the final fixture in the daisy chain m...

Page 11: ... show the functions and values for each channel in the four different channel modes 3 6 7 and 8 3CH MODE CH VALUES FUNCTION PRIORITY REMARKS 1 000 255 Red dimming 0 100 2 000 255 Green dimming 0 100 3 000 255 Blue dimming 0 100 6CH MODE CH VALUES FUNCTION PRIORITY REMARKS 1 000 255 General dimming 0 100 1 2 000 255 Red dimming 0 100 3 000 255 Green dimming 0 100 4 000 255 Blue dimming 0 100 5 000 ...

Page 12: ...127 Dark Bright Dark fade 128 159 Multicolor gradient 160 191 Multicolor fade in out 192 223 Multicolor jump 224 255 Sound Activated 7 8CH MODE CH VALUES FUNCTION PRIORITY REMARKS 1 000 255 General dimming 0 100 1 2 000 255 Red dimming 0 100 3 000 255 Green dimming 0 100 4 000 255 Blue dimming 0 100 5 000 014 Dimming 3 015 255 Strobe fast slow ...

Page 13: ... speed control 160 191 Multicolor fade in out 192 223 Multicolor jump 224 255 Sound Activated 7 000 009 Not used 2 Channel 1 is master dimmer Channels 2 4 have no effect 010 029 R 100 030 039 R 85 Y 15 040 049 R 60 Y 40 050 069 Y 100 070 079 Y 85 G 15 080 089 Y 60 G 40 090 109 G 100 110 119 G 85 B 15 120 129 G 60 B 40 130 149 B 100 150 159 B 85 C 15 160 169 B 60 C 40 170 189 C 100 190 199 C 50 P 5...

Page 14: ...nnel 8 note below table 006 055 DIMMING 0 056 105 DIMMING 1 106 155 DIMMING 2 156 205 DIMMING 3 206 255 DIMMING 4 Channel 8 Note Similar to the nodE setting but with variable speed control DIMMER0 has the fastest range DIMMER4 the slowest Depends on the use of channels 1 4 It is recommended to use DIMMING 1 at minimum if using a low res DMX controller ...

Page 15: ... that there is a DMX terminator connected to the DMX Out connector of the final fixture in the daisy chain Verify that the DMX controller is operating properly by using it with another DMX device TECHNICAL SUPPORT Monoprice is pleased to provide free live online technical support to assist you with any questions you may have about installation setup troubleshooting or product recommendations If yo...

Page 16: ...5 kHz flicker free for TV and camera shooting Signal Input 3 pin XLR male Signal Output 3 pin XLR female Control Modes Standalone Master Slave Auto Sound Activated Functions Dimmer Strobe Jump Gradual Change Ingress Protection Rating IP20 Anti Electricity Intension 1 5kV Insulation Resistance 2MΩ Cooling Natural convection Dimensions 6 9 x 4 4 x 12 6 175 x 112 x 236 mm Weight 2 6 lbs 1 2kg ...

Page 17: ...protection against harmful interference in a residential installation This equipment generates uses and can radiate radio frequency energy and if not installed and used in accordance with the instructions may cause harmful interference to radio communications However there is no guarantee that interference will not occur in a particular installation If this equipment does cause harmful interferenc...

Reviews: