background image

16 

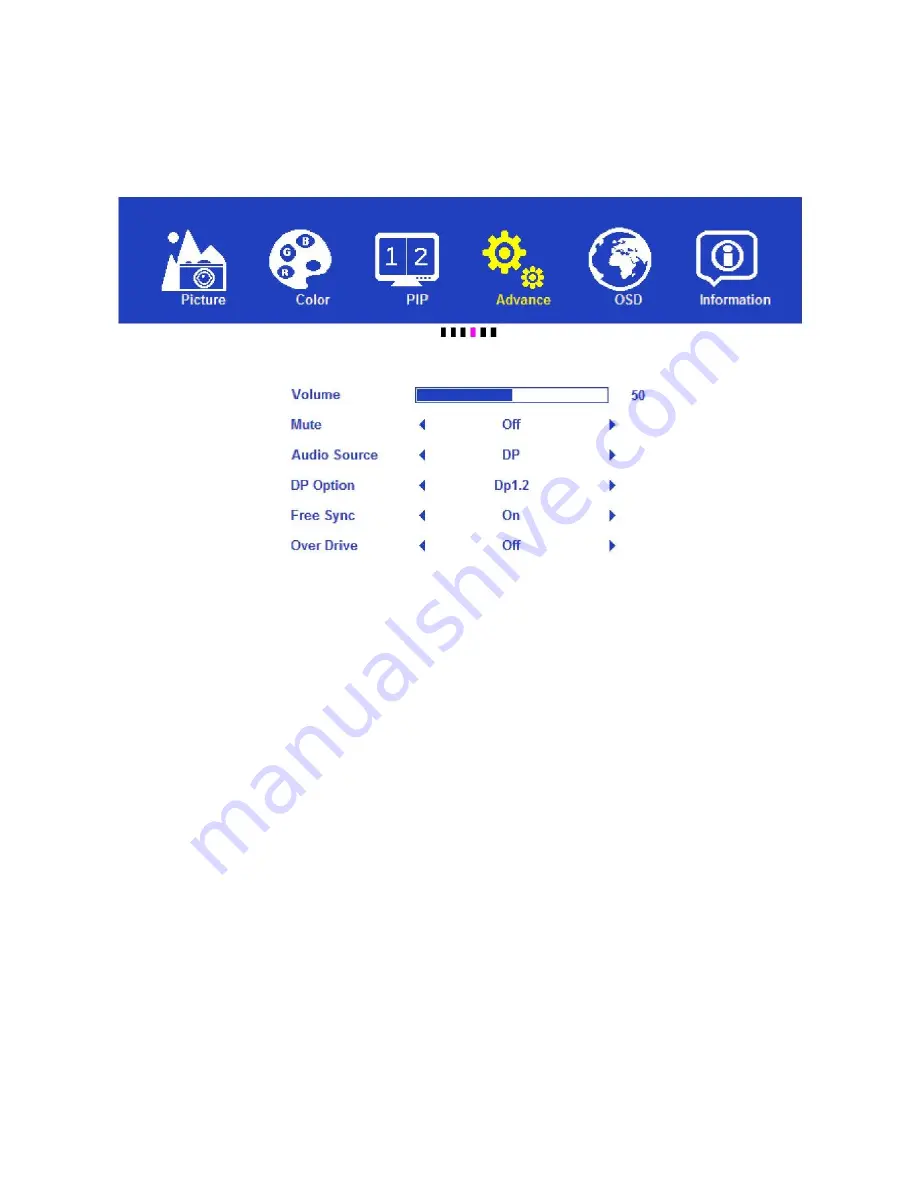
Advanced Menu 

Note that the Advanced tab is misspelled as "Advance" in the OSD. 


Volume: Allows adjustment of the audio volume level. The adjustment range is 0 to 100. 
Audio Source: Allows selection of the audio source. The options include Line In, DP, HDMI® 

1, and HDMI 2. Note that the DP, HDMI 1, and HDMI 2 options are only available 
when a signal is present on the indicated input. 

DP Option: Allows selection of the DisplayPort standard to use. The available options are 

Dp1.1 and Dp1.2. This option is only available when DisplayPort is the selected input. 

Free Sync: Allows the AMD® FreeSync™ mode to be enabled or disabled. The available 

options are On and Off. This option is only available when DisplayPort is the active 
input and when the DisplayPort source supports FreeSync. 

Over Drive: Improves the display response time when enabled. The available options are 

On and Off. 


Summary of Contents for 16384

Page 1: ...MONOPRICE MP 27 Zero G 1440p 144Hz LED Gaming Monitor P N 16384 User s Manual...

Page 2: ...CONTROLS 7 USING THE INCLUDED STAND 8 USING A WALL OR DESK MOUNT 9 INSTALLATION 9 AUDIO SPLITTING 10 VOLUME CONTROL 11 Main OSD Menu 11 Volume Control 11 BRIGHTNESS CONTROL 12 Main OSD Menu 12 Brightn...

Page 3: ...3 INPUT SELECTION MENU 19 DISPLAY MODE MENU 19 SPECIFICATIONS 20 REGULATORY COMPLIANCE 21 Notice for FCC 21 Notice for Industry Canada 22...

Page 4: ...a heat source such as a fireplace heating vent radiator etc The power supply for this monitor uses a NEMA 5 15 three prong grounded plug Do not use a cheater plug or otherwise bypass the grounding pi...

Page 5: ...ur smartphone directly to the monitor 3 5mm audio input and output with optional audio output of audio carried along with video on the DisplayPort or HDMI video inputs Supports simultaneous display of...

Page 6: ...cord NEMA 5 15 to IEC 60320 C13 1x High speed HDMI cable 1x User s manual CONNECTIONS 1 DC In DC barrel connector attaching the included AC power adapter 2 DVI Dual link DVI D video input connector 3...

Page 7: ...WN If the Main OSD menu is displayed and a page has been selected pressing the DOWN button moves the highlight down If no menu is displayed pressing the DOWN button opens the Display Mode menu 4 UP If...

Page 8: ...rform the following steps to install the stand base 1 Place the stand base on a desk or table with the long side with the mounting post away from you and the larger side toward you 2 Grasp the monitor...

Page 9: ...onitor to a wall or desk mount with a 100x100 VESA pattern following the instructions and using the hardware that came with the wall or desk mount INSTALLATION Perform the following steps to install t...

Page 10: ...ely into the Ear Phone jack 5 Plug the DC barrel connector on the included AC power adapter into the DC In jack on the monitor 6 Plug one end of the AC power cord into the AC power adapter then plug t...

Page 11: ...tton once to enter the Advance page The white highlight will already be on the Volume entry 4 Press the SELECT button once again to move the white highlight to the Volume value 5 Use the and buttons t...

Page 12: ...e The white highlight will be on the Brightness entry 3 Press the SELECT button again to move the white highlight to the Brightness value 4 Press the and buttons to adjust the Brightness level as desi...

Page 13: ...The three options are Full 4 3 and 1 1 Ultra Vivid Improves image sharpness The available options are Off Low Middle and High DCR Enables or disables the Dynamic Contrast Ratio The DCR is a circuit t...

Page 14: ...t photographs Vivid A preset designed for the best brightness and contrast Gamma Allows selection of the gamma decoding value The possible options are Off 1 8 2 0 2 2 and 2 4 Temperature Allows select...

Page 15: ...possible options are Bottom Left Bottom Right Center Top Left and Top Right with Bottom Right as the default Note that the Bottom options are misspelled as Button in the OSD PIP Size When the Mode is...

Page 16: ...a signal is present on the indicated input DP Option Allows selection of the DisplayPort standard to use The available options are Dp1 1 and Dp1 2 This option is only available when DisplayPort is the...

Page 17: ...ion Determines the horizontal position of the OSD menu The adjustment range is 0 to 100 OSD V Position Determines the vertical position of the OSD menu The adjustment range is 0 to 100 Transparency Ad...

Page 18: ...18 Information Menu This screen shows the connection type screen resolution with vertical scan frequency horizontal frequency and pixel clock values...

Page 19: ...yellow highlight then press the Select button To exit without making any changes press the Menu button DISPLAY MODE MENU Rather than using the Main OSD menu to set the display mode you can access the...

Page 20: ...dio Input 1x 3 5mm TRS Headphone Output 1x 3 5mm TRS Horizontal Frequency 30 135 kHz Vertical Frequency 60 144 Hz Pixel Clock Frequency 594 MHz Plug n Play Standard VESA DDC2BTM Power Consumption Oper...

Page 21: ...ursuant to Part 15 of the FCC Rules These limits are designed to provide reasonable protection against harmful interference in a residential installation This equipment generates uses and can radiate...

Page 22: ...3 du Canada HDMI the HDMI Logo and High Definition Multimedia Interface are trademarks or registered trademarks of HDMI Licensing LLC in the United States and other countries MHL is a trademark of MHL...

Reviews: