background image

17 

9.


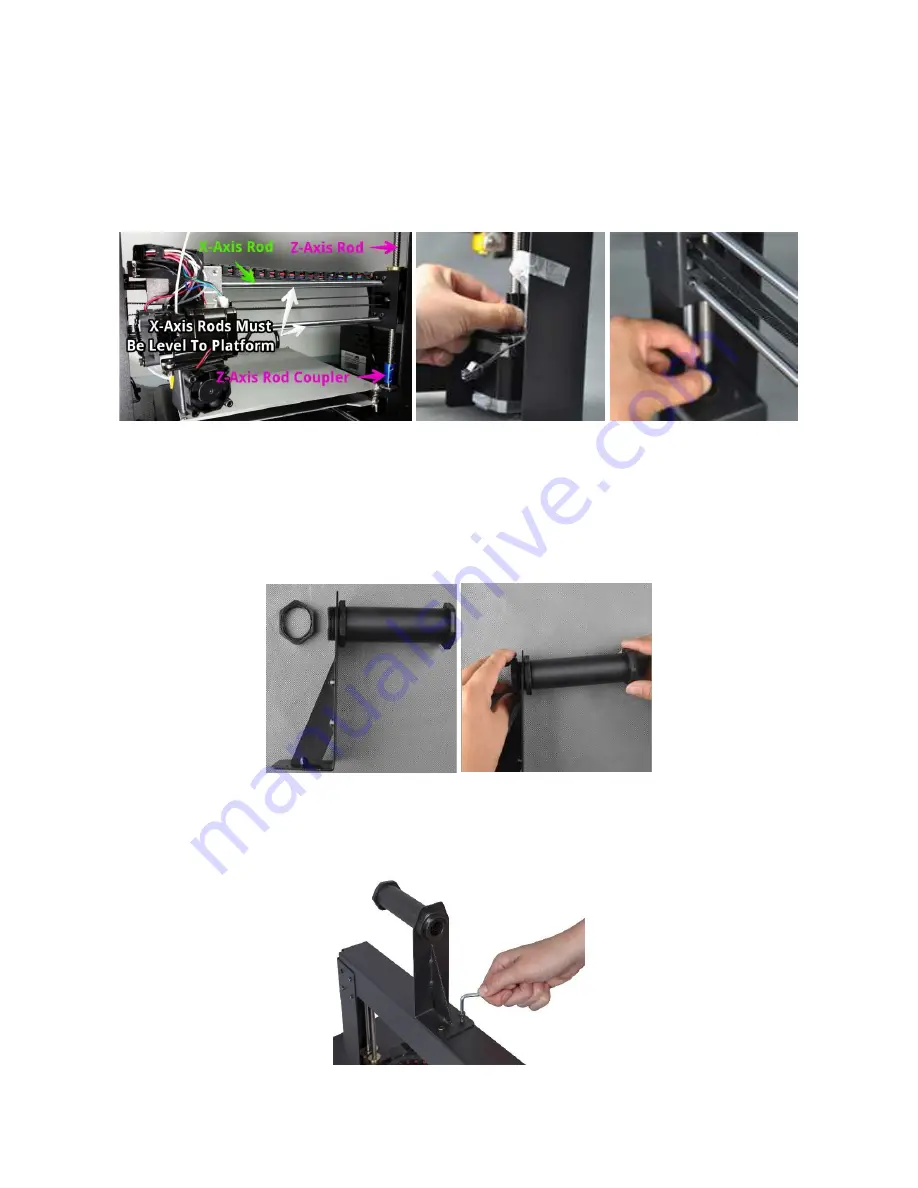
Use a carpenter's level to ensure that your flat surface is level. If it is not level, locate 
a level surface and place the printer on top of it. Next use the carpenter's level to 
check that the X-axis guide rods are level. If not, raise or lower either side by 
manually turning the Z-axis couplers on either side of the frame. 


10.


Remove one of the plastic nuts from the threaded end of the Spool Holder, but 
leave the second nut in place. Insert the threaded end of the spool holder through 
the Filament Stand, from the side opposite the base support. Thread the plastic nut 
onto the spool holder and tighten the plastic nuts on each side of the filament 
stand. 


11.


Use two hex screws and the hex wrench to attach the Filament Stand to the top of 
the Tower Frame. Ensure that the spool holder is mounted over the center of the 
build area. 


Summary of Contents for 15711

Page 1: ......

Page 2: ...SING THE MENU SYSTEM 11 Main Menu 11 System Menu Main System 11 PID Menu Main System PID 11 Motor Menu Main System Motor 12 Tools Menu Main Tools 12 Preheat Menu Main Tools Preheat 12 Move Menu Main Tools Move 13 Print Menu Main Print 13 Status Menu Main Print Status 13 Settings Menu Main Print Status Settings 14 UNPACKING ASSEMBLY AND SETUP 14 FINE TUNING PLATFORM HEIGHT 23 MAINTENANCE 25 ...

Page 3: ... 26 Motor Connections 26 Print Mat 26 INSTALLING CURA 27 MANUAL CURA SETUP 30 CREATING A GCODE FILE 31 TECHNICAL SUPPORT 33 TROUBLESHOOTING 33 SPECIFICATIONS 36 REGULATORY COMPLIANCE 37 Notice for FCC 37 Notice for Industry Canada 38 EU Conformity with Applicable Directives 38 ...

Page 4: ...oisture of any kind Do not place drinks or other containers with moisture on or near the printer If moisture does get in or on the printer immediately unplug it from the power outlet and allow it to fully dry before reapplying power Do not place the printer near a heat source such as a fireplace heating vent radiator etc Do not leave it in direct sunlight This printer uses a NEMA 5 15 three prong ...

Page 5: ...t PLA ABS and other materials LCD touchscreen menu system Open frame design for ease of use and maintenance Includes PLA filament for printing right out of the box Includes 4GB SD card with preinstalled sample 3D models CUSTOMER SERVICE The Monoprice Customer Service department is dedicated to ensuring that your ordering purchasing and delivery experience is second to none If you have any problem ...

Page 6: ...rvice for a replacement 1x Monoprice 3D printer extruder tower and heated print bed 1x Filament spool holder 1x Filament spool stand 1x AC power cord 1x USB cable 1x 4GB SD card with sample 3D model files 1x Scraper 1x PTFE tube 1x Hex key set 6x Hex bolts 2x Cable ties 1x Sample roll of PLA filament 10m 32ft 2x Print bed mats 1x User s manual 1x Quick install guide 1x Thank you card ...

Page 7: ...T OVERVIEW Front View 1 X Rail 2 X Belt Drive 3 Extruder Spring Lever 4 Extruder Cooling Fan 5 X Stop Micro Switch 6 Filament Cooling Fan 7 Extruder Driving Motor 8 Filament Spool Holder Assembly 9 Tower Frame ...

Page 8: ...Rear View 1 Extruder Cable 2 X Axis Stepper Motor 3 Extruder Cable Way 4 Extruder 5 Z Drive Screw 6 Z Rod 7 Z Stop Micro Switch 8 Z Axis Stepper Motor ...

Page 9: ...9 Bed Assembly 1 Y Stop Micro Switch 2 Heated Print Bed 3 Printing Mat 4 Leveling Wing Nut 5 Print Bed Frame 6 Heating Bed Cable 7 Y Belt Drive 8 Y Rail ...

Page 10: ...10 Front and Rear Panels 1 LCD Display 2 Touchscreen 3 SD Card Slot 4 USB Port 5 AC Power Connector 6 Power Switch ...

Page 11: ...D card and editing of printer temperature settings System Menu Main System 中 En Toggles between English and Chinese language in the menu system Home X Y Z Moves the extruder and print bed to the home position PID Displays the PID menu which determine how the printer determines how much to change temperatures as it prints and moves This should only be adjusted by advanced users Motor Displays the M...

Page 12: ...e positions in all three axes Disable Motors Disables the stepper motors but leaves the printer on and leaves the sensors and heaters active Disable All Disables the stepper motors and sensors but leaves the printer powered on and heaters active Preheat Menu Main Tools Preheat ABS Begins preheating the extruder to 210 C and the printing bed to 70 C which are suitable for printing ABS material PLA ...

Page 13: ... Home Z Moves the extruder to the home position in the Z axis only Print Menu Main Print SD Card This area displays the files on the SD card Use the Up and Down buttons to move the highlight and allow selection of a different file Status Displays the Status menu which allows you to start and control printing It also displays temperatures and printing progress Status Menu Main Print Status Continue...

Page 14: ...1 C increments Bed Temp Allows adjustment of the print bed temperature from 0 C to 125 C in 1 C increments Fan Speed Allows adjustment of the fan speed from 0 to 100 in 1 increments OK Changes the settings to the displayed values and returns to the Printing menu UNPACKING ASSEMBLY AND SETUP 1 Open the box and remove the large foam assembly containing the printer and accessories 2 Remove the cardbo...

Page 15: ...e the Printer Base assembly 4 Remove the middle foam layer then remove the Tower Frame assembly 5 Stand the Tower Frame up vertically on the flat surface Carefully cut the zip tie that holds the extruder in place ...

Page 16: ...ex Screws and the Hex Wrench that fits Insert a screw into the hole on the frame on the left side and tighten it using the hex wrench Repeat the process on the right side 8 Flip the printer onto its left side then insert a screw from inside the base and secure it to the frame using the hex wrench Flip the printer onto the other side and repeat the process ...

Page 17: ...of the frame 10 Remove one of the plastic nuts from the threaded end of the Spool Holder but leave the second nut in place Insert the threaded end of the spool holder through the Filament Stand from the side opposite the base support Thread the plastic nut onto the spool holder and tighten the plastic nuts on each side of the filament stand 11 Use two hex screws and the hex wrench to attach the Fi...

Page 18: ...led A into the white connector on the bottom of the X axis stepper motor also labeled A 13 On the left side insert the long cable connector labeled B into the motor connector also labeled B 14 On the left side insert the white connector labeled C into the white connector on the stepper motor also labeled C Attach the ribbon cable to the cable connector on the left side of the base ...

Page 19: ... the spring and reduce the distance between plates to the minimum Note that the above image shows a wingnut The new printer version uses knurled nuts instead of wingnuts 17 Ensure that the power switch is in the OFF position O side depressed Plug the C13 end of the included AC Power Cable into the C14 panel connector on the Printer Base then plug the other end into a nearby AC power outlet Depress...

Page 20: ...de a single sheet of paper between the build platform and the nozzle There should be some resistance to free movement but moving the extruder should not cause the paper to be dragged with the extruder To raise the build platform loosen the nuts under the build platform To lower the build platform tighten the nuts under the build platform Note that you may need to slightly squeeze the platform to m...

Page 21: ...ed the filament into the hole in the top of the extruder until you meet significant resistance Release the lever then press the button next to the Extruder entry on the LCD screen several times until filament starts to extrude out of the nozzle 25 Wait for filament to stop extruding then carefully clean the extruded filament from the nozzle and build platform 26 Insert the included SD card into th...

Page 22: ...Resolution 0 2mm 0 2mm 0 2mm 0 2mm Print Time 50 min 6 min 1 hr 43 min 36 min 27 The display will change to the Status menu showing the temperatures filename and printing progress Press the Continue button to start printing the selected model Congratulations you have successfully setup your new 3D printer and are printing your first model ...

Page 23: ... a successful print Examine the extruded material and compare it to the following charts to determine if your build platform is a tad too high a tad too low or just right You may need to make several passes at height adjustment before you are ready for a large complicated print job ...

Page 24: ...24 ...

Page 25: ...aise the extruder to a point where you can insert the drill bit into the nozzle 4 Press the Back button twice to return to the Main menu Press the Print button and then the Status button to get to the Status menu Press the Settings button then press the button next to the Extruder Temp entry to increase the temperature to at least 215 C Press the OK button save the values and return to the Status ...

Page 26: ...xcess oil to prevent dust accumulation Motor Connections Periodically check the cable connections to all the stepper motors and sensors to ensure that they are securely connected Print Mat Periodically check the print mat for defects When the mat becomes worn it should be replaced Remove the old mat then apply the new one If you do not have any additional mats you can use ordinary masking tape pai...

Page 27: ...un the installer Follow the installation instructions to install the software and any necessary drivers After installing and launching Cura the software will ask which 3D printer you are using Select the I3 Plus option When Cura starts you will see the following screen with the following elements 1 Load File Button Click this button to open the file browser which allows you to select and load a co...

Page 28: ...cale Model Button Use this button to change the scale size of the model 10 Mirror Model Button Use this button to flip mirror the model in three dimensions 11 Loaded 3D Model This is the 3D model object 12 3D Print Area The background area represents the build area and build volume of this printer The buttons and wheel of your mouse perform the following functions Left Mouse Button Click an object...

Page 29: ...ons then move the mouse to zoom the camera in or out Scroll Wheel Use the scroll wheel to zoom the camera in or out Right Mouse Button Shift Key Hold down one of the shift keys then click and hold the right mouse button and move the mouse to pan the 3D view ...

Page 30: ...ed in the following images to configure your software to work with the i3 Plus printer Note that the ideal temperatures to use depend on the type of filament material used ABS should have a bed temperature of 50 100 C and extruder temperature of 210 240 C For PLA the ideal temperatures are 0 50 C and 180 210 C respectively Refer to the temperatures indicated by the filament manufacturer ...

Page 31: ...can upload your own designs for others to enjoy Perform the steps in this section to download a model and create the gcode file in Cura 1 Open your internet browser and navigate to www youmagine com 2 You can browse the site to find models of interest For this example we will select the UItimaker Coffee Cup mode Click in the search field next to the magnifying glass at the top of the page and type...

Page 32: ...t will take to print the model as well as the length and weight of filament that will be required 7 If you have an SD card mounted on your computer the Save Toolpath icon will change to the Save Toolpath to SD button For best results we recommend that you print from an SD card rather than using the USB connection and printing from your computer Click the Save Toolpath or Save Toolpath to SD button...

Page 33: ...e needed for cool down 14 Once the cool down process has finished you can remove the print from the build plate The best way to do so is with the included scraper TECHNICAL SUPPORT Monoprice is pleased to provide free live online technical support to assist you with any questions you may have about installation setup troubleshooting or product recommendations If you ever need assistance with your ...

Page 34: ...Check the following issues Ensure that the print bed is clean and free from dust Check that the temperature of the heated print bed is correct for the type of material being printed Check that the bed is level and is the proper distance from the extruder nozzle which is the thickness of a sheet of printer paper Check to see if there are defects or scratches in the printing mat and change it as nec...

Page 35: ...tor does not stop at the end of the axis A8 Check that the stop micro switches are aligned with the motor mount and are being activated Q9 The print head or bed does not move A9 Check the following issues Turn the printer off or disable the stepper motors and verify that the parts can be moved by hand Clear anything that is blocking the movement path Use the options in the Move menu to verify that...

Page 36: ...peed 10 70 mm sec Supported Print Materials PLA ABS PVA HIPS Wood Flex Conductive Ambient Operating Temperature 59 86 F 15 30 C Operational Extruder Temperature 338 464 F 170 240 C Operational Print Bed Temperature 86 158 F 30 70 C Slicer Software Cura Wanhao Edition 16 01 Cura Input Formats STL OBJ DAE AMF Cura Output Format GCODE Connectivity SD card USB port Input Rating 100 120 VAC 60Hz 3 5A P...

Page 37: ...pursuant to Part 15 of the FCC Rules These limits are designed to provide reasonable protection against harmful interference in a residential installation This equipment generates uses and can radiate radio frequency energy and if not installed and used in accordance with the instructions may cause harmful interference to radio communications However there is no guarantee that interference will no...

Page 38: ...ign ErP Energy Efficiency Directive 2009 125 EC RoHS2 Directive 2011 65 EU WEEE Directive 2012 19 EC SD SDHC SDXC microSD microSDHC and microSDXC are all trademarks or registered trademarks of SD 3C LLC in the United States other countries or both Microsoft and Windows are registered trademarks of Microsoft Corporation in the United States and or other countries Apple Mac and OS X are trademarks o...

Reviews: